FixMyBlinds offers a number of how-to videos that explain the inner workings of blinds and how to repair them.
We own a 2002 Winnebago Adventurer motorhome and most of the day/night shades will not stay up any longer. Some of the strings are broken and even those blinds where the strings are still OK, the blind will not stay up. It looks rather complicated, but I’d like to try fixing the shades. Any suggestions on how to get started?
— Paul Ragland
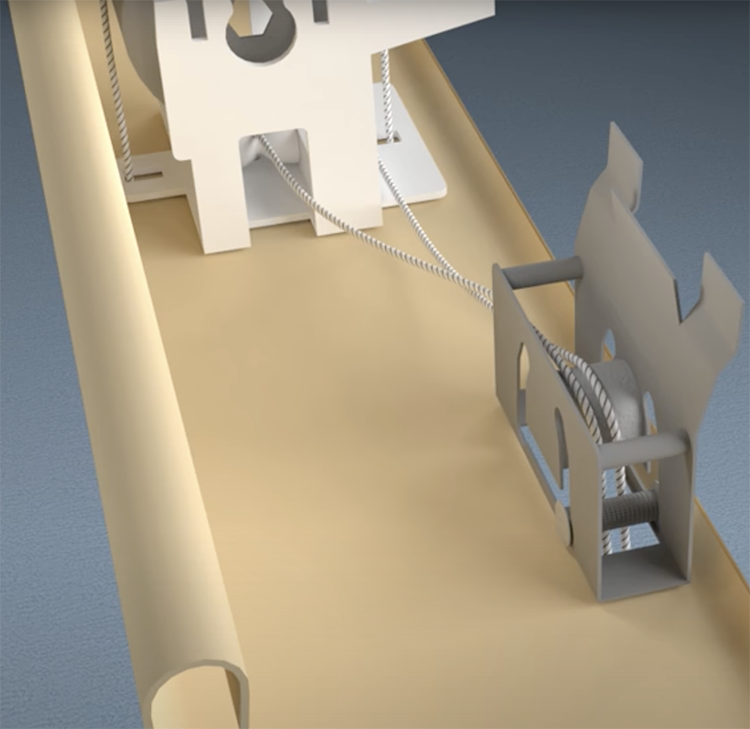
Paul, glad to hear you want to try to fix the shades yourself. It’s not as difficult as you might think and after you do one of them the others will fall into place even easier. It actually might be more difficult to remove the valances to have access to the bracket that holds the shade in place. It’s not practical to give you step-by-step instructions in this column, but check out blinds.com and fixmyblinds.com where you’ll find very good basic videos that show you how to restring the shades. You’ll need to get the kit with the string and the restringing feeder; the sites will also have a guide on how to determine the diameter of the strings needed should you decide to order new shades in the future. Chances are you’ll be able to pick a color that’s close to the shades you have now if you want to go in that direction.
If you are going to tackle the re-stringing job, you won’t need any specialty tools other than the restringing kit — you’ll need a Phillips screwdriver, a few rubber bands, scissors and a tape measure. You might want to use a screw gun to remove the valances but be sure to reduce the torque when re-installing; the wallboard is not that stout.
For those blinds where the strings are still attached and in good shape, there’s a very simple fix. On the bottom of each side of the blind is a cord retainer; there should also be a philips or square-head screw in the middle of each retainer. Just loosen that screw and turn the cord retainer to tighten the tension cords; after a few adjustments, the blind will stay up. Repairing Bali-type blinds is very similar and it’s just about as easy to replace the strings. The websites mentioned above will have parts and accessories for just about all the blinds on the market today.
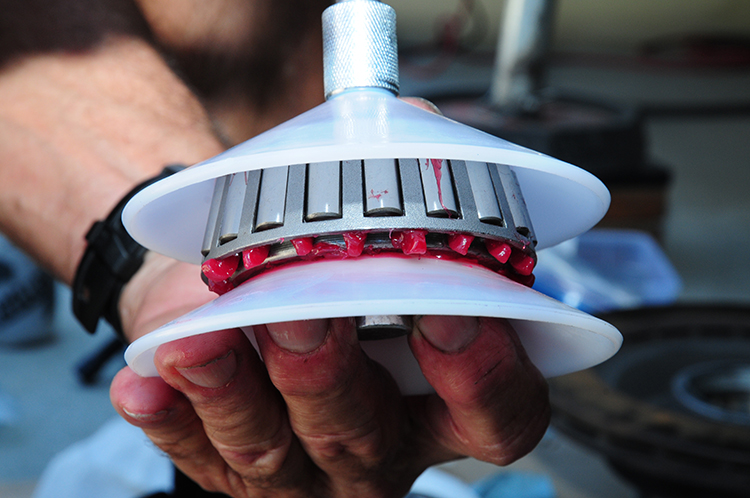
Once the bearing is placed on the base of the pressure packer and the top section is set in place, a grease gun is used to push grease into the bearing.
Packing Trailer Wheel Bearings
Bill, I was thinking of tackling the job of repacking the wheel bearings on my 25-foot travel trailer. I’m a little bit handy but I’ve never worked on wheel bearings or brakes. I looked at a couple of videos online and it seems very simple. What do you think about a novice tackling such a job?
— Juan Ramirez
Repacking wheel bearings and checking the brakes are not very difficult jobs, if you know what you’re doing — a little bit of experience goes a long way here. Study the videos carefully and then decide whether to do the job yourself. It’s not complicated, but it must be done right to prevent future failures.
Should you decide to go for it, you will need a hydraulic jack and some blocks to get the wheels off the ground. Make sure you do not lift the trailer by the axles and use jack stands for safety. If you do not have an impact wrench and will be using a lug-nut wrench, you will need to loosen the lug nuts before lifting the tires off the ground. Once you have the wheels off, remove the dust cap with a hammer or a pair of pliers and you will see a castle nut inside the drum assembly held in place by a cotter pin. Remove the cotter pin and the castle nut and gently pull the hub and drum assembly off the spindle, being careful not to drop it on the spindle or the threads.
Once the drum assembly is removed, you will see the electric brake assembly and be able to determine whether there’s a spring broken or if one of the brake shoes are cracked and deteriorating, etc. Replace any worn or broken parts. In order to repack the bearings, you will need a pressure packer (available at Amazon or borrowed from some auto parts stores) and high-quality grease; you will also need new grease seals and possibly new bearings. Generally, the grease seals for 10-inch and 12-inch hub and drum assemblies are the same.
You will need a tool to drive the inner bearing out of the other side, which will take the grease seal with it. Wipe the grease from the wheel bearings and inspect them very carefully for any flaws or discoloration. Make sure you use a new race (cup) for any of the bearings that are replaced. Clean the old grease out of the wheel bearings with paint thinner or similar product and then use the pressure packer to squeeze the grease in through the roller bearings completely; some old timers will do this by hand, but they know how to fill all the rollers properly. When installing the hub and drum assembly, do not over tighten the castle nut; there needs to be 1/10,000-inch of end play to prevent the bearings from overheating. A rotor and drum assembly (with disc brakes) require no end play.
By the way: if you subscribe to RV Enthusiast, you can read prior issues — and there’s a great step-by-step article in the May 2021 edition (see “Keep on Rolling”) that illustrates this entire process. Good luck with your new adventure.
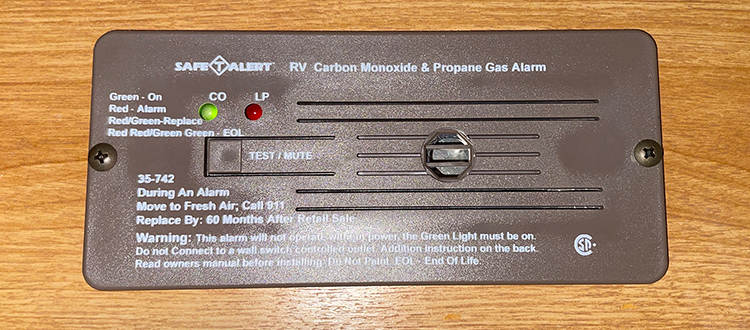
This detector monitors the air inside an RV for both carbon monoxide and propane.
The LP-gas leak detector in my 2010 motorhome keeps going off at odd times, sometimes in the middle of the night, which is rather irritating. I’ve had my LP-gas system checked for leaks and, of course, there were none as we never smelled any gas. Have you got any ideas why it keeps going off in the middle of the night or at odd times?
— Ryan Hodges
Ryan, I’ve seen this problem many times over the years. First, the LP-gas leak detector — as well as the carbon monoxide detector — should be replaced every five years. The LP-gas leak detector will have a date stamped or printed on the back of it. If your LP-gas detector is the original device that was installed by the manufacturer, then it could have simply failed. If the detector is up to date, it’s either defective or voltage may be an issue. Even though you may have plenty of voltage elsewhere in the rig according to your multimeter and your lights are bright, power can still be inadequate or even drop out at the leak detector. By the way, if the carbon monoxide detector has a replaceable battery, I recommend replacing the device with one that is hardwired.
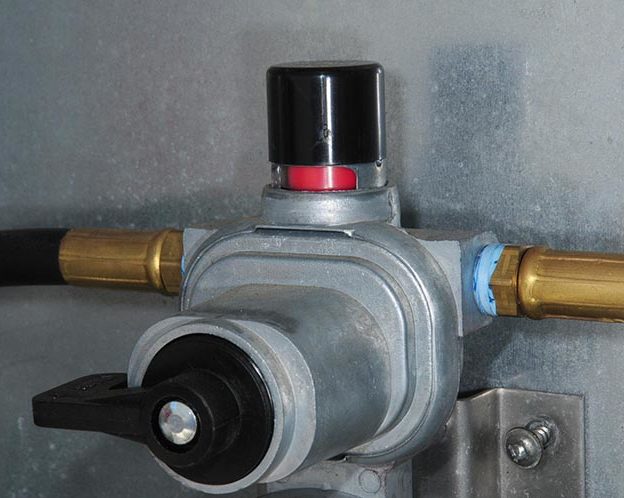
RVs with dual LP-gas cylinders have an automatic changeover regulator, which allows an interrupted flow of propane when one cylinder runs out. At this juncture, the indicator will turn red. When the lever is flipped to the other side the indicator will turn green and the empty cylinder can be removed for refilling.
My wife has been complaining that the large burner on the stove in our 2012 fifth wheel trailer is experiencing a diminished flame when the water heater comes on. We noticed this situation last winter when the furnace lit, but just thought maybe it was a glitch in the system since the flame functioned properly without the furnace running. Any advice would be appreciated.
— Jack Sisar
You did not mention whether the propane cylinders were mounted on one side or if there is one on each side of the fifth wheel in separate compartments. This could make a difference in the diagnosis, so I will cover a process for both instances.
If both cylinders are on the same side, chances are your LP-gas regulator is defective and is unable to handle the added pressure when the large burner fires up. By the way, a good way of finding out whether your regulator is bad is to turn on all three stove burners and then turn on the furnace and see if the flames on all three burners diminish dramatically. If that happens, a replacement is required, which should be done every five years regardless of performance.
The regulator is very easy to change; a new matching regulator can be located and purchased from one of the Internet sellers or from your local RV dealer. Once you install the new regulator, swing by your local RV repair shop and have the technicians perform a leak/drop-down test using a manometer (this should be done every year, anyway). If your trailer is used at very high altitudes, this could explain part of the problem since the pressure changes drastically when you get up around 8,000 to 10,000 feet in elevation.
If you have propane cylinders on either side of the trailer, one side should have a single-stage regulator, which controls gas pressure in the line routed to the automatic changeover regulator on the other side of the trailer. Since this regulator can also be defective, plan on replacing it at the same time. Again, this should be done every five years.