Motorhome Diesel Generator Maintenance
Motorhome Diesel
Generator Maintenance
tools for motorhoom diesel maintenance on display
Motorhome Diesel
Generator Maintenance
The AC generator is really nothing more than a small garden tractor engine — and keeping it in top shape doesn’t require much more than a few tools and some time
By E. Don Smith
K

eeping the AC generator running while traveling is a very important part of any motorhome trip. Even if you usually stay at campgrounds with full electrical hookups, the generator still has an important function. Many owners use the generator while driving to keep the rooftop air-conditioners and the refrigerator going. In hot weather the dash A/C unit is not usually capable of keeping you cool while driving, so the generator becomes not only necessary but a more practical option of cooling your motorhome.

And, it does so on a reliable basis — so long as you maintain the genset and perform service on a regular schedule. None of the requisite maintenance items for a diesel generator — changing the oil and oil filter, cleaning the spark arrestor and changing the air filter and the fuel filter — is especially taxing, but kept up to date, such maintenance will help to ensure that when you hit the “start” button it does what you want. To help guide you in the process, we’re going to illustrate what each step requires; in addition, we’ll show how to drain and flush the radiator and replace the coolant. Each of these service items have a schedule in the Onan owner’s manual so you may not need everything we are doing.

We picked these items because they are the most frequent and easy to do for an owner. If you have a different generator or a gas-powered generator the steps may be similar, but there could be a different service interval and different items that need to be serviced. So, make sure you check the owner’s manual or look up the exact model of your generator online to find the recommended maintenance schedule that applies to your unit and follow it. Also in the manual you will find the specifications for what type of coolant to use, as well as the oil viscosity.

a Big Red jack stand
Safety first — you should always use a pair of strong jack stands to hold the coach up after raising it with the coach jacks. Make sure the coach is level and safe before crawling under it. Also, you need to make sure all electrical devices are off and unplug the coach from electric hookups.
If you are hesitant to work on your motorhome, know that the generator is really nothing more than a small garden tractor engine. The engine in this Onan 7500 Quiet Diesel generator is a small 3-cylinder diesel with 3 quarts of oil capacity and 4.2 gallons of coolant capacity. It has a small oil filter and, although it isn’t particularly easy to access, it can be changed by most anyone. Even flushing the coolant is an easy operation.

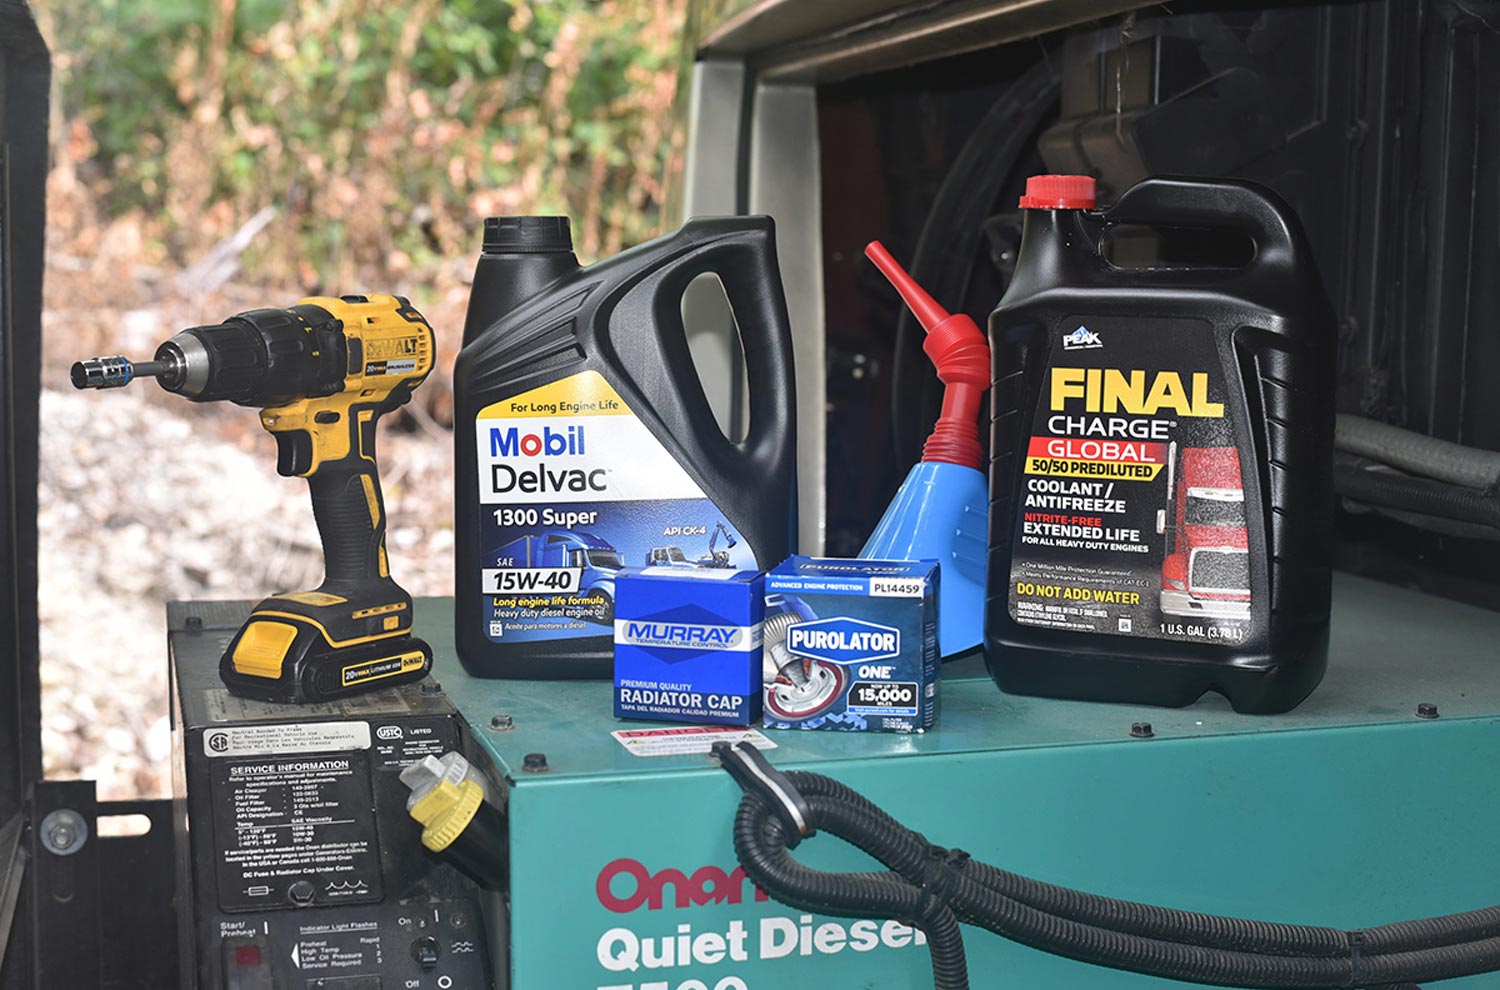
To keep things simple, we suggest you use the same coolant in both the chassis engine and the generator so you can carry one gallon of the same coolant and it will work for either application. Of course, you need to check the owner’s manual and use an approved coolant type. For this generator, Onan simply specifies that you need to use an ethylene or propylene glycol coolant with no stop-leak additives.

Safety is the top priority on any DIY project so make sure you utilize stationary jack stands under the frame of the chassis — do not rely solely on the built in hydraulic or electric jacks. It is fine to use them to raise the coach high enough to place the jack stands. And, of course, make sure the jack stands are rated for at least the weight of the axle being supported.

The tools required for this type of service are basic. Other than the jack stands, most any DIY mechanic will have an oil filter wrench and sockets/wrenches to perform this work without having to purchase anything special. We purchased the oil and coolant as well as the oil filter at a local auto parts store but the Onan air filter and fuel filter is specific to the generator, so you will have to get that online or at a local RV dealer or Onan service center. Also, you will need two gallons of distilled water for flushing the radiator.

mechanics fingers point to the “Off” switch for the generator and the oil fill point and radiator fill point
Next you need to locate the “Off” switch for the generator and the oil fill point and radiator fill point. You should also make sure that nothing will trigger the generator to come on while performing this service, so turn off the main chassis and the house power at the disconnects. The yellow cap on the right is for oil and the white cap behind it is for the radiator overflow tank. On this generator, the fill for the radiator is under the plate seen here. Remove the bolt and the neck will be accessible. Open the oil fill and radiator fill points to allow them to drain faster.
mechanic opens the oil drain plug with a ratchet wrench
We started with the oil change so after locating the oil drain plug, we removed it and allowed the oil to drain in a large pan. Make sure you capture the oil and recycle it at an approved location.
view of the gold-colored access panel near the oil drain opening
To replace the oil filter, you will need to open the gold-colored access panel shown here by squeezing the black plastic tabs together. The panel will open and swing down.
view oil filter inside the access panel
Buried deep inside the access panel is the oil filter. You can use a thin cap-style wrench or a strap wrench to remove it and reinstall the new oil filter. If you use an aftermarket filter, make sure the length is the same as the OEM filter — even a slight length increase makes access more difficult. While you are in this area, you can also remove the Onan fuel filter and replace it. It’s difficult to show in a photo but the large silver box here is the fuel filter. To remove it start by using a wrench to slowly relieve pressure on the brass fittings for the fuel lines, then remove them completely. They are made to be non-reversable, so reinstallation is easy. Once you have the two fuel lines removed, loosen the center nut and the filter can be removed. To install the new filter, first mount it in place with the silver nut, then connect the two fuel lines and tighten.
close view of the dipstick used to check the oil level
After replacing the oil drain plug, we refilled the oil with three quarts of Mobil Delvac 1300 Super in 15W-40 viscosity. Make sure you are refilling the oil in the proper location, as the radiator overflow tank is also co-located here. After adding three quarts of oil, run the generator for a minute or two and then allow it to sit. Check the oil level on the dipstick to make sure it is up to the full mark.
mechanic uses a metal tape measure to determine the height of the vertical divider is measured for cutting the foam
To drain the radiator, locate the coolant drain (shown here on the bottom of the generator) and remove the cap. If the generator is warm be careful — the fluid will be hot. Capture the coolant in a large drain pan and recycle it properly. Replace the drain cap.
mechanic holds the radiator fill hose in hand
Remove the radiator fill hose from the service panel shown earlier and pull it up and out of the generator. Open the radiator cap (after ensuring the radiator is cool) and fill completely full with distilled water. Run the generator a few minutes, which allows the water to mix with the remaining coolant, then drain it again. Repeat this twice to make sure you are removing all the old coolant.
mechanic holds the radiator fill hose and funnel side by side in preparation for refilling the radiator with coolant
After draining all the water from the bottom radiator fitting for the final time, install the drain cap and refill the radiator with coolant. You can use premixed 50/50 solution if you are sure the radiator and hoses are empty, or use undiluted coolant and add exactly half of the rated capacity and top off with distilled water. On this generator, that would mean adding 2.1 quarts of undiluted coolant and then filling the balance with distilled water. Make sure you use a funnel with a long point like this one — the point is needed to ensure that the coolant going into the radiator flows only into the main hose and not the smaller side hose which is the vent. Keeping coolant out of the vent is the best way to avoid creating an air bubble in the system while refilling.
view of the overflow tank
After you have filled the radiator fill hose to the very top, reinstall the radiator cap (we installed a new one). Then, run the generator under load for a few minutes and recheck the level in the hose and in the overflow tank. The tank should be filled to center of the tank as seen here. We had to add more coolant through the white cap to fill up the overflow tank.
mechanic points to a box with a wing nut
To change the air filter, you need to first locate this box with a wing nut on the bottom of the generator. Remove the wing nut; under it you will find the air filter.
view of the air filter
After removing the black outer cover, you will see the air filter is held in place by a plate and another wing nut. Remove the nut and plate, then pull off the air filter and replace it with a new one. Put the metal plate back over the end of the new filter and tighten the wing nut, then reinstall the black outer cover and tighten the wing nut down.
close view of the coverless generator
the cleaned radiator
While we had the toolbox open, we decided to remove the cover off the generator and look around inside to check the condition of the belt, hoses, and everything else we could see. The belt and top hose all looked good, but the radiator had a lot of debris in it, so we took the opportunity to clean it up. After using an air hose to clean the radiator, it looks great and should do a much better job of keeping the generator cool.
full view of the coverless generator
Everything else looked good, so we reinstalled the cover and went back under the generator to perform the final maintenance item on our list — cleaning the spark arrestor.
view of the spark arrestor
To clean the spark arrestor, you will need multiple socket extensions to reach the brass bolt shown here at the very top between the two round silver mufflers. If you are sure all the other items are correctly done and you have refilled the oil, coolant and installed all the filters, etc., remove the bolt and start the generator — allowing it to run under full load for five minutes. We do this step last because after this the generator is hot, which makes other maintenance difficult. Reinstall the bolt and check all the oil and coolant levels one last time.
Adhering to a Service Schedule
Maintenance schedules differ between manufacturers and even units, so your first order of business should be to locate the schedule for your specific ac generator — and follow it. For example, here is the service schedule for the generator used in this article.

The belt change, hose replacement and thermostat replacement are considered more advanced and should most likely be performed by a qualified mechanic

150 Hours
500 Hours
1000 Hours
Change engine oil and filter at least annually

Clean Spark arrestor least

Replace engine air filter (at least annually)

Replace Fuel Filter

Check Coolant

Flush coolant; perform at least every two years

Replace radiator cap; perform at every two years

Replace engine belt; perform at least every 5 years

Clean crankcase breather; perform at least every 5 years

Replace hoses and thermostat; per form at least every 5 years.

150 Hours
Change engine oil and filter at least annually

Clean Spark arrestor least

500 Hours
Replace engine air filter (at least annually)

Replace Fuel Filter

Check Coolant

1000 Hours
Flush coolant; perform at least every two years

Replace radiator cap; perform at every two years

Replace engine belt; perform at least every 5 years

Clean crankcase breather; perform at least every 5 years

Replace hoses and thermostat; per form at least every 5 years.