—Joe Stevenson
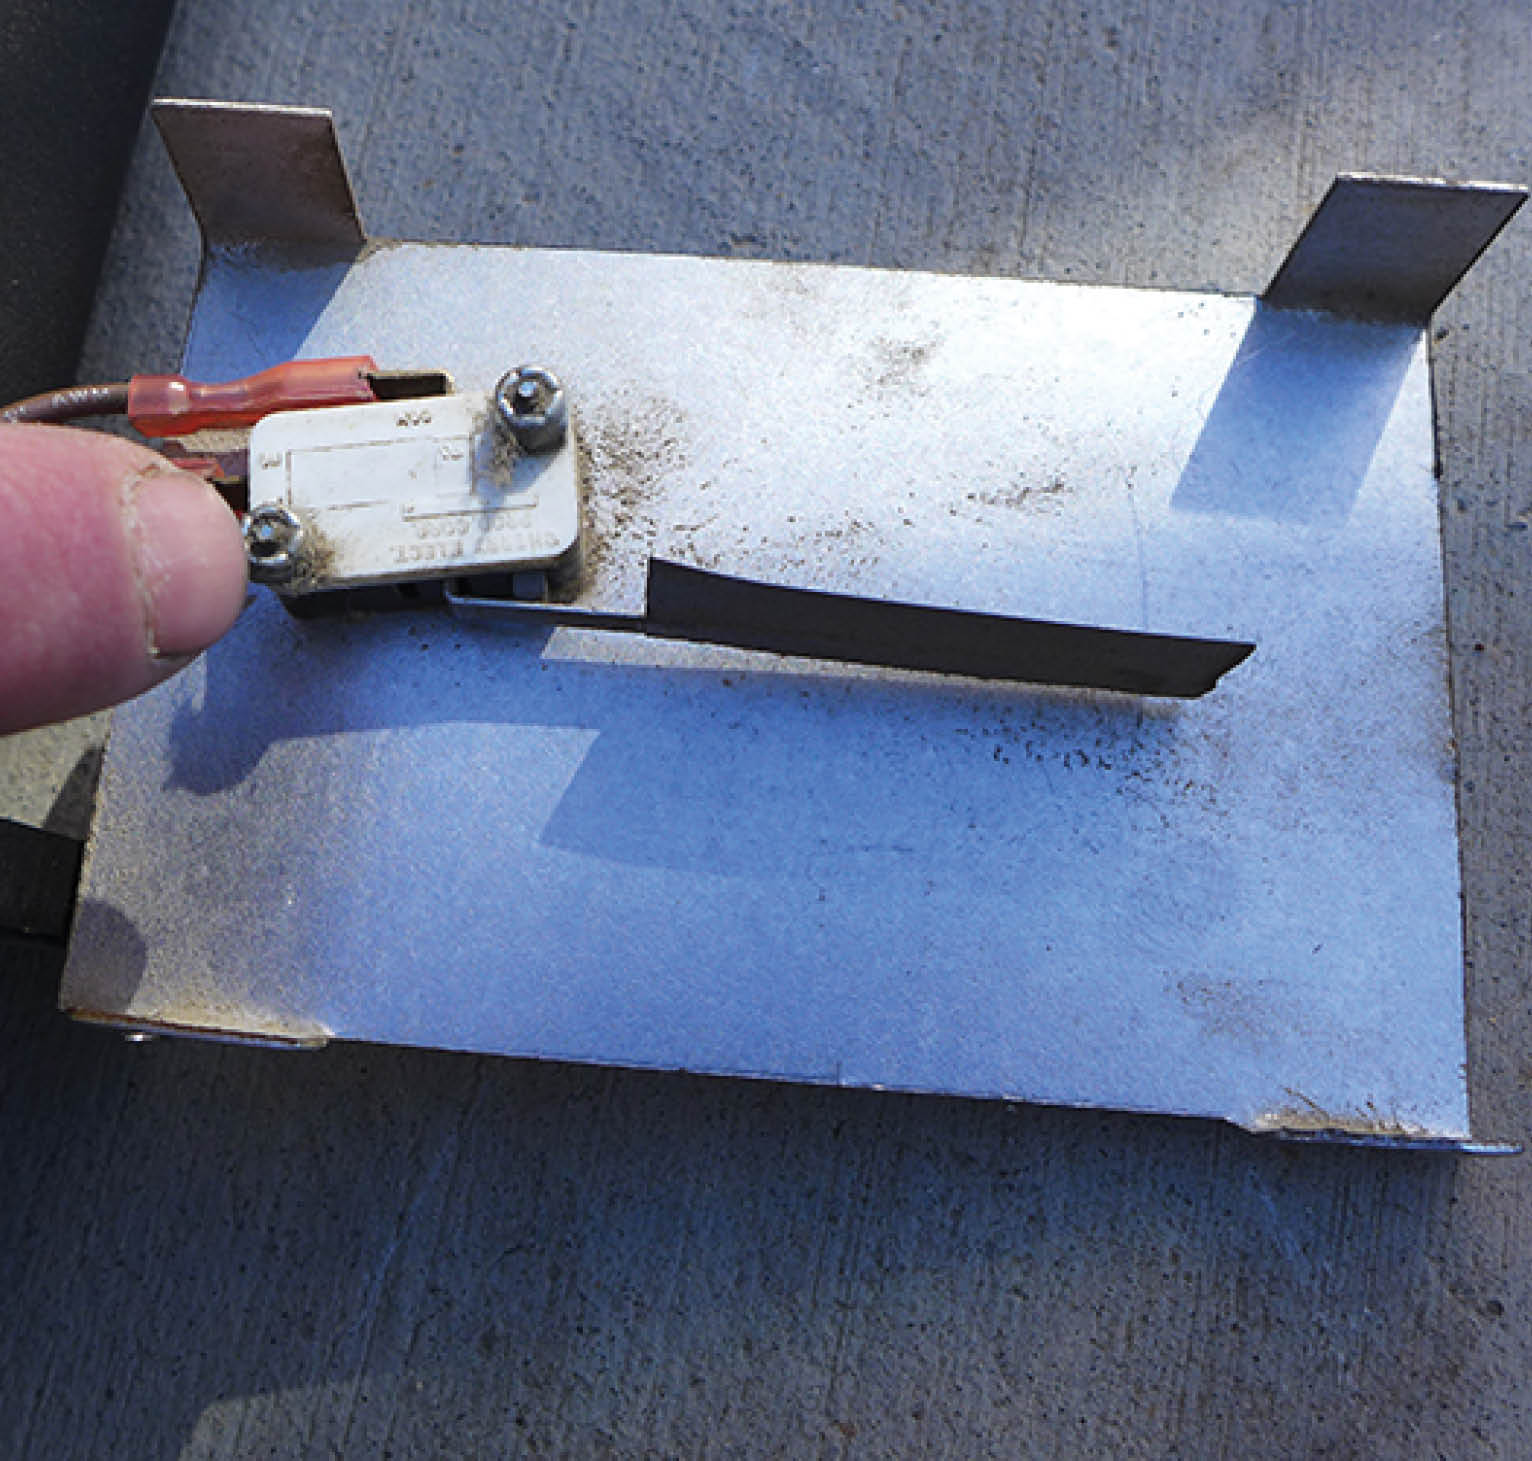
Joe, good thinking about the throwing parts at problems; there’s no reason to start hanging parts on it before you have a concrete diagnosis. There are only three places to look and test based on your description of the problem: the limit switch, sail switch and/or the circuit board. Typically, the circuit boards are durable, so my best guess is to focus on the sail switch. For some reason, the circuit boards fail more often on these furnaces. Also, the limit switches very rarely burn out — but they can.
At this point the only way to really know for sure is to remove the furnace and connect power to it; you don’t necessarily need propane to test it. Without ignition (remember there is no propane to ignite for this test), the circuit board will try three times before it goes into lockout. The fan will run for about 15 seconds, so have your test light ready to go. To test the sail switch with the test light, ground the wire/clip and touch the flat terminals on both sides of the sail switch. If only one side lights up, you have your answer. If both sides light up, test both terminals on the limit switch; if both of those light up then you’ll need to make sure there’s voltage at the circuit board. If you see power, then the PC board is defective.
Two different sail switches are used on Atwood furnaces. If you discover that the sail switch needs to be replaced, you’ll have to remove the one in your particular furnace to match the paddle. There are two different part numbers for the sail switches and it’s critical that you make an exact comparison to avoid installing the wrong part, which will prevent the furnace from functioning properly.
—Gavin Schwartz
Gavin, it just so happens that I have the same refrigerator. I’ve done extensive research on the matter and can offer you a couple of suggestions.
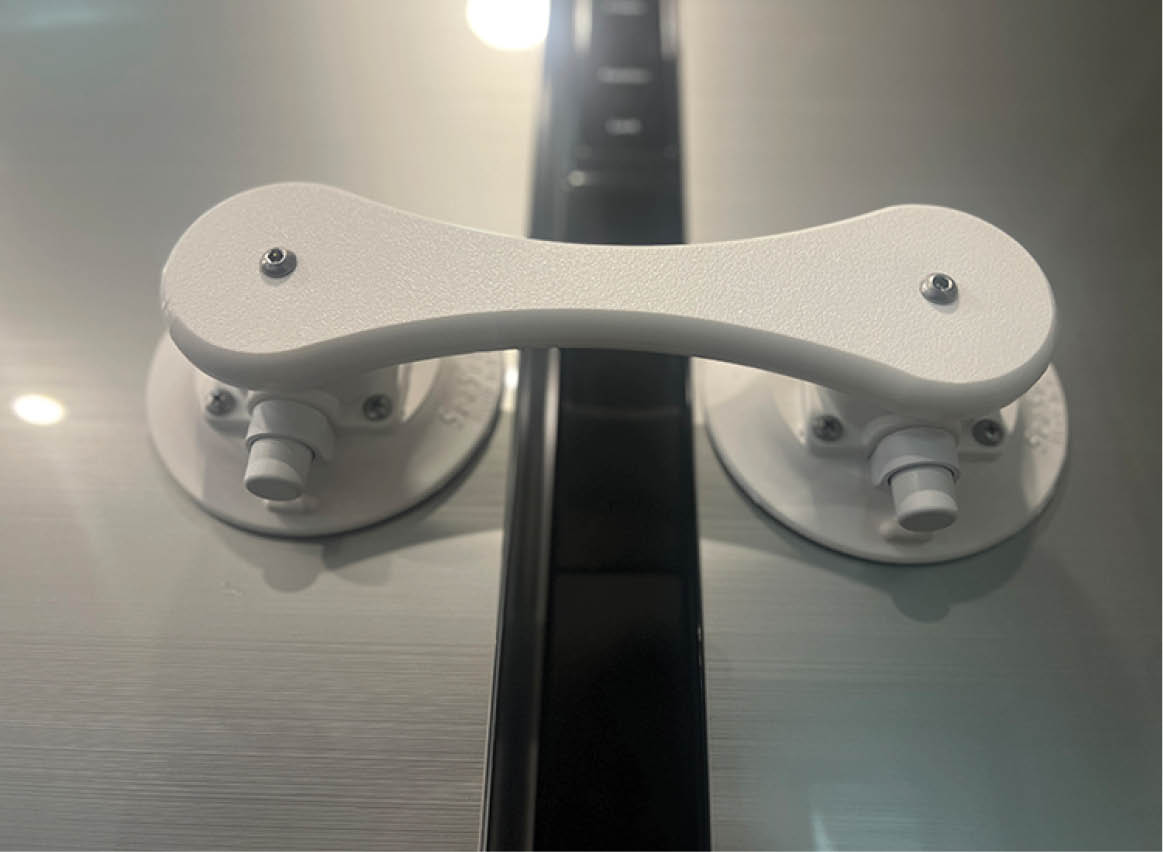
After fooling around with straps — which didn’t work — I settled on suction-cup, grab handles that are typically installed in the shower to lend a helping hand for those with physical limitations. All I did was position two handles across the two refrigerator doors, one near the top and one near the bottom.
Suction-cup handles are all over the Internet and Amazon, so you won’t have any trouble finding one. Most of these suction-cup handles will stick well to smooth surfaces, like the refrigerator doors, but you can add a thin coat of vegetable oil to improve adhesion — something people do when mounting monitors on the windshield.
The suction cups held nicely, even on rough roads, but as I soon discovered, it took some doing to get them off (probably because I don’t have long fingernails to get under the suction cups and release the adhesion). While the extra effort was worth not having the doors fly open and scatter foodstuffs all over the floor, I was still in search for one that could be released easier. I recently found a heavy-duty version made by SeaSucker (seasucker.com).
SeaSucker markets a comprehensive line of brackets, racks and camping accessories targeted at the marine and RV industry. I bought the Medium Duty Handle (grab bar) that has two 4.5-inch diameter suction cups. What separates these suction cup devices from others is the way it uses vacuum to provide amazing suction. Pushing a button on each suction cup creates vacuum for the holding power. The suction cups will hold vacuum for 24 hours before additional pumping is required — which is plenty of time for most of us. These suction-cup products are not cheap ($99 for the Medium Duty Handle) but they do work. Considering SeaSucker offers bicycle racks that are only mounted to the vehicle with suction cups, holding refrigerator doors closed is child’s play.

—Elaine Simpson
Elaine, I’m not sure that this is something you could tackle. Dealing with cooling units, LP-gas and electricity can be too complicated and dangerous for most owners. I highly suggest that you find a qualified RV technician with a lot of refrigerator service experience.
There are only a few reasons that the refrigerator will not cool correctly on propane, one of which is the wrong gas pressure, which must be set at 11 ½ inches of water column at the pressure tap on the gas valve. The pressure at this value can be measured using a manometer — a pressure test should only be done by a qualified technician.
The other common problem is a dirty orifice. It doesn’t take a lot of obstruction to reduce the BTU output of the burner, which in turn will affect the function of the cooling unit. This type of cooling unit requires a certain amount of heat to function — kind of like how an old percolator coffee pot requires a high flame to perk.
Another issue could be that the burner tube is full of rust that blocks the slots where the flame comes out. There could also be rust in the flue that drops to the burner, but this is less common with newer refrigerators. We know it’s not a bad cooling unit as it works fine on electric.

—Walker Stevens
Walker, just because the light comes on doesn’t mean that the water pump has voltage. First, check the fuses; some of them are marked, some are not. If the fuse is good, it’s possible the water pump lost the ground. Use a multimeter to check for power to the water pump and confirm there’s a good ground connection. If there’s voltage at the water pump, it probably needs to be replaced.
If you would like to upgrade, even if the existing demand pump is still good, I recommend the Shurflo Revolution. It’s a good medium-priced water pump, has plenty of pressure (55 psi) and it’s very quiet if installed properly. One thing you need to consider is that the system may not be able to handle pumps with a higher-pressure rating, which can cause short cycling — and it would likely be noisier.
Be sure to replace the inline filter between the freshwater tank and the pump; normally they’re attached right at the pump. Even if you don’t replace the pump, it’s best to check the inline filter before heading out; it’s critical to keep any debris out of the valve system inside the pump.