Battery Bliss
[maghub_sidebar]
digital illustration of an hourglass; Quick Tech Tips department heading
Battery Bliss
digital illustration of an hourglass; Quick Tech Tips department heading
quick charger for cordless-tool batteries
Quick chargers for cordless-tool batteries can add to the clutter inside any RV. “Out of sight” does not necessarily mean “out of mind” when mounting these bulky units inside a storage compartment.
By Bob Livingston / Photos by author
N

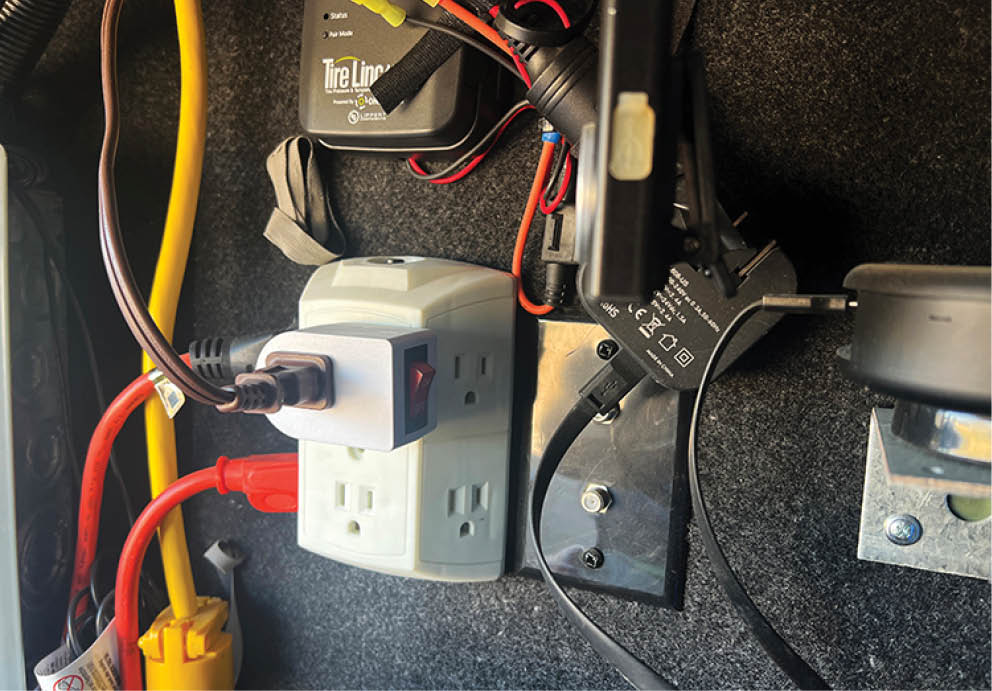
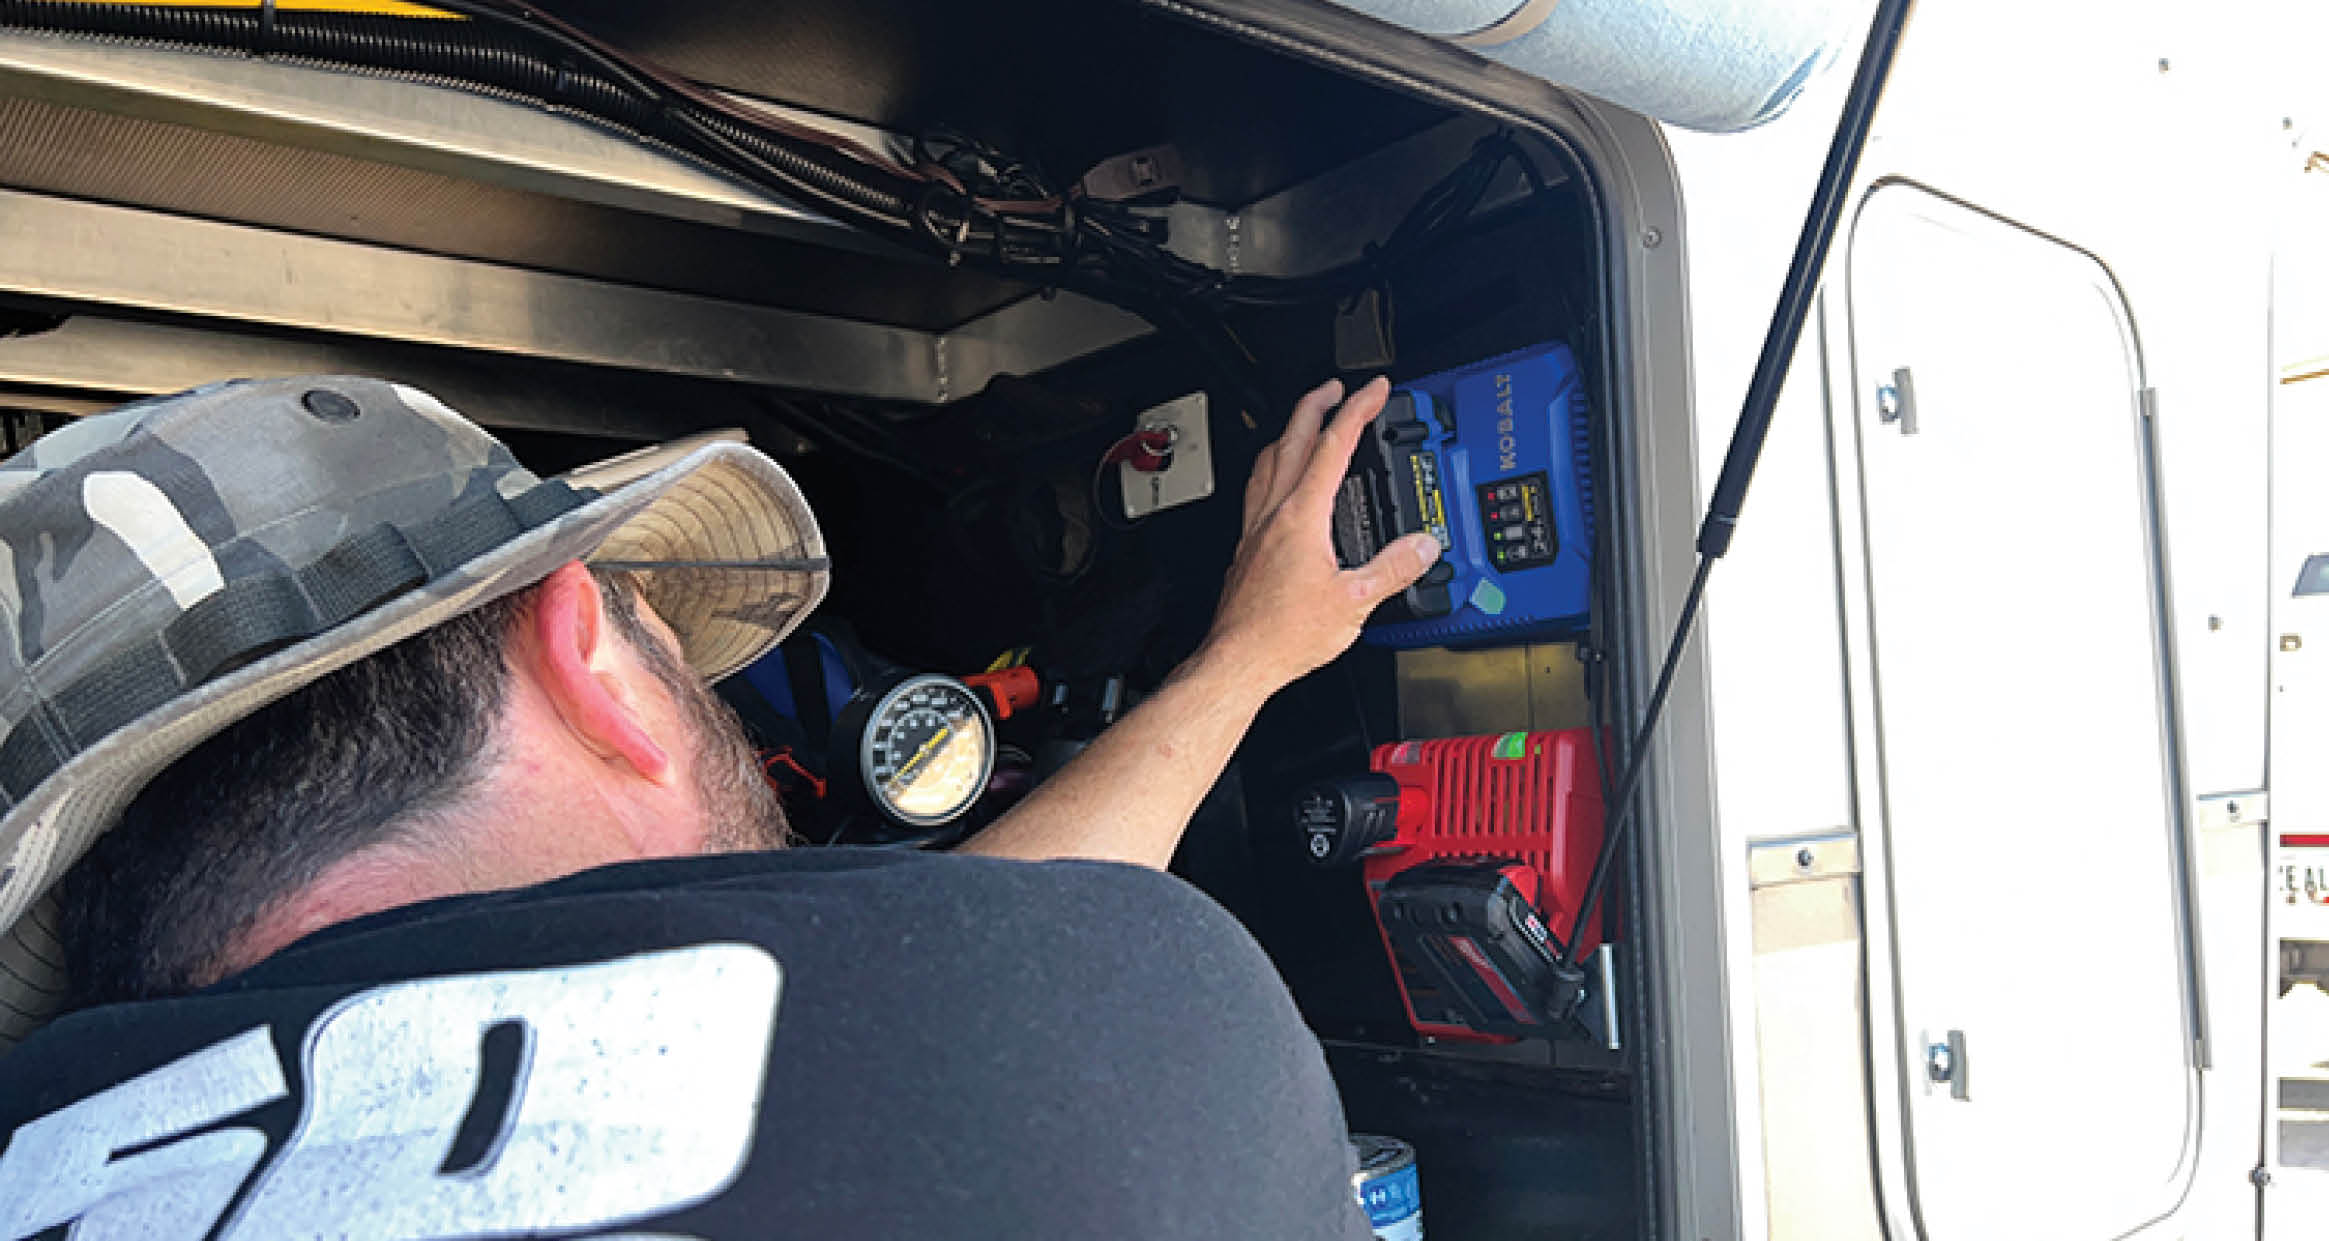
o RV tool kit can be complete without a few cordless power tools. I carry six of these tools, which means charging batteries is a frequent task. And since I have two brands of tools, Milwaukee and Kobalt, I have to likewise deal with two quick chargers — which always seem to be in the way. After much consternation about how to keep these battery chargers covert and still easily accessible (which may qualify as an oxymoron), I hung them on the carpet-covered, front wall divider in the storage compartment.

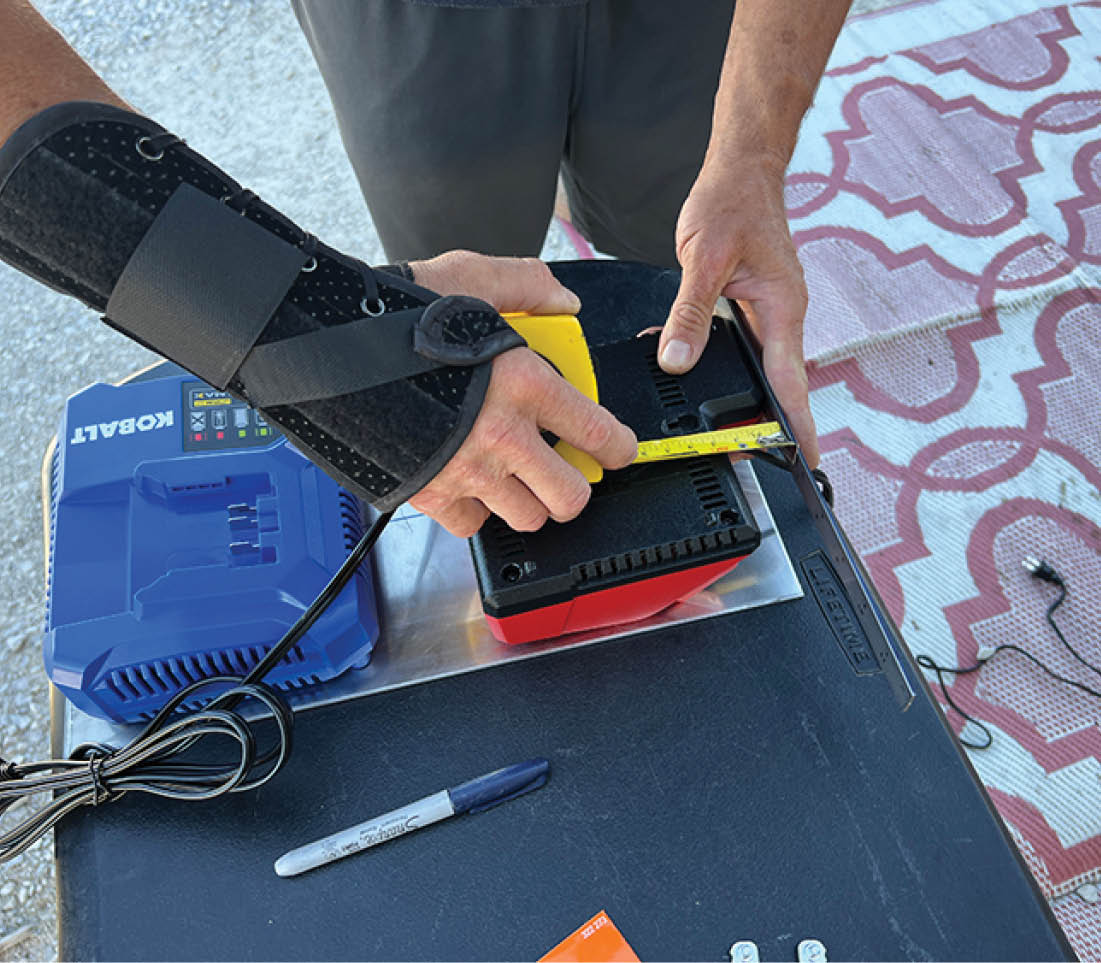
Naturally, that didn’t last long. The installation was less than stellar because these chargers have a couple of slots in the back for sliding onto screw heads that are in their respective mounting locations. Getting the right locations for the screws takes some measuring gymnastics — and getting a tight fit takes experimentation. At that, over time the screws loosened and the chargers wiggled, which made it difficult to release the batteries without using two hands — and that was awkward.

Fortunately, I wasn’t quite back to Square One. The area immediately to the right of the exterior compartment door turned out to be a perfect location — but the mounting system needed embellishment.

Determining the center point of the aluminum plate was necessary to orient the battery chargers. The 8- by 15 1/2-inch, 1/8-inch-thick plate is made from 6061 (T6) aluminum and was procured at a local metal supplier.
Two slots are provided for each charging base, but the dimensions are different. Measurements were taken to establish positioning; the distance between the center points of the two slots were marked on the housing.
I devised a way to mount the chargers solidly to a piece of aluminum, which was then screwed into the wall. Knowing that I only needed an 8- by 15 ½-inch piece of aluminum, I paid a visit to a local metal supplier (which you can find online). Many of these suppliers have large crates of “drops” from cuts they made for other customers that can be purchased inexpensively. The only scraps of aluminum available at the time were way too big and, frankly, more expensive than having a fresh piece cut to size. However, for $24 I had a perfectly sized piece of 1/8-inch thick, 6061 grade (T6) aluminum stock for the project, eliminating the cutting step —which didn’t hurt my feelings.
drill being used on a metal sheet
Holes coinciding with the placement of the slots in both charging bases were drilled in the aluminum plate. Accuracy is important here to ensure the slots and holes will line up properly. There is very little tolerance here, so measure twice and drill once.
It was important that the charging bases were tight against the aluminum plate to prevent wiggling when inserting and removing the batteries. To get there, ¾-inch-long, #8 x 32 machine screws and lock nuts were called into service. Although not a textbook use of fasteners, the screw was held with a needle-nose pliers and the lock nut tightened with an open-end wrench until the screw heads were snug enough to prevent movement. Tightening too much can deform or crack the plastic mounting slots, so use a light touch.
To mount the chargers to the aluminum base, I used four #8 x 32, ¾-inch-long machine screws (you just have to make sure the heads are right sized to fit in the designated slots in the charging bases). From here, holes were drilled in the aluminum plate and the chargers mounted using the screws and lock nuts. Since I also needed a way to tighten the screws enough to snug the chargers to the aluminum, the screws were first set loose enough to slide the chargers in place before they were final-tightened from the back side of the aluminum. While not exactly a textbook method, the ends of the screws were held in place with a long-nose pliers while the lock nuts were tightened with an open-end wrench to snug the chargers to the aluminum. Just be careful not to bung up the threads and overtighten the nuts to a point where the plastic mounting slots on the back of the chargers can deform or crack.
1/2-inch wood shims were used to space out the aluminum plate from the wall
Note the hole drilled in the top shim to clear the screw and nut; the lower shim was not affected.
In order to preserve the protruding threads for future removal of the chargers, 1/2-inch wood shims were used to space out the aluminum plate from the wall. Note the hole drilled in the top shim to clear the screw and nut; the lower shim was not affected.
At first, I was tempted to cut off the protruding ends of the screws to allow for a flusher fit to the wall but realized that doing so would make it impossible to remove the chargers (if necessary) without damaging the slots. Plan B required the use of ½-inch-thick wood strips of pine to keep the screw ends from jabbing into the wall and provide a finished look. Once the chargers and wood shims were in place, the aluminum plate was fastened to the compartment wall using 1 ¾-inch #8 wood screws. The result was super-solid.
Once the shims were in place and the holes drilled in the corners, wood screws were used to fasten the aluminum plate to the wall in the fifth-wheel’s exterior compartment that isolates the front storage area. A level was used to make sure the plate was square.
An extension cord was plugged into a lighted On/Off switch that was itself plugged into the gang adapter for the 120-volt AC outlet on the opposite wall inside the compartment. The cord was then routed closer to the chargers and cable-tied to other wiring conduit. Both chargers were plugged in at that point. This set-up provides one-switch control of power to the chargers.
Finally, the chargers were plugged into a 120-volt AC outlet on the opposite wall inside the compartment using a short extension cord. The extension cord was routed along other wire conduits and cable-tied in place. A lighted On/Off switch was plugged into the outlet from the extension cord to make it easy to turn the power on or off to the chargers. The power wires from the chargers were bundled and also cable-tied in place.
The two chargers will allow conditioning of three batteries from two brands of tools. It’s now easy to install and remove the batteries with one hand and view the indicator lights when the compartment door is lifted. Although the lower mount for the door strut looks too close, it actually moves away when closing the door. At least, that’s what the gremlin told me.
Other than chasing the parts, the entire project only took about an hour. Now I can have the proverbial “cake and eat it” situation: The batteries can slide into the chargers using only one hand and the conditioning process (lights on the charger bases) can be monitored by opening the compartment door to access the batteries. I don’t have to deal with bulky chargers inside the RV — and I have the batteries ready to go.