Watch Your Step
[maghub_sidebar]
Watch Your Step
Person entering RV on newly installed stairs
Getting into and exiting a fifth wheel or travel trailer seems like a simple proposition, but there’s more than meets your feet. Torklift’s Glowstep Revolution Uprising takes a good idea and makes it even better.
By Bill Gehr / Photos by Bob Livingston
T

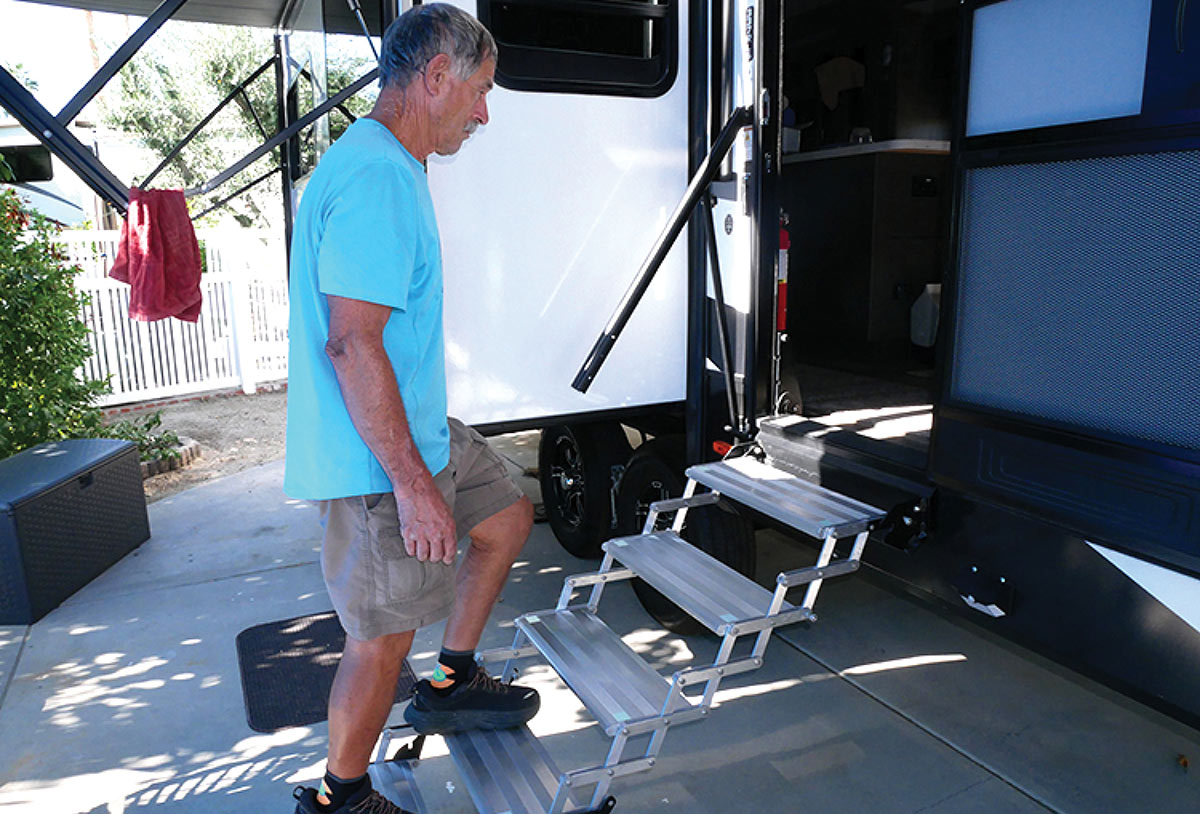
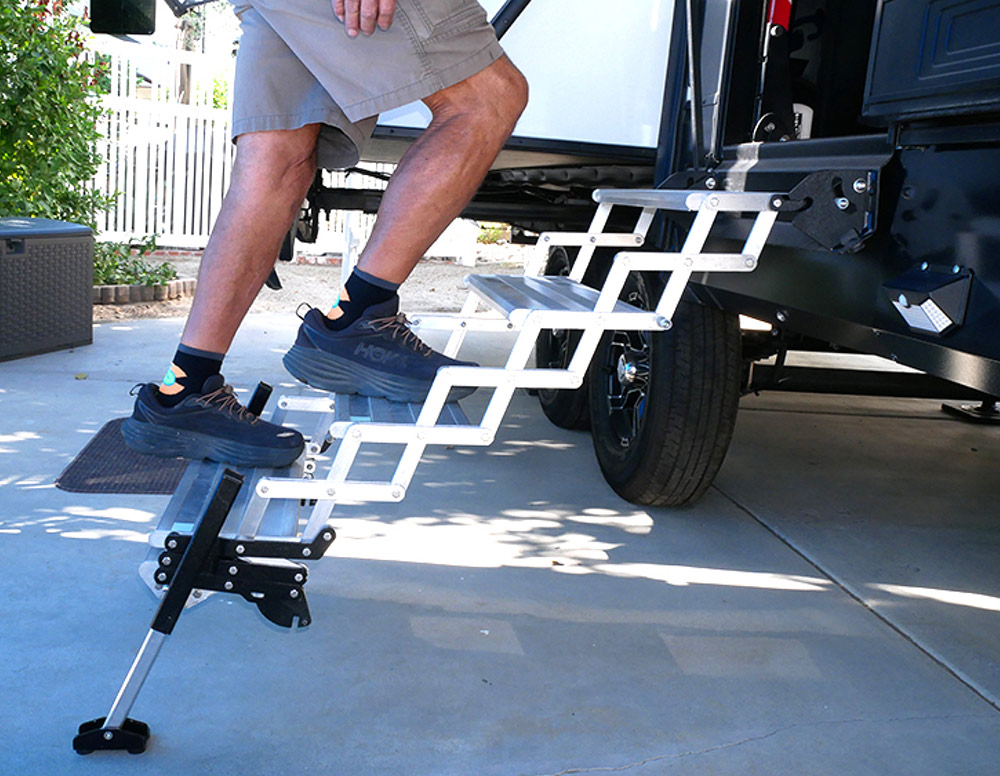
here’s nothing exotic about getting into and out of a trailer or fifth wheel. Steps have been around for as long as there have been entry doors — and those used on towables have looked the same for as long as most owners can remember. Then, a few years ago, a company reimagined how to employ steps, which made for better footing and versatility. These new steps store upright in the entryway and swing out to provide uniform rungs and the ability to stabilize the landing on uneven ground. Quite novel at first and now commonplace.

The current models of these “drawbridge-type” folding steps have been tweaked over the years and provide a high level of safety and convenience. Torklift International (torklift.com), a company known for its RV products, took it a step further (pun intended) with its Glowstep Revolution Uprising product. Actually, these new steps take strong cues from the company’s scissor mechanism that have changed the paradigm when it comes pickup camper entry and egress. Expanding the lineup to include models specifically designed for towables was expected and now are available for rigs with various-size doorways.

Drawbridge-type entryway steps in stowed position
Drawbridge-type entryway steps being lowered
Drawbridge-type entryway steps are more popular than ever. They fold up into the doorway and pull out when needed. These steps are inherently more stable, but when opened, they take up a lot of real estate adjacent to the trailer. In some cases, there’s not enough clearance to extend the steps. Torklift International designed its Glowstep Revolution Uprising to be an easy retrofit and remove the clearance issue.
There are a number of features unique to Torklift’s Glowstep Revolution Uprising, but its deployment method provides tremendous adjustability and operates in a smaller space than traditional drawbridge steps. While the step hardware also installs in the door frame and is folded into the entryway for travel, the scissors mechanism allows the frame and rungs to fold compactly. This really comes in handy when you find yourself parked in close quarters in a storage facility or someone decides to park too closely while in a parking lot for shopping or visiting an attraction. And in some situations, an obstruction in an RV camp spot can make it difficult to deploy the steps from the doorway, making the Torklift steps even more versatile.

Although the steps fold compactly, they open to provide generous footing on rungs with a 7.5-inch leg height on both sides that can be adjusted independently on uneven terrain. If the first step is still too high, a built-in booster step can fold out to lower the distance to the ground. Combine those features with the ability to adjust the landing legs — with swiveling foot pads — in ½-inch increments and you have a step system that makes it safe to enter and exit the trailer, regardless of where you’re parked. Adding to the sure footing are “glow-in-the-dark” markings that remain lit for 10 hours after five minutes of exposure to light. And the friction material on each rung helps to keep your feet firmly planted.

The Uprising steps can be adapted to most trailers and are available in three- to six-step configurations; the hardware will fit 24- and 28-inch doorways. A smooth operation is assured by precision manufacturing using aircraft-grade aluminum and stainless steel — which also assures rust will be kept at bay. Quality is backed by a lifetime warranty and the Uprising steps are made in the USA.

Unscrewing old step brackets
Removing old steps
In order to remove the original drawbridge-type step system, the screws were removed from the floor and the entire mechanism lifted out in one piece. The door must be wide open for proper clearance. Be careful here — these steps are heavy. The threshold kick molding also will have to be removed, if so equipped.
To determine if these steps will work with your trailer, you’ll need to do some measuring, or you can input your trailer particulars and let Torklift determine if there is an application available. You’ll be asked to measure the doorsill height; it should be between 5/8 and ¾-inch. Then you’ll need to verify that there is 3/8-inch clearance at the doorsill plate and measure the distance from the top of the sill to the ground. Once you get the door frame width, you can check with the online charts and find the exact kit that will work for your trailer. For this evaluation, we confirmed that the steps would fit on my 2023 Grand Design Reflection fifth wheel. Know, too, that if your RV doesn’t have steps that store in the doorway, you can opt for other styles with similar mechanisms and safety provisions.

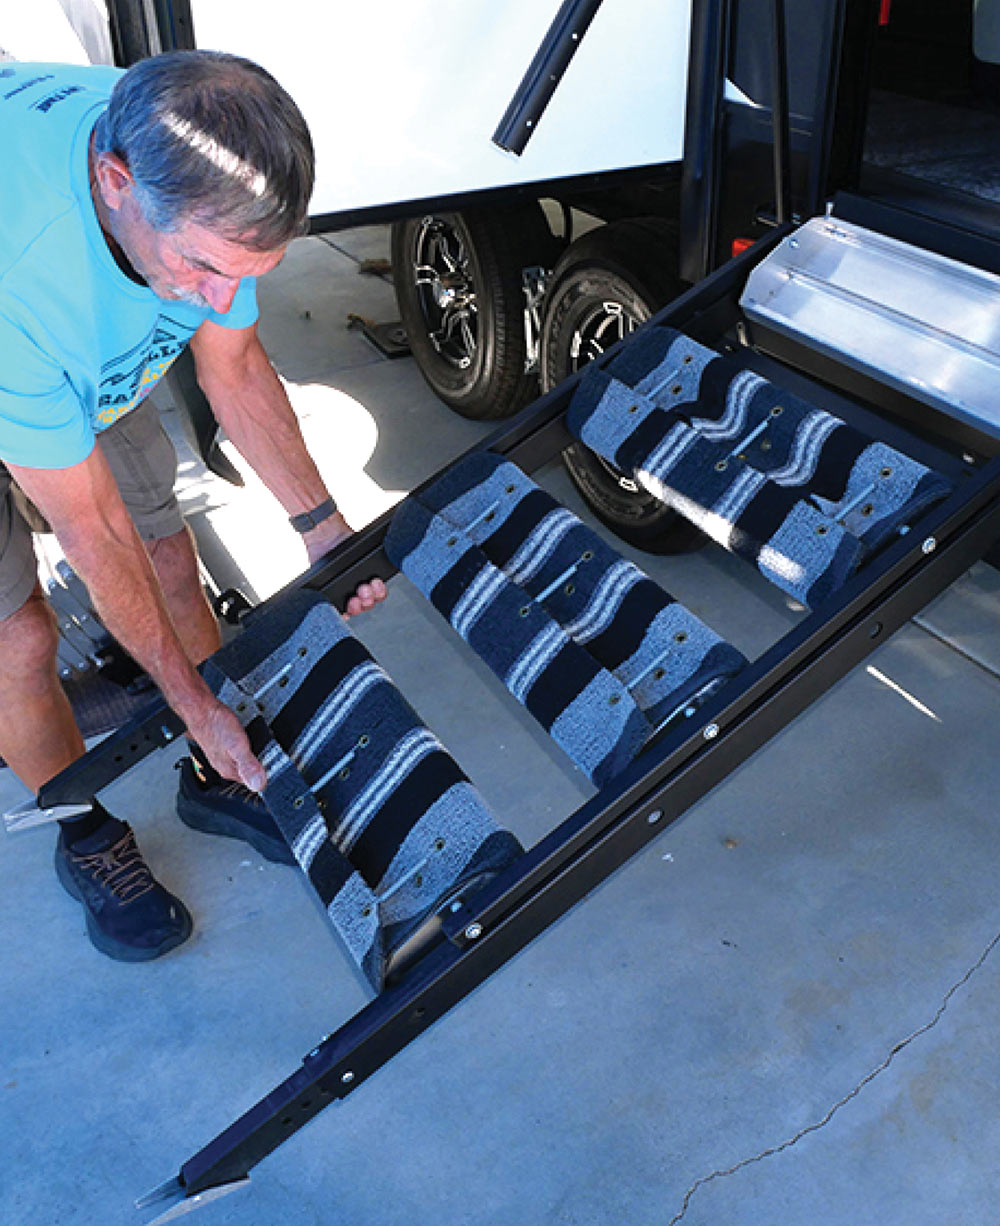
Unboxing the Uprising kit I was impressed with the overall quality — it was easy to see how Torklift could offer a lifetime warranty. The linkage and the rungs are made of anodized aluminum and all of the steel parts have a powder-coated finish that looks like it should last for many years without losing its shine. I also liked the aforementioned built-in booster step that can be used with the flip of a lever when the door side of the trailer is jacked up or on blocks requiring more height.

Mounting bracket for new steps
The new mounting bracket was set on the floor and centered. If there is a trim piece on the inside of the frame, a 10 ½-inch section will have to be cut. This can be done with an oscillating tool (not shown since it was not necessary for this installation).
The Installation
The provided installation guide might lead you to believe that the mounting procedure is complicated; quite the opposite is true. Of course, the original steps must be removed first. This requires opening the entry door as wide as possible (at least past 90 degrees), which means that if you have a model with gas struts that limit door travel, they will need to be removed to widen the access to the hold-down screws and make room to pull the old steps away from the doorway. If you have a threshold molding at the bottom of the door frame, it will need to be removed.

Some trailers will have a trim piece — such as a wood molding — on the inside of the frame; you will need to test the new mounting bracket to see if it interferes with the wood molding. If it does, you will need to cut off a piece about 10 1/2 inches above the bottom of the door frame. This can be done easiest with an oscillating tool, but a finish saw will also work. In my case, I did not need to remove the molding.

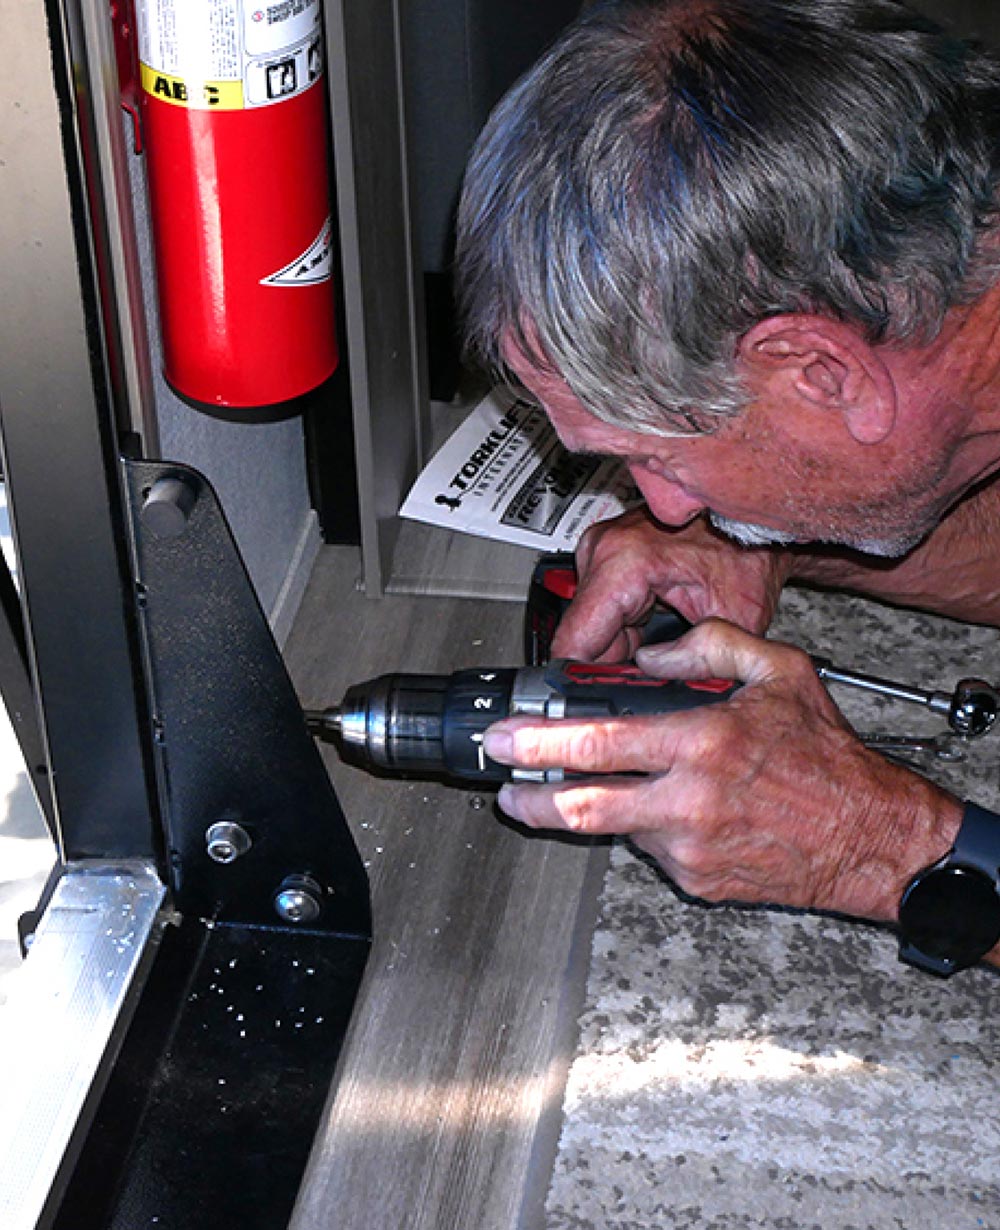
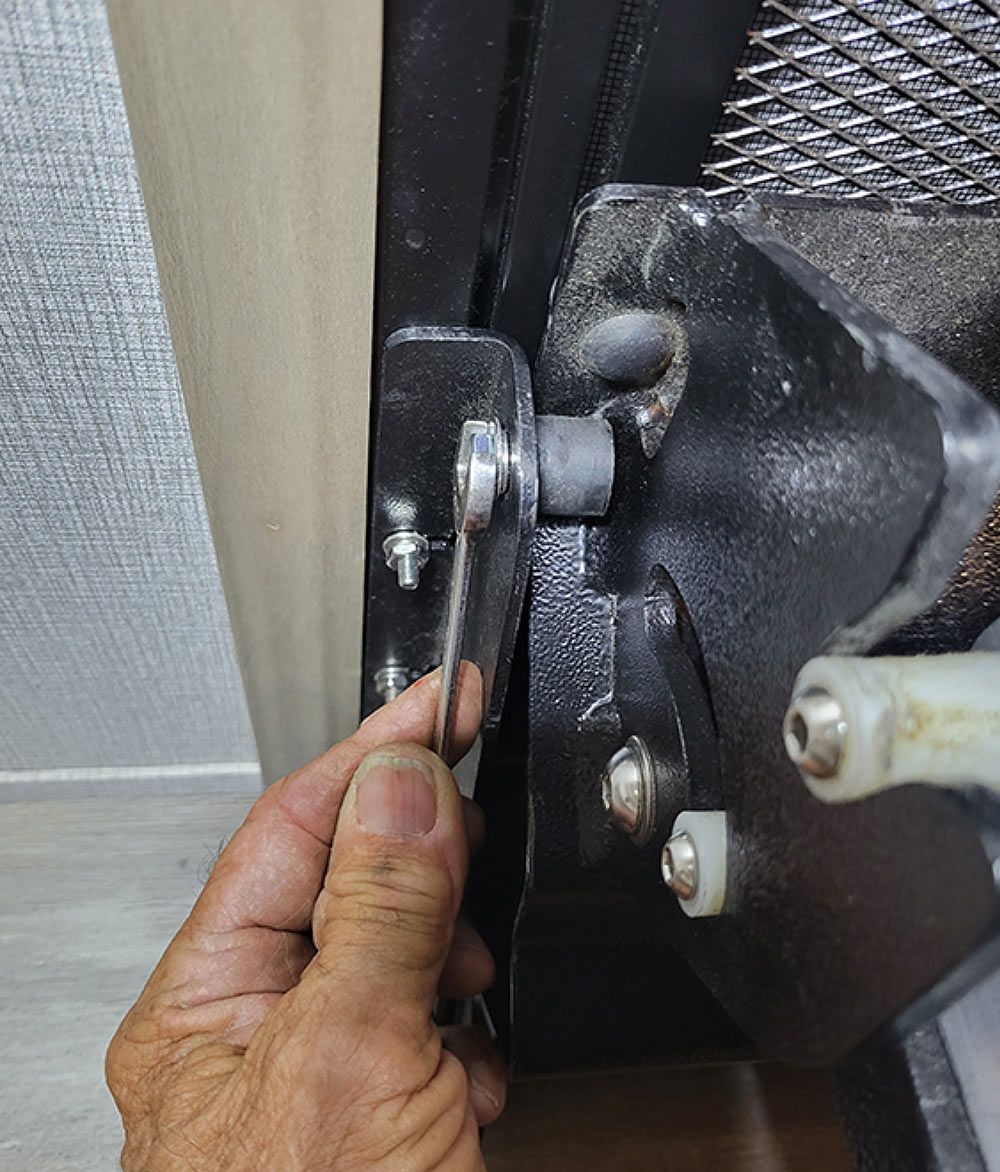
From here, the installation procedure is straight-forward and clearly illustrated in the installation booklet. Place the mounting bracket inside the door frame, making sure it is centered, then mark the locations for the six holes in the door frame and drill them with a 7/32-inch bit. Install the supplied low-profile bolts, flat washers and split washers and tighten them to specifications listed in the manual. Lift the step assembly over and past the smaller studs in the mounting bracket, then hook the ends of the main bracket over each large stud with the nylon spacer. Next, test the step by rotating the mechanism down and away from the trailer; do not let the steps fall freely as they could damage the doorway. At the same time, expand the steps by pulling the bottom step away from the trailer and set it on the ground.

Drilling holes in door frame for new bracket
Using the new mounting bracket as a template, three 7/32-inch holes were drilled in each side of the door-frame flange. This was done from inside the trailer.
Using the supplied Allen wrenches, you’ll have to loosen the studs on each side of the mounting bracket and push the step assembly up and against the main bracket until it contacts the face of the threshold molding. Keep in mind that there may be screws in the face of the threshold molding; if you encounter this, they will need to be removed and the holes filled with caulking in order for the Uprising hardware to fit properly.

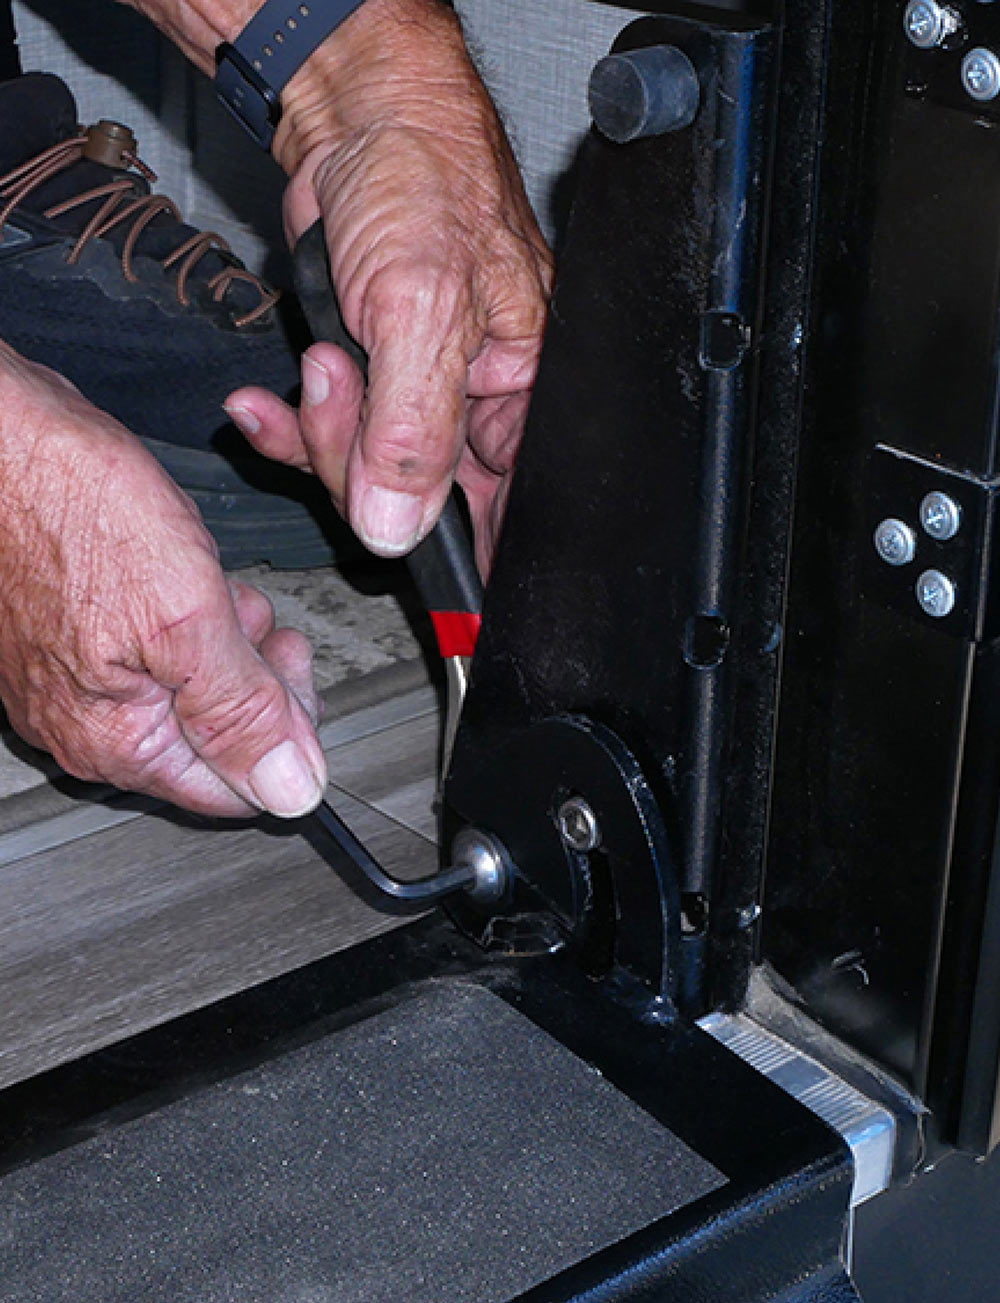
After loosening the bolt holding the rubber bumpers on each side of the mounting bracket, you will need a second person to go inside for the remainder of the install. If the trailer has a second door, a helper can access the interior via that door; otherwise, you’ll probably need a step ladder since the new system will be out of service at that time.

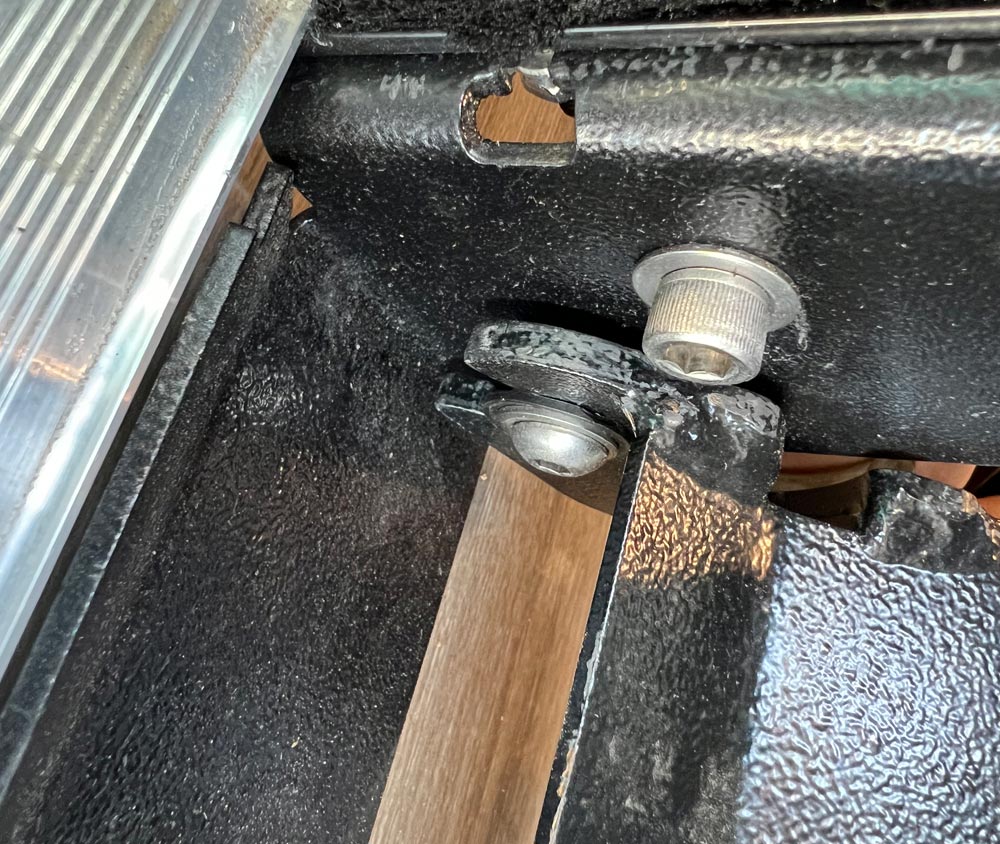
The final stages for adjusting the installation will require coordination between the person inside the trailer and the other standing outside. Once the bottom step is raised off the ground, the mechanism is pushed upward until fully collapsed. At this point, the studs on each side should engage into the slots of the main bracket. With the door and screen closed, the person inside gently pushes the steps back against the screen door frame until the rubber bumpers are adjusted to specification and the hardware torqued to 70 in.-lb. The bracket that bolts to the entry door frame has a ramp that makes it easy to sweep debris from inside the trailer right out the door. It’s suggested that you run a bead of black silicone rubber sealant along the edge to stop the debris from going under the ramp.

Attaching bracket to door frame
The mounting bracket was attached to the door-frame flange using the supplied low-profile socket-head screws, hex nuts, washers and split lock washers. All the screws were tightened to 28 lb.-in.
There’s no question that this step is about half the weight of the suspension bridge-style step system that came with the rig and the whole process should take less than 1½ hours to complete.

Finally, we tested the mechanism two or three times to make sure that everything fit perfectly. We also deployed the bottom rung by moving the lever to the right and pulling the rung down as far as possible to ensure that the latch locks back into place properly to prevent user injury.

Inventing a “better mousetrap” takes some doing. In this case, Torklift’s GlowStep Uprising improves livability and adds versatility. And your feet will thank you.

Placing new steps onto mounting bracket
Bracket hook end on stud
At this point, the step assembly was lifted to the doorway and the main-bracket hook ends were placed over the large studs in the mounting bracket. You’ll have to lift high enough to clear the smaller studs in the bracket. Rubber bushings stop the mechanism to prevent damaging the flooring.
Unfolding mounted steps
Once the main bracket for the steps was hooked to the studs, the steps were pulled out and away from the trailer and the feet placed on the ground.
Adjusting step mount
We then loosened the two studs on each side of the mounting bracket (not shown) and pushed the step assembly main bracket into the doorway until it contacted the front face of the threshold molding. The studs were then retightened.
Finishing step installation
At this point, it takes two people to complete the installation. The bolt holding the rubber bumper on each side was loosened. The bottom step was rotated off the ground until the main bracket rotated upwards and the studs on the sides engaged in the slots of the main bracket.
Checking step alignment
The steps were then pulled down again to make sure everything was aligned before final tightening. To get there, we pushed on the sill plate until it was tight against the door jam.
Tightening sill plate bolts
Once we were happy with the final position of the step assembly, the bolts that hold the sill plate solid in place were tightened.
Adjusting rubber bumpers on bracket
The step assembly was again retracted into the doorway and adjusted until the rubber bumpers on the main bracket contacted the screen door frame. From there, the rubber bumpers on the mounting bracket were moved outward until contacting the main bracket and retightened (torqued to 70 lb.-in.).
Bolt head on bracket
If the step assembly is installed correctly, the slot on each side will engage the bolt head, which acts like a stop when the steps are stowed in the doorway.
Adjusting telescoping legs on new steps
There are 7 ½ inches of travel for each leg, which can be adjusted in ½-inch increments. This configuration makes it possible to level and stabilize the steps on uneven ground without the need for boards or blocks of wood.
Pulltab on bottom rung to extend step size
Stowing steps
If needed, depending on the terrain, the bottom step can be pulled out from the others after releasing a lever. The bottom step is normally stowed below the last rung. Consider it an extension step for use on uneven ground.
Steps folded and retracted into doorway
The Torklift Uprising step system retracts into the doorway for travel and is more compact that competitive drawbridge-style counterparts. There are no pins or latches to deal with.
New entry steps being used
Torklift’s scissor-action step system is easy to extend. Once the rungs are level — accomplished with the adjustable legs — the Uprising assures solid, safe footing.
Accessorizing The GlowStep
Dirt Destroyer shoe brush mounted to side of RV steps
A great option is the Dirt Destroyer, which is a nylon-bristle brush that is attached to either side just above the bottom step. A few swipes of your shoes through the brush strips the soles and sides of mud and dirt that normally would be tracked inside.
There are three accessories that work hand-in-hand with the GlowStep Uprising (as well as other Torklift step products). A GlowGlide Handrail (part #A7621) has three telescoping arms that can be adjusted to fit any entryway configuration. It offers a much longer railing to hold on to when entering and exiting the RV, as well as additional support when leaned on.

Another safety accessory, the Safe Step Panel (part #A7602), adds a protective step riser guard that closes off the gap between the rungs. Many dogs get spooked by the natural open space found on the majority of RV steps and will not climb onto the rungs without repetitive persuasion. Panels are held on with hook-and-loop fasters and can be left attached to the steps when folded for travel.

Last — but certainly not least for those who hate cleaning up dirt tracked in by shoes — is the Dirt Destroyer (part # A7603). We installed this unique nylon-bristle brush that can be clipped on or removed quickly without tools; it simply hooks through one of the aluminum arms of the step mechanism. When attached to the side of the Uprising, it provides “solid footing” for scraping dirt and mud off shoe soles before entering the RV. At first we sneered at the need for the shoe-cleaning device, but after a few uses, it’s inherent purpose makes it a “cannot-live-without” add on.