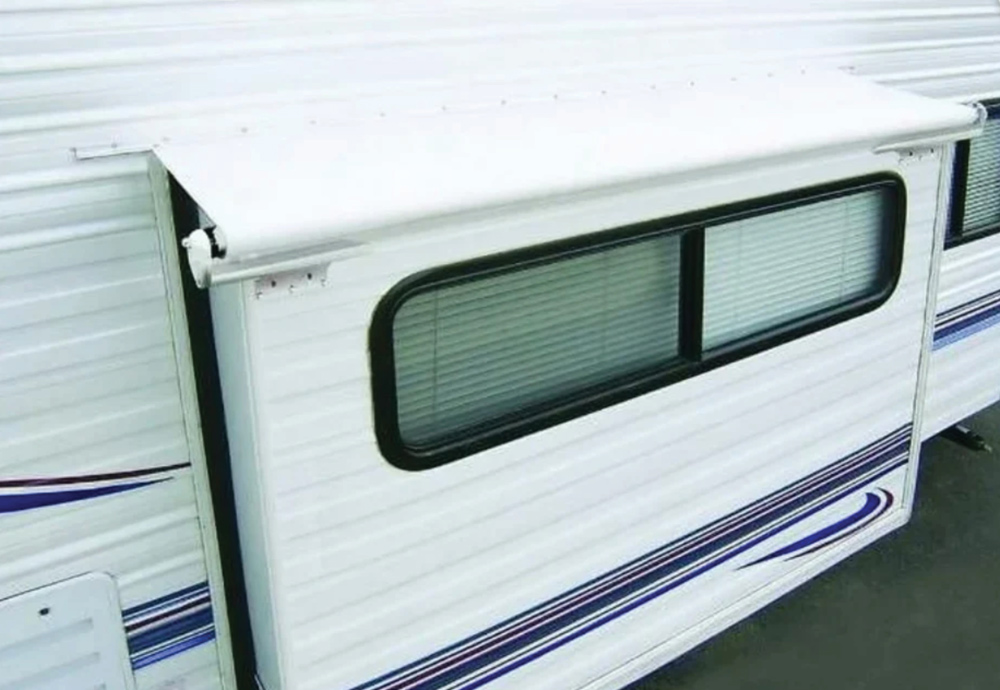
I’m pretty handy and a contractor friend has offered to help me make any repairs. What are your thoughts on replacing the slideout topper fabric and retaining the hardware?
—John Sealman
John, I’ve seen a lot of slideout topper fabric deteriorate during my tenure as a shop owner and it’s good that you’re catching the problem before it lets go and loses the spring tension. The best deal on slideout topper fabric is through Lippert Components (lippert.com); it actually can cut fabric from a roll and offer it at a great price, which you can cut to size.
If want to upgrade, consider material from Tough Top Awnings (toughtopawnings.com). The owners of this company have designed awning and slideout topper fabric after years of camping in high-wind areas in their own RVs. The proprietary pre-sized (based on provided dimensions) fabric is super-strong and a key element is the beading that’s sewn with marine-grade stitching. RV Enthusiast Publisher Bob Livingston replaced the topper fabric on his fifth wheel with this material after his originals were blown off in a windstorm. This fabric is not cheap, but it’s much thicker (so it’s a little more difficult to install). The Tough Top fabric on Bob’s RV has been brutalized for more than three years under fulltime use and is doing fine.
I believe that you can pull it off, based on your DIY level. First, extend the slideouts all the way. You will need a heavy-duty cotter pin, an awl or even a ground-off small screwdriver — something that won’t bend easily. With a person on each side, unroll the topper until you see the aluminum roller tube; there’s quite a bit of spring tension so you will need two hands, for sure. After you’ve unrolled the fabric, you’ll need to install the cotter pin or other tool through the hole in the end cap and the shaft (on either end) to secure the roller tube. You may have to rotate the tube back and forth a little bit to find the through hole.
At this point, you will see a slot in the end cap where you can simply slide the fabric out after removing the screws that hold the fabric in the rail. Slide the fabric out of the roller tube and awning rail at the same time; reverse the process with the new fabric and remove the cotter pin/tool holding the spring from unwinding and that’s pretty much it. If you’re cutting the fabric to size, you may have a little bit more wiggle room; sometimes the fabric shrinks and you can actually widen it an inch or two to get more coverage over the slideout room.
Note: be very careful; there is a lot of tension on that spring so do not attempt to remove one or both of the end caps while the roller tube is under tension.

I hate to spend a whole lot of money on a motorhome that’s not worth very much. Do you have any brilliant ideas?
—Jason Alexander
I do have a procedure that I’ve done many times with pretty good success. Your problem is common and is usually caused by water leaks — probably from rain — that have worked under the Filon and caused swelling. Start by removing the window, which will take two or three people to remove the inside trim ring and then pry the window from the side of the motorhome. You might have to use a putty knife to break the seal. Go all the way around the window to break the sealant loose and the window will come out.
After you’ve removed the window, place a couple of pieces of wood or wedges to open the siding to make sure that the material under the bubble is completely dry. Next, you will need some liquid epoxy to coat the area underneath the fiberglass siding.
This next process is critical! Place a piece of plywood against the siding and position the motorhome so that pressure can be applied to the repaired area. I usually drive the motorhome close to a fence or wall and cut pieces of wood so they can be wedged against the plywood and fence until the glue is dry. This process is rather crude but works as long as you can get to the area that needs to be repaired and keep the wall flat and under pressure during the process.
As far as the other smaller bubble is concerned, try drilling a small hole through the wall and squirt some epoxy in the area with a syringe. Use wood and pressure in the same manner as above to keep the wall flat during the drying process. No guarantees, but it’s worth a try and a heck of a lot cheaper than replacing the entire wall which, obviously, would not be worth it considering the age of the motorhome.
Once the sidewall is dry, replace the window using butyl tape around the window and silicone sealant around the edge of the frame without covering the weep holes.

—Alfredo Garcia
Unfortunately, I have had to deal with this issue on my own RVs as well as those experienced by my customers over the years. Replacing the cable will probably not solve your problem completely; the grit and particles from the liquid and solids in the tank are likely clogging up the valve. The debris drops into the slot where the blade runs in-and-out, and after a while the friction from compacted material makes it almost impossible to pull the cable.
Theoretically, you can remove the valve, clean it, lubricate it and put it back on. However, that fix is probably not going to last long. Considering the extent of the labor and the fact that this is a really dirty job, I suggest replacing the valve with a new one and getting a fresh start. Removing the inner wire from the cable and greasing the entire length will help, but make sure to use a clean grease or lubricant that will not collect gunk or get sticky. Lately, I’ve latched on to Superzilla (superzilla.us), a spray lubricant that does a great job. Once lubricated, pull it out and push it in a few times — while the tank is empty — to make sure the movement is smooth.
The cable is generally secured under a bolt or an Allen set screw at the valve body. Technically, the cable should not need lubrication, but some manufacturers put too much bend in the cable, which causes more friction. The cable is usually around 96 inches long.
— Alex Villanueva
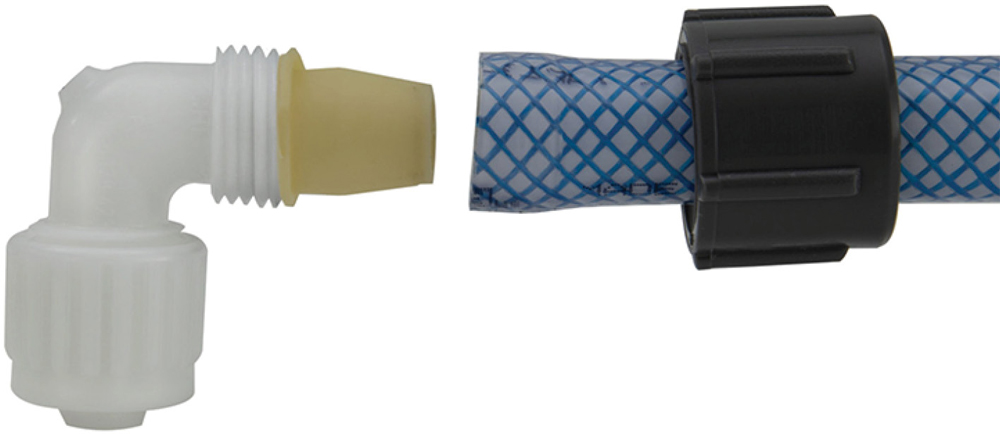
Alex, I feel your pain since I have a fifth wheel with the same bird’s nest of hoses and fittings. Replacing the crimped fittings is only possible if you have a good crimping tool, clamp rings and the special fittings. For most owners, that’s where the problem lies: the tubing seems to be just shoved onto the smooth fitting, which is not the proper way of connecting the two; flexible hose requires barbed fittings. Not only that, but in this configuration from the factory, the crimped rings could become compromised as the tubing stretches enough to allow for leaking water.
A better way fix this problem is to use flexible-hose adapter fittings made by Flair-It. These fittings can be found at RecPro (recpro.com) for $11.95 for a five pack. They are called “Flair-It Hose Insert and Nut for ½” Compression Hose,” SKU RP-06325-5.) These fittings are designed specifically to connect the Pex tubing to the flexible hose and should never let go due to the overall design and latex rubber material in the cones. The company has a video on YouTube to show how it’s done.
Over the years, I’ve replaced hundreds of fittings with Flare-It products and I have never had a problem with them. You just need cutters (like anvil pruners found in any hardware/home improvement store) and pliers to tighten the fitting another ½-turn after snugging with fingers. Flair-It also offers a tool to tighten these fittings.
Bill Gehr