Stop Skirting the Issue
[maghub_sidebar]
Stop Skirting the Issue
closeup of trailer fender skirt on RV
Trailer fender skirts that flop wildly while traveling are sure to take flight someday — or at least crack and become unsightly. Here’s a simple fix using automotive fender bolts and locking stainless-steel nuts.
By Bill Gehr / Photos by the author and Bob Livingston
F

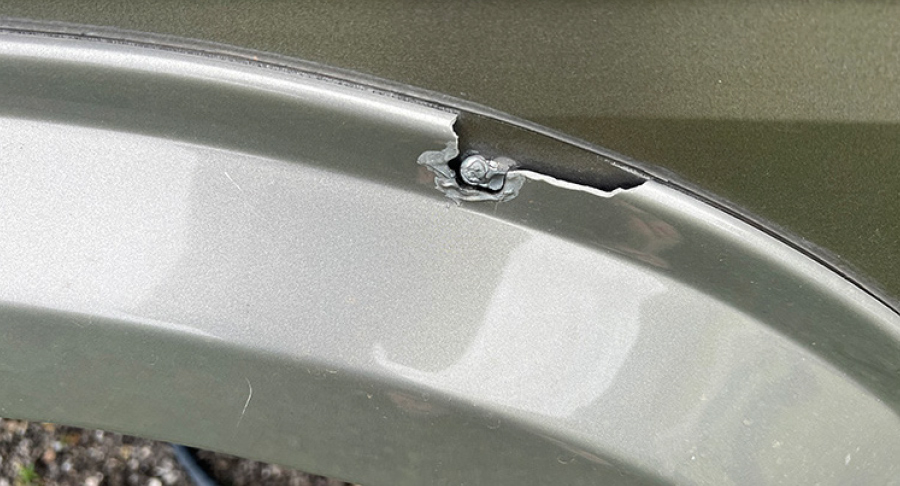
ender skirts that trim out the wheelwells on fifth wheels and travel trailers improve the appearance and actually serve a purpose by keeping road spray under control. However, they are usually made of thin plastic and are screwed in place — leaving a bunch of threads and points exposed on the other side of the lower metal siding. Not only do these screw ends exude an unfinished look, they can rip your skin when working in that area or even trying to wash away road grime.

Likely, these screws are driven by power tools on the assembly line which, considering the thin material, makes it difficult to get a good feel when they are sufficiently tightened — often resulting in overtightening. Many times, self-drilling screws are driven so tightly they distort the plastic and pull the skirt in toward the siding. I’ve seen hundreds of skirts where the screws were even pulled through the plastic. When this happens, it’s only a matter of time before these fender skirts litter the side of the road.

Another issue is the aging of the plastic. Exposure to sun and other outdoor elements weaken the plastic — and their typically flimsy supports become dislodged from constant vibration. When this happens, the fender skirts flop around wildly in the wind created by highway speeds but usually go unnoticed by most drivers. The small screw heads simply cannot hold the plastic in place any longer — and if you’re not scrutinizing the screws and fender skirt constantly, it’s easy to miss early cracking.

close up of self-drilling screws
Self-drilling screws were used at the factory to attach the fender skirt to the lower section of the slideout. This is a crude way to install the fender skirt, but it’s done this way all the time. You have to be careful when running your hand on the inside of the metal slideout skirt to avoid cutting your skin.
closeup of screw heads
These screw heads are smaller and, over time, pop through the fender skirt plastic. Here the cracking was stopped by drilling a hole, but these fender skirts will have to be replaced.
I found an unusual fix for improving longevity of these fender skirts: the use of automotive fender bolts and stainless-steel lock nuts. Fender bolts are easy to find at auto parts stores, but I bought the “Rexka 20pcs M6-1.0 Hex Head SEMS Body Bolts Bumper Fender Splash Shield Under Cover Hood” bolts on Amazon for $10.99. These bolts are painted black, have a 10mm hex head and a 20mm washer. The nuts, too, can be found at most hardware stores, but if you search “binifiMux 35pcs M6-1.0 Nylon Inserted Hex Lock Nuts 304 Stainless Steel Silver” (where do they get these crazy descriptions?) on Amazon you’ll get them for $5.68.

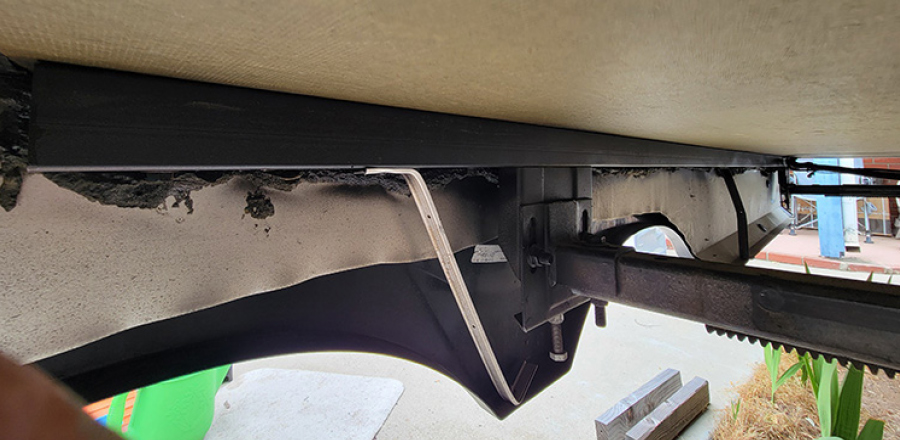
Before ordering the fasteners, I checked access underneath the slideout and other than one screw hidden behind a bracket on each side, the coast was clear. I figured a longnose pliers would have to be used to hang onto the nut when tightening that bolt. The washers spread the load out and locking nuts allowed me to snug the bolt against the plastic without exerting undue pressure — just enough so that the fender skirt can’t move without deforming the plastic.

closeup of failed brackets
Brackets to supposedly prevent the fender skirts from flopping in the wind quickly became road litter as they broke away from their fasteners. Epoxy glue failed to keep the plastic from breaking, rendering this screw useless. Overtightening the screws with a power driver can create similar problems.
original screws being removed
Only a few original screws were removed initially to ensure that the fender skirt would remain oriented properly. Next, the holes were drilled out with a 15/64-inch bit to make way for the M6-1.0 fender bolts. Although the original holes serve as pilot holes, care must still be taken when drilling to prevent cracking.
closeup of hand holding fastener
The fasteners of choice for this project were M6-1.0 automotive fender bolts and stainless-steel lock nuts. These bolts have a 10mm hex head and a 22mm washer, which spread out the pressure around the hole.
bolts being installed with a screw gun set at low torque
We chose to install the bolts with a screw gun set at low torque to prevent overtightening. While this made the tedious job of setting 22 bolts easier, the nuts still had to be loosened slightly and finally set by hand.
It was necessary to drill 15/64-inch holes to allow the bolts to pass through the fender and metal skirts. Rather than take the fender skirt off completely, I pulled enough screws to keep the fender skirt positioned from the factory and installed the new bolts in those locations before proceeding with the others. This saved time and prevented any chance of mounting the skirt off-center. When drilling through the plastic, care was taken not to force the drill bit and crack the plastic. There were already pilot holes from the old screws, so the process went smoothly.

It was a little tricky getting the bolts and the nuts tight enough to prevent distortion of the fender skirt because there were uneven surfaces to deal with and the foam insulation sprayed against the frame to prevent water from getting up inside. A putty knife and a large screwdriver were used to break away some of the foam to make room for a few of the nuts.

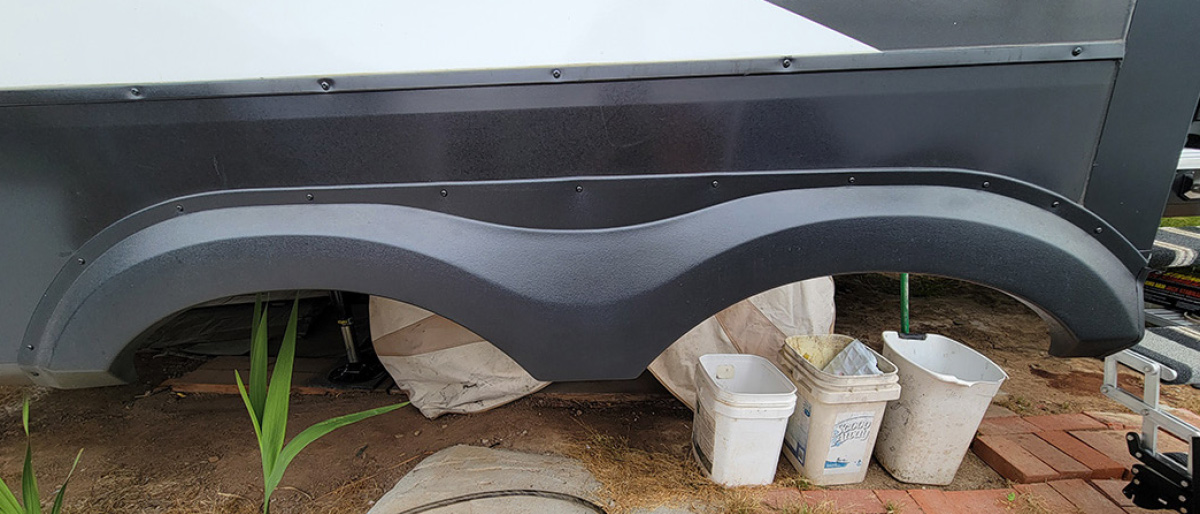
I did use an impact driver (offsetting the tedium of tightening 22 bolts and nuts) to snug the locking nuts, but the driver was set at low torque and care was taken to prevent overtightening. Still, I had to adjust the nuts by hand to make sure they were set properly. (By the way, I had to order more bolts since there were only 20 in the original package.) I don’t think the bolts and the washers are quite as attractive as the small screw heads, but it beats the expense of replacing the fender skirts. While I was at it, I bolstered the fender skirts with additional brackets; the originals were just too flimsy.

Next on the agenda: paint the skirts. The ones from the factory were made from black-color plastic and it seems like a coat of paint will be a good hedge against premature fading and cracking.

closeup of hand holding lip that rests against the lower metal skirt
The lip that rests against the lower metal skirt on the slideout can be easily squashed with too much torque on the new bolts. Sealant is not used between the fender and metal skirts.
closeup of new hex bolts and washers on skirt
The new hex bolts and washers are bigger and less attractive than the original screw heads, but here function trumps form — and no doubt these fender skirts will stay put without damage. The plan is to paint the black fender skirts to protect them from the elements.
closeup of nut blocked by a bracket
Most of the nuts were easy to reach, but one on each side was blocked by a bracket. A longnose pliers was used to hold on to the nut during the tightening process.
closeup of original brackets were made from scraps of molding
As you can see, the original brackets were made from scraps of molding and not very secure. To finish this project, new brackets were added (not shown) to prevent the fender skirt from flopping in the wind while traveling.