What’s on Tap?
[maghub_sidebar]
"What's on Tap?"
Man drinking cup of tap water with clothespin pinching his nose
Pure water is no longer guaranteed, especially when visiting unfamiliar places. Proper filtration and purification systems designed for RVs will keep you safe while controlling noxious odors and taste.
By Bill Gehr and Bob Livingston / Photos by Bill Gehr and Bob Livingston
W

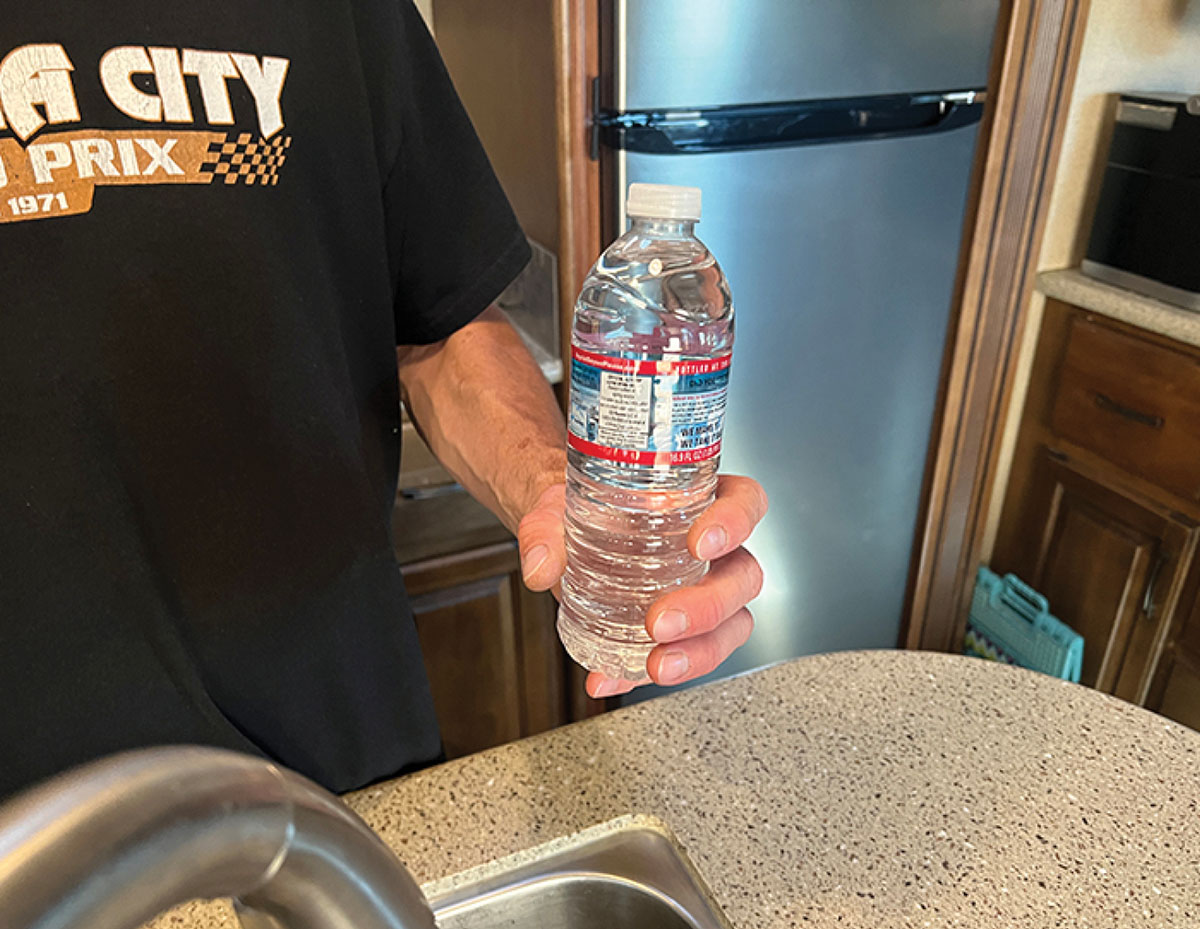
ithout a water system, an RV cannot be self-contained. Water is needed for bathing, cleaning, cooking and, of course, drinking. Many of us don’t drink enough on a daily basis; throw in terribly bad tasting and smelling water and staying hydrated without using a clothespin on your nose can be difficult. No wonder the bottled water industry is so gigantic.

Unfortunately, beyond taste, water contaminated with bacteria, viruses and cysts, to name a few, can lead to medical problems — and such problems can crop up more frequently as RVers embrace boondocking and set up camp well away from campgrounds often fed by city water systems. Fortunately, water purification and filtration systems for RVs have reached new levels in sophistication and conditioning — to the point that even manufacturers are now including effective equipment as standard equipment on some models.

Person holding water bottle
A proper filtration system will do more than deliver quality water to your faucets – it will cut down on the weight, space and expense of having to tote around crates of bottled water.
Why? Because while all water suppliers in the U.S. are required to uphold certain levels of water quality — which theoretically make tap water safe to drink — violations are still alarmingly common. According to a 2017 report by the Natural Resources Defense Council (NRDC), nearly 77 million Americans got water from systems that violated federal protections in 2015. More than a third of this number relied on systems that did not comply with standards put in place to protect public health. For RVers, these concerns may be compounded by a poorly maintained local water supply at an RV park or campground, and/or a spigot that may not be sanitary. With all this in mind, a system that both filters and purifies the water entering your RV would be a smart investment.

While installing effective systems to combat bad water is readily available in the aftermarket, choosing a filtration system that fits your needs will be an individual process — and there are a number of questions that must be answered before designing a system. RVers should calculate how much water will be used during a typical trip and deciding if that water source will be used for drinking and cooking. If you want whole-house treatment, the requirements suggest the use of a larger system. And if you rely on onboard water and/or hookups for drinking, consider embellishing the system with a true purification component.

Having absolutely pure water in an RV is more complicated. Most filtration systems do not offer purification. For many years the go-to system for purification was reverse osmosis, but these systems are expensive, take up valuable space and use a lot of water. Distillation provides the purest water, but having such a system in an RV is not practical — and all the good stuff is stripped out, leading to no taste. Water softeners, meanwhile, only remove calcium, which is the stuff that makes the water hard and leads to clogged faucets and showerheads.

As you might’ve guessed from all this, there is no one-size-fits-all system; assembling a suitable system requires multiple components and careful consideration on how they will be installed, stored and serviced. What you end up with will reflect your needs and how you approach them, but you don’t have to start at Square One — we’ve assembled the most common options used by the RV community to provide insight as to what’s available and what works, from simple filtration systems to soft-water equipment.

RV water filter
Basic inline water filters are best for light-duty use; they can never match the capability of multiple canister systems. Make sure the inline filter contains KDF additives, which will have zinc and copper incorporated into the carbon filter to resist bacteria growth. These filters tend to clog more easily, reducing water pressure.
Person holding a new sediment filter next to dirty used one
A good sediment filter is your first line of defense when using a multiple-canister system. This one from Clearsource removes anything larger that 5.0 microns and has been combined with a rust inhibiting material to help prevent ugly stains. As you can see, this filter has done a good job removing rust and sediment.
In-line Filters
A basic, single in-line filter cannot perform the task that multiple canister systems are capable of, but are an adequate first line of defense. These filters will treat water to a lesser degree and, for some owners, it may be all that is necessary, depending on the water source and how often they use their RV. These types of filters can also be used to fill your water storage tank from a home or campground source, but in many cases may provide a false sense of security.

When shopping for an in-line filter, choose a model with KDF additives. This cartridge will have zinc and copper additives incorporated into the carbon filter that resist bacteria growth. Single, in-line filters are the biggest culprit for diminishing water volume and flow and the problem is compounded as the filter becomes clogged with sediment and particles, so you’ll have to check it regularly. High-quality filtration is not feasible with an in-line filter simply due to its small size. However, these cartridges can help improve taste to a small degree — but will not remove chlorine or other biological contaminants.

Hydronix CB-45-1005 filter
Carbon block filters are essential for removing metals, cysts and other harmful compounds that affect taste. This one, a Hydronix filter (www.filtersfast.com), is designed for larger diameter canisters.
Sediment filters
The best first line of defense against bad water is to use a sediment filter placed in front of filters designed to capture biological contaminants and improve taste. These filters are designed to remove dirt, sand, minerals, metals and other similar contaminants that can create problems with the water. However, smell and bad taste will pass through a sediment filter — and so will contaminants. Every RV should have a quality sediment filter. Most sediment filters will capture sediment bigger than 5.0 microns, which is enough to prevent premature clogging of the other filters down the line. The life of these cartridges is dependent on the amount usage, but generally will need to be replaced when the water flow slows down.

Carbon Filters
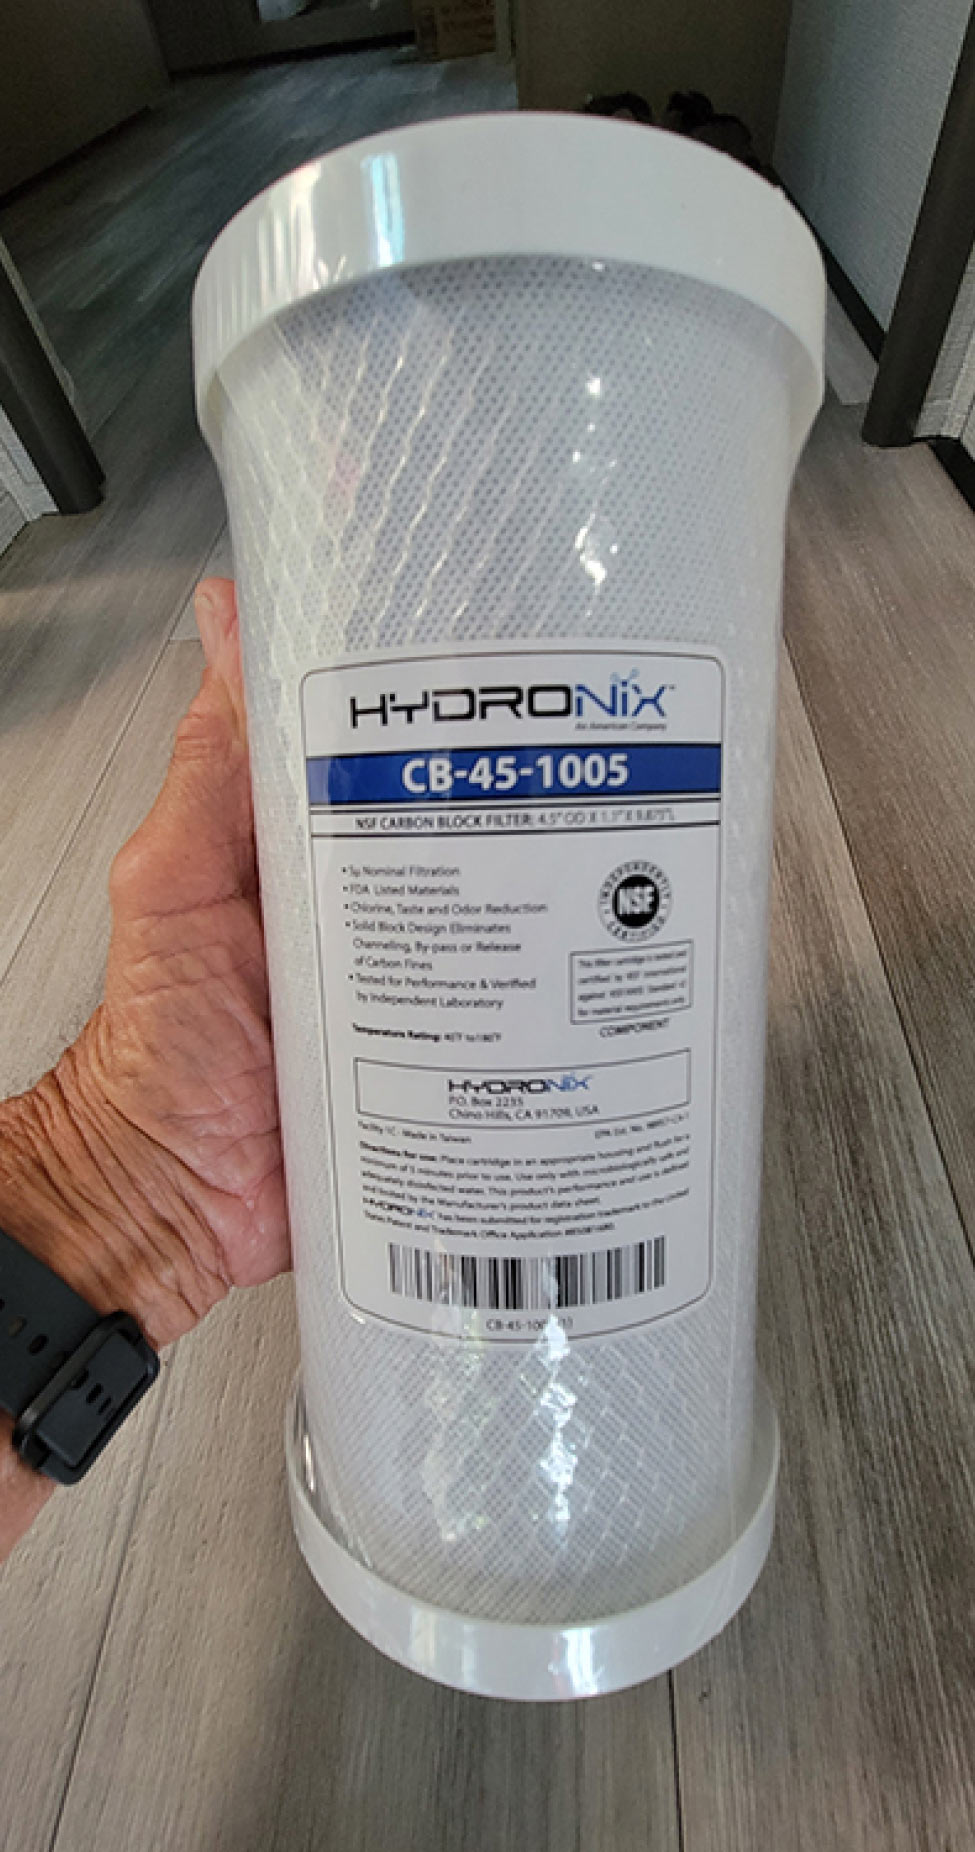
The second filter in a good two-cartridge system should be carbon. It should be rated at minimum 0.5 microns and capable of removing lead, heavy metals and cysts — all of which contribute to bad taste. Carbon filters can either be a solid block or be granulated. Water that’s forced through a solid block of carbon will be stripped of many more contaminants when compared to water that flows in and around granules. Water that flows through carbon will taste better, generally.

Ceramic Filters
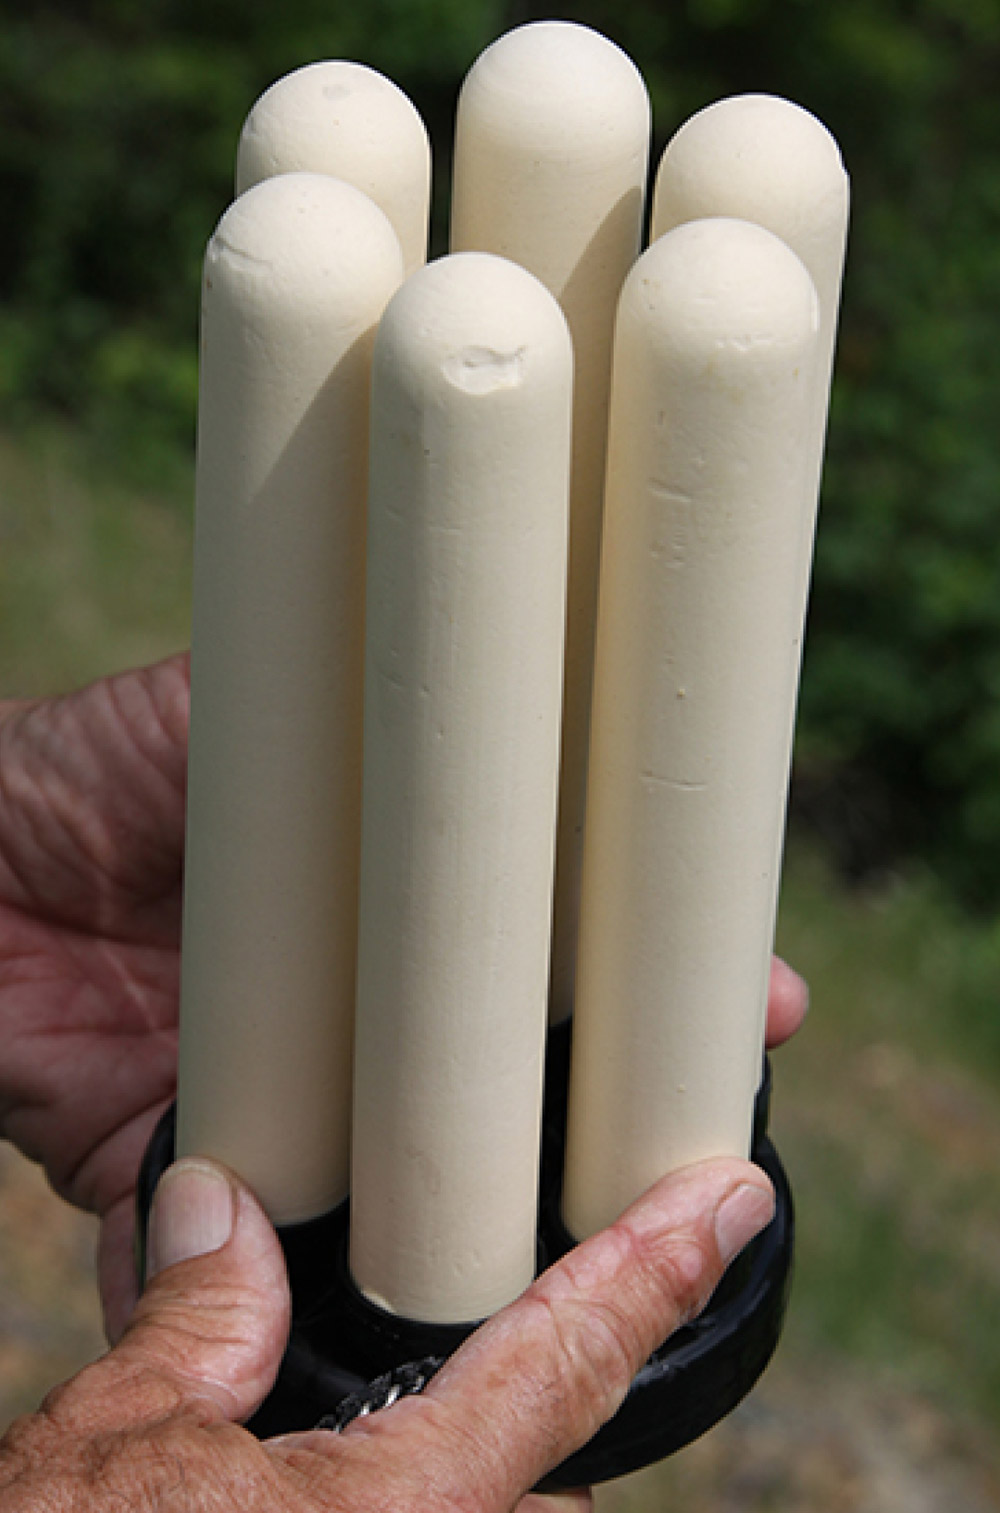
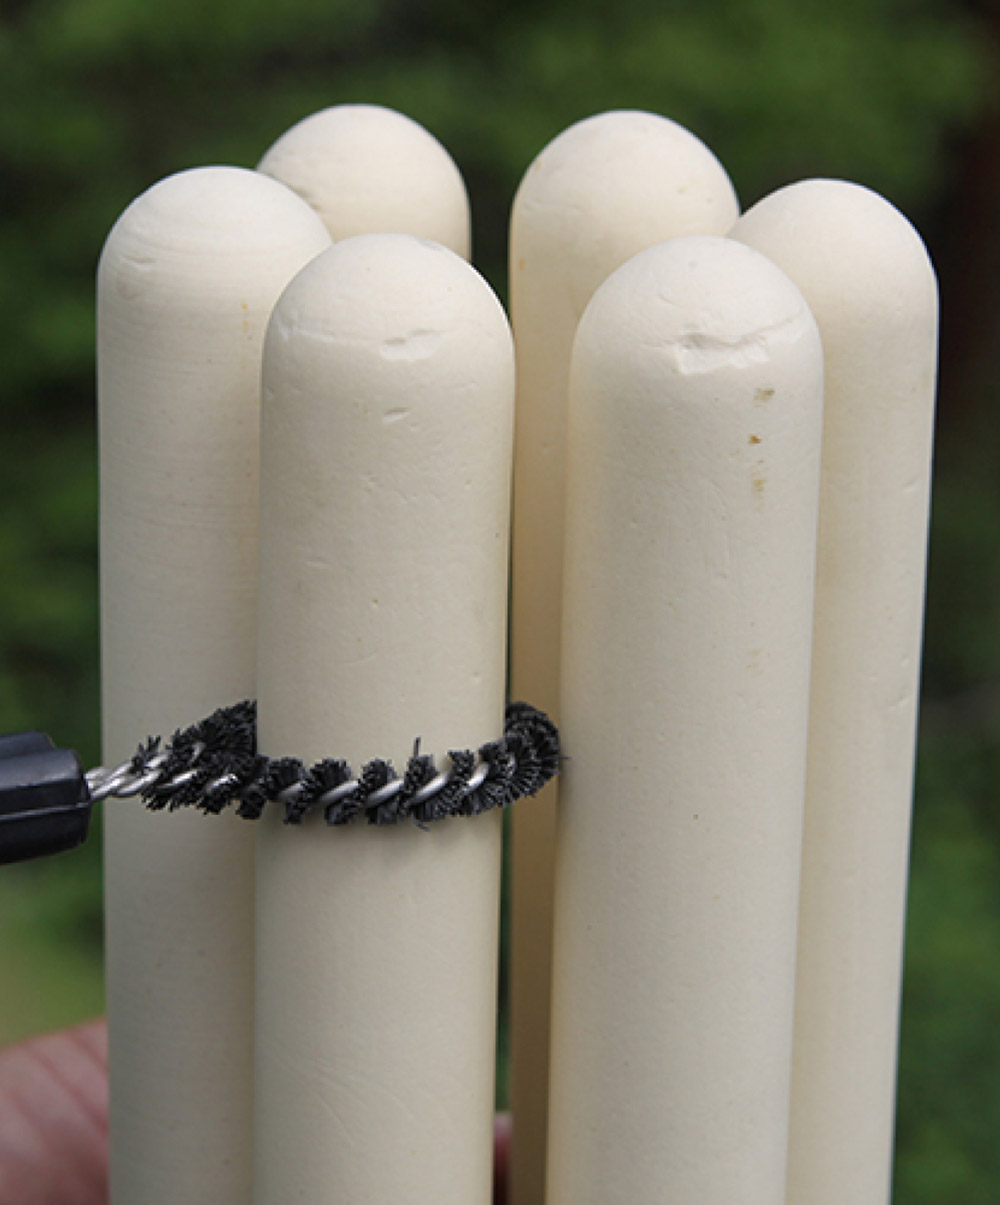
Ceramic cartridges offer exceptional sub-micron filtration (a micron is equal to 1 thousandth of a millimeter). Ceramic filters, in a candle configuration, will remove biological contaminants and chlorine — and they can be cleaned and reused for many years with great success. While there are a number of these filters on the market, the Doulton cartridge (doultonusa.com) is said to be best for purification.

A ceramic filter, used in conjunction with sediment and carbon filters, will provide the good protection against bad water for any RV, even in areas where the water supply is not up to strict quality standards.

Ceramic candle filters
Ceramic candle filter being cleaned with specialized brush
Ceramic candle filters offer exceptional sub-micron filtration for removal of biological contaminants and chlorine; the Doulton cartridge is said to be the best in this category and can be used in conjunction with sediment and carbon filters. They can be cleaned multiple times over many years with a brush designed for this purpose.
The Right Canisters
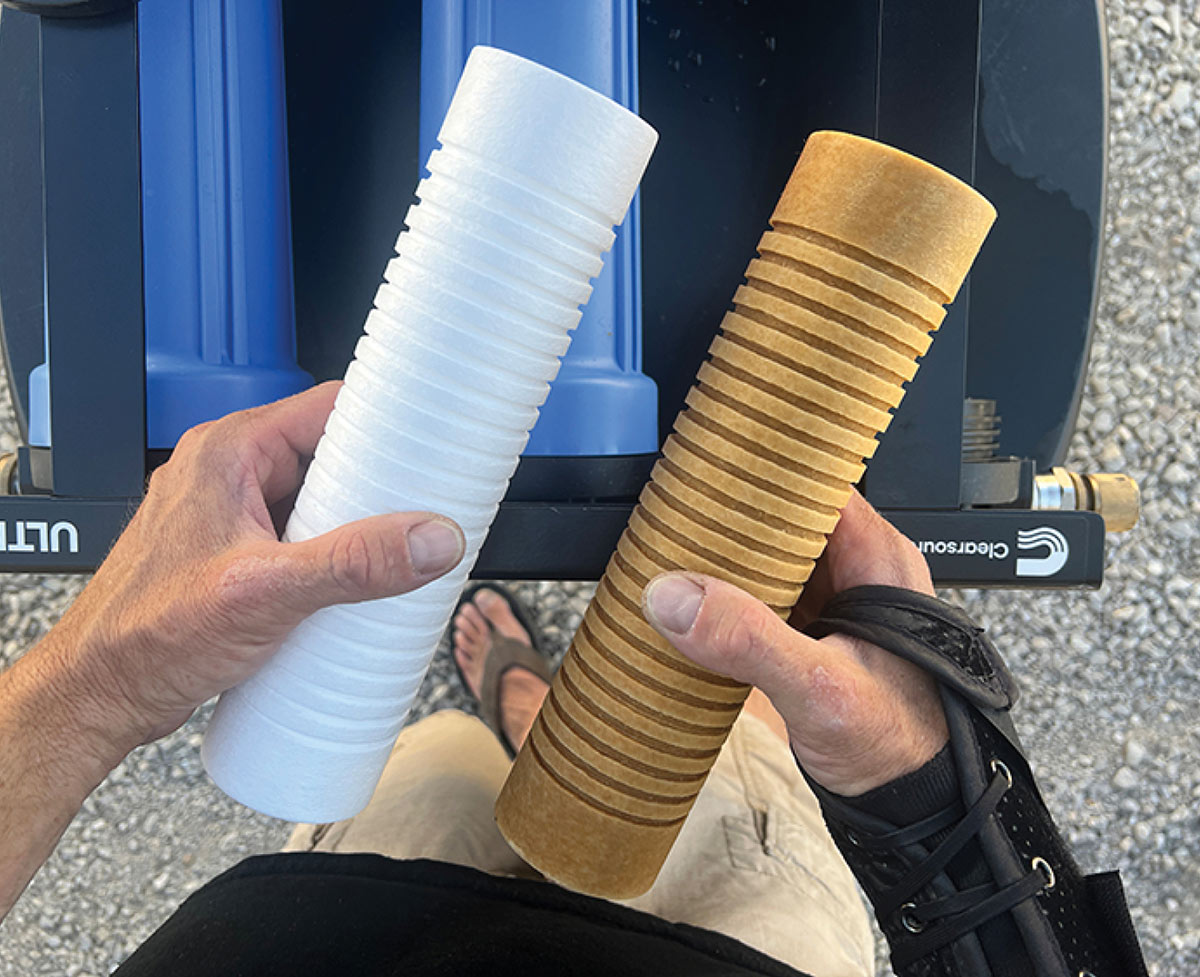
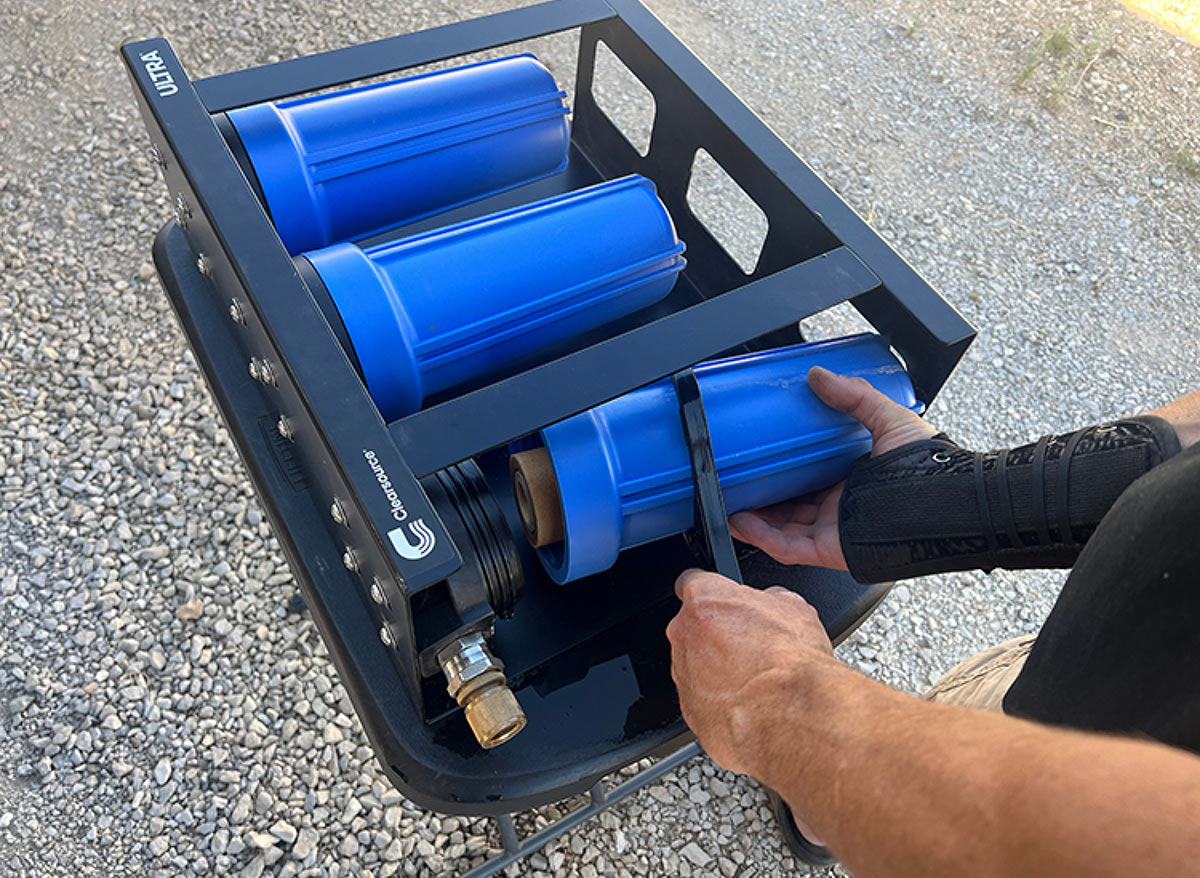
Standard or jumbo canister type systems are typically found on the market. The standard 10-inch versions are available at most home improvement stores, online, and at Camping World and RV supply stores. These are generally the most popular models used by RVers and companies like Clearsource (clearsourcerv.com) offer high-quality mounting systems. A basic, single standard canister can be used with a sediment or a carbon filter, but in today’s world does not do enough to treat water. A double standard canister system can be equipped with the sediment and a carbon filter or even a hybrid ceramic/carbon block filter.

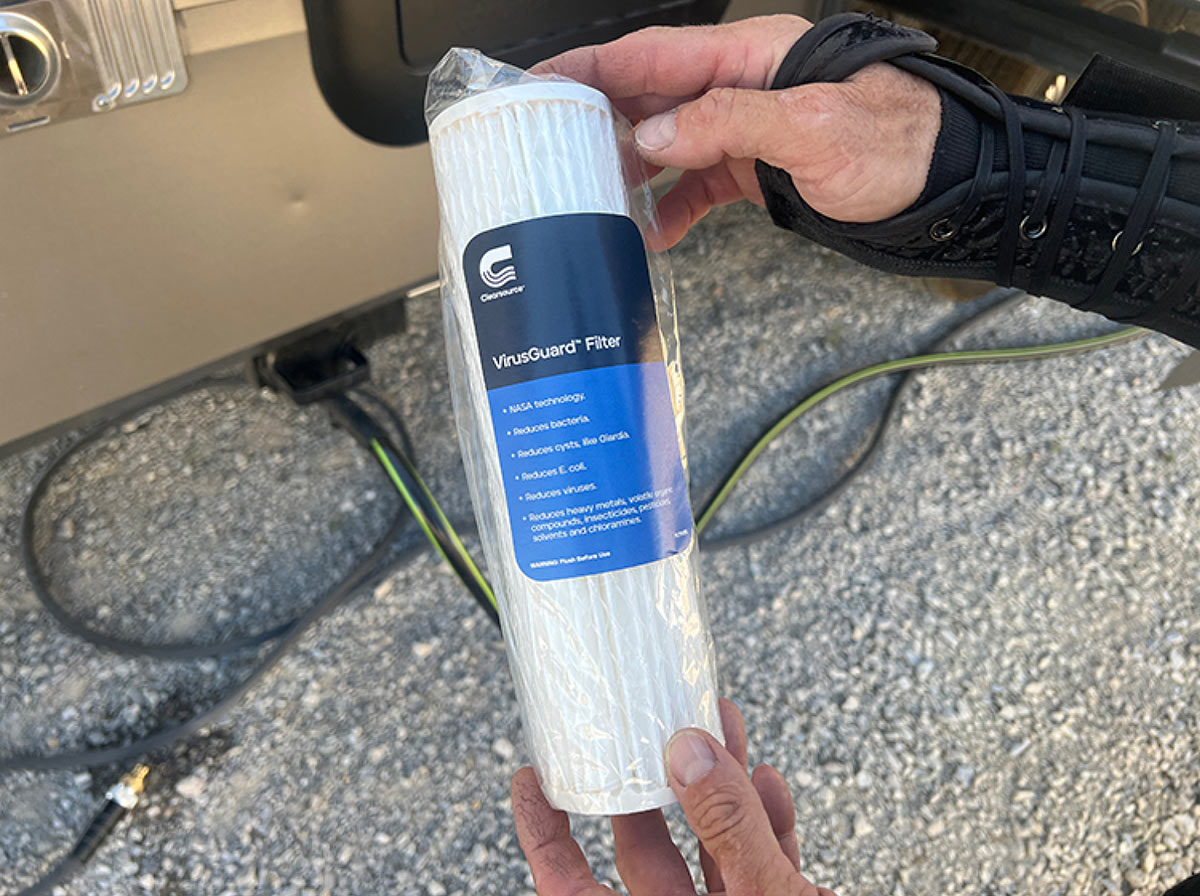
Full timers, or those who spend long periods of time on the road, should consider larger systems like those offered by Clearsource. The company has upgraded its two-cannister system to a Premier system ($399.99). This newer version features a first-stage 5.0-micron coconut shell carbon block that removes sediment while reducing or even removing volatile organic compounds like insecticides and pesticides, as well as solvents, chlorine and chloramines. The second, 0.2-micron filter traps bacteria, cysts, Giardia and E.coli—the stuff than can make you sick.

Clearsource two-canister Premier filter system
The Clearsource two-canister Premier system features a first-stage 5.0-micron coconut shell carbon block that removes sediment and nasty compounds and a 0.2-micron filter that traps bacteria, cysts, Giardia and e-coli.
RV Enthusiast Publisher Bob Livingston upgraded to the three-canister Clearsource Ultra system last year ($499.99), which is even more effective. This three-canister system, like the Premier two-canister model that Livingston used for many years, has a solid, powder-coated metal housing and stainless-steel fittings. It’s only 3 ¾ inches longer and a little heavier, but the filter combination offers the utmost in protection. The first stage has a 5.0-micron filter than does a very good job of reducing rust and sediment, thereby preserving the integrity of the hoses and fittings and preventing deep staining on the toilet bowl and sinks. A 0.5-micron coconut shell carbon block filter occupies the second stage canister and it improves water taste and smell, while also controlling sediment and removing bacteria, cysts, petrochemicals, mercury, lead, pesticides, chorine and cryptosporidium.

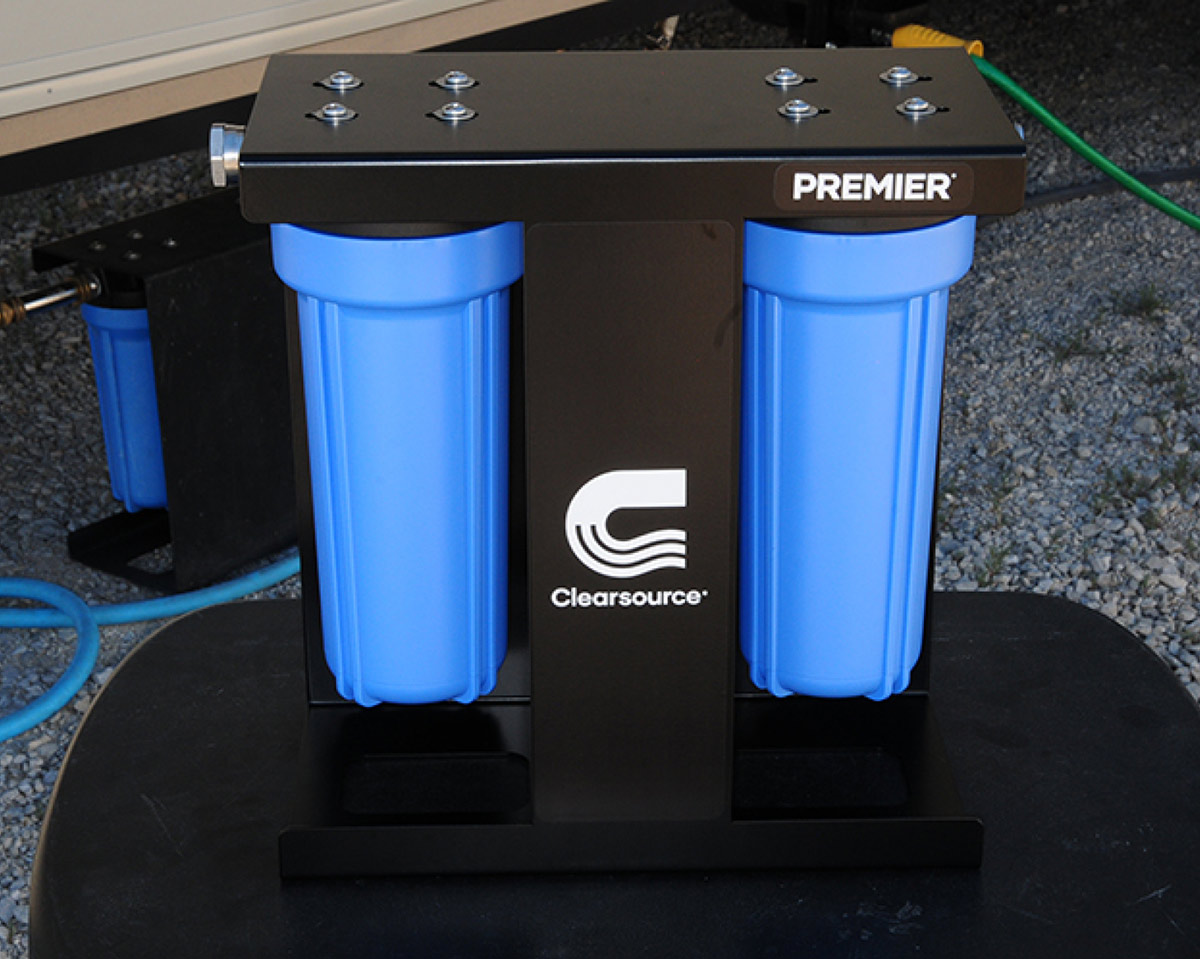
The technology for the system’s third-stage filter, under the VirusGuard nameplate, was developed by NASA and offers advanced protection tantamount to that found in survival and exploration-grade water purification systems. This filter is certified to remove/reduce bacteria like E.coli, cysts like Giardia, and most importantly — and uniquely — viruses. We all can relate to that these days.

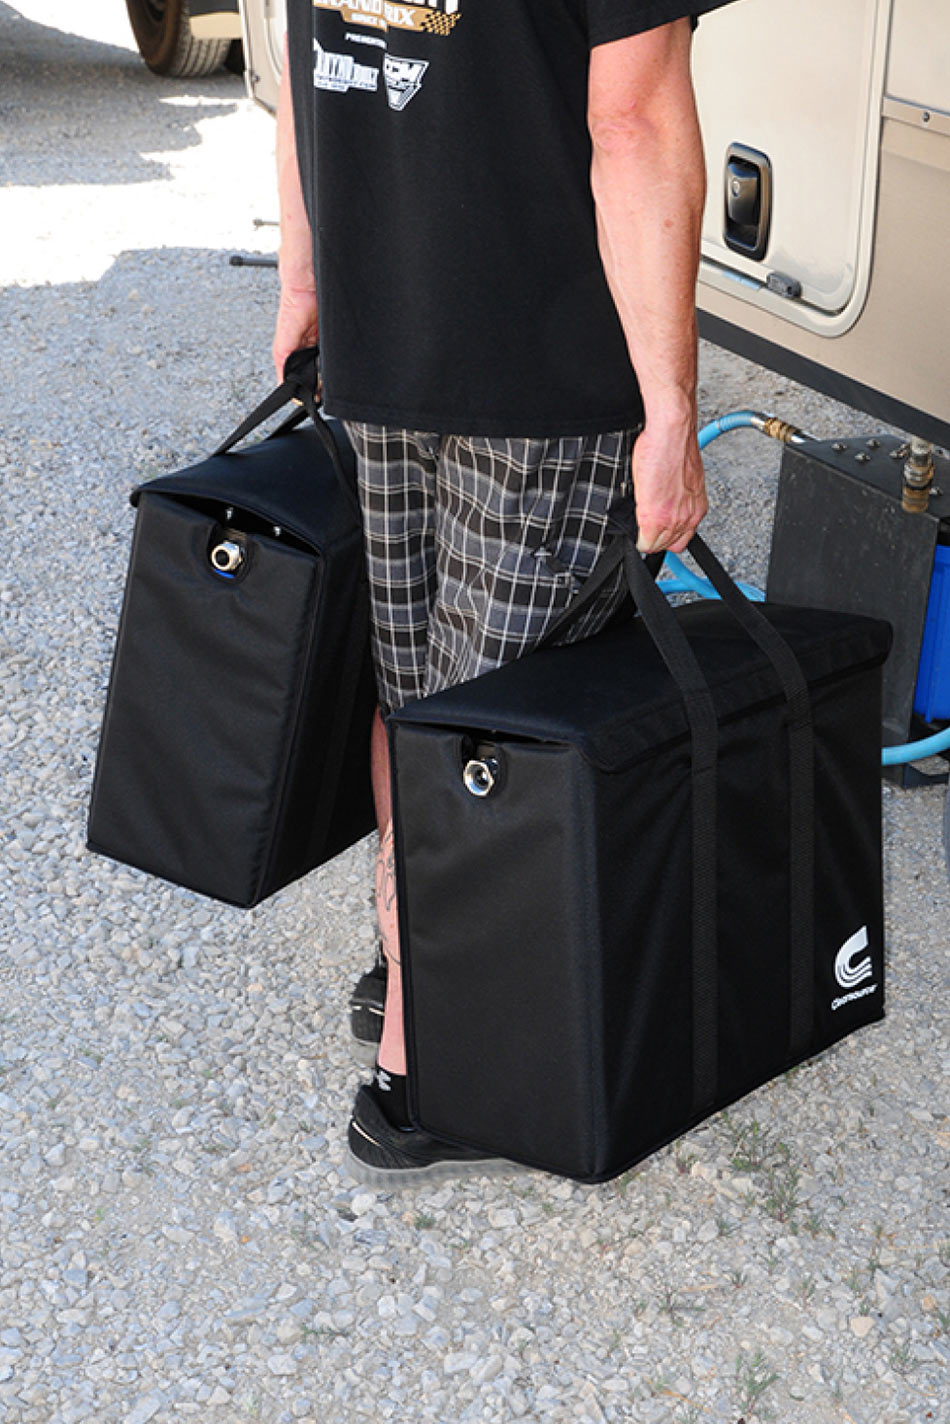
There’s also a WeatherGuard Pro insulated and heated tote ($299.99) that will prevent water freezing down to 10 degrees F. It automatically turns on (120-volt AC power) when the internal temperature drops to 40 degrees F, turning off at 60 degrees F. Specific size totes work with the two or three-canister systems and double as a convenient carry bag. WeatherGuard totes without the heat function are available for both systems ($150). This tote has proved to be invaluable when it comes to handling the filter housing and keeping the components clean.

Clearsource three-stage Ultra filtration system
Clearsource VirusGuard filter
This three-stage Ultra system from Clearsource, is only 3 ¾ inches longer and a little heavier than the Premier model, but uses a 5.0-micron, sediment/rust inhibiting filter followed by a 0.5-micron coconut shell carbon block filter which improves taste and smell while also removing bacteria, cysts, petrochemicals, mercury, lead, pesticides, chorine and cryptosporidium. The third stage has a NASA-developed VirusGuard filter that rivals exploration-grade water purification — certified to remove/reduce bacteria like e-coli, cysts like Giardia and, most importantly and uniquely, viruses.
If size and weight are factors, Blu Tech (goblutech.com) is a viable option. Over the years the company has developed a line of 5-inch, three-filter systems that are housed in a high-tech package that weighs as little at 7.8 pounds with much smaller frame dimensions. The AR3 Adventure Series is the latest iteration; it has an aluminum frame and uses a 2.0-micron Longevity/sediment filter, a high-flow 0.2-micron filter for particle reduction and a “TASTY” filter with granulated activated charcoal to improve taste. It retails for $499.99 and includes a carry bag. The company also offers the ARX+ four-stage filtration system that is designed for adventurers who can access nearby water from natural sources (river or lake) and want to spend more time in the outback.

The Blu Tech ARX+ features an onboard pump that can draw 3 gallons per minute up to 6 vertical feet with no pressure drop. A 25-foot stainless-steel hose is fitted with a 500 mesh (20 micron) prefilter followed by a 2.0-micron sediment filter; the pump operates on a standard M12 cordless-tool battery with enough capacity to pull 90 gallons of water on a single charge.

A key element for this backcountry set-up is an electro-absorbity, 0.2 micron High Flow Off-Grid+ filter that is combined with a carbon block able to remove up to 99.99% of the bad stuff, while improving taste. The system has a unique carrying case for use without removing the unit and a 12-volt DC/120-volt AC charger ideal for solar integrations. Blu Tech’s new systems will be available sometime in August or September.

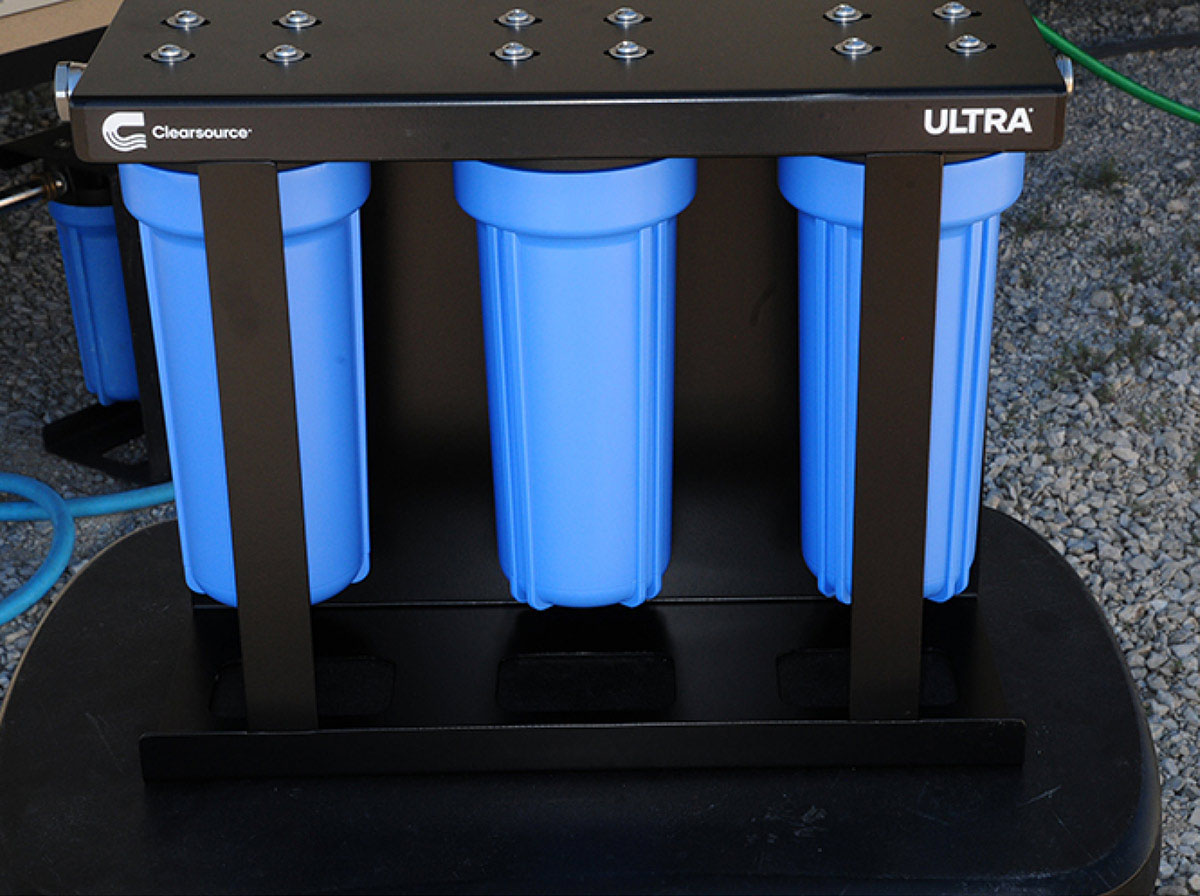
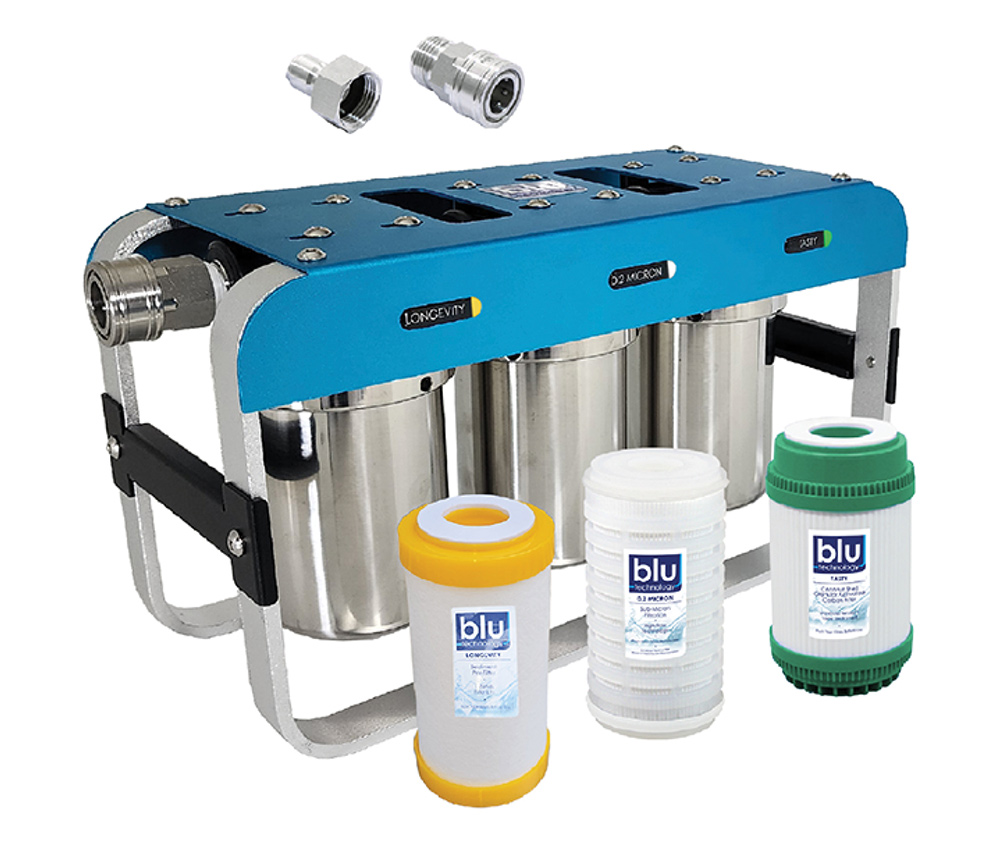
Since water quality is a big topic these days, there are many filtering/purifying systems for RVs on the market. Always look for carbon filters to remove chlorine and bacteria and improve taste. Keep in mind that most systems will not purify the water; filters with purification provisions, like the Clearsource Ultra, will ensure safe drinking water.

Multiple Clearsource replacement filters
Clearsource replacement filters for its two- and three-stage systems can be purchased in a kit form. They are readily available online.
Another system, the Acuva ArrowMax 2.0 (acuvatech.com), is dedicated to purifying water for drinking purposes by using ultraviolet (UV) and LED technology and is engineered to remove 99.9999% of bacteria and viruses lurking in water (see sidebar). The control box operates on 120-volt AC or 12-volt DC power (depending on the model ordered) and is tied into an advanced prefilter. The control box and filter are typically installed under the galley sink where the water line can be easily tapped into the cold side of the faucet and dispenses water through a “smart” faucet that’s usually mounted at the kitchen sink. This faucet has a ring light at the base that shows when the purification process is active. It’s sells for $600, which is a sizable investment, but the peace of mind knowing that the water is safe to drink is worth the money.

Soft Water
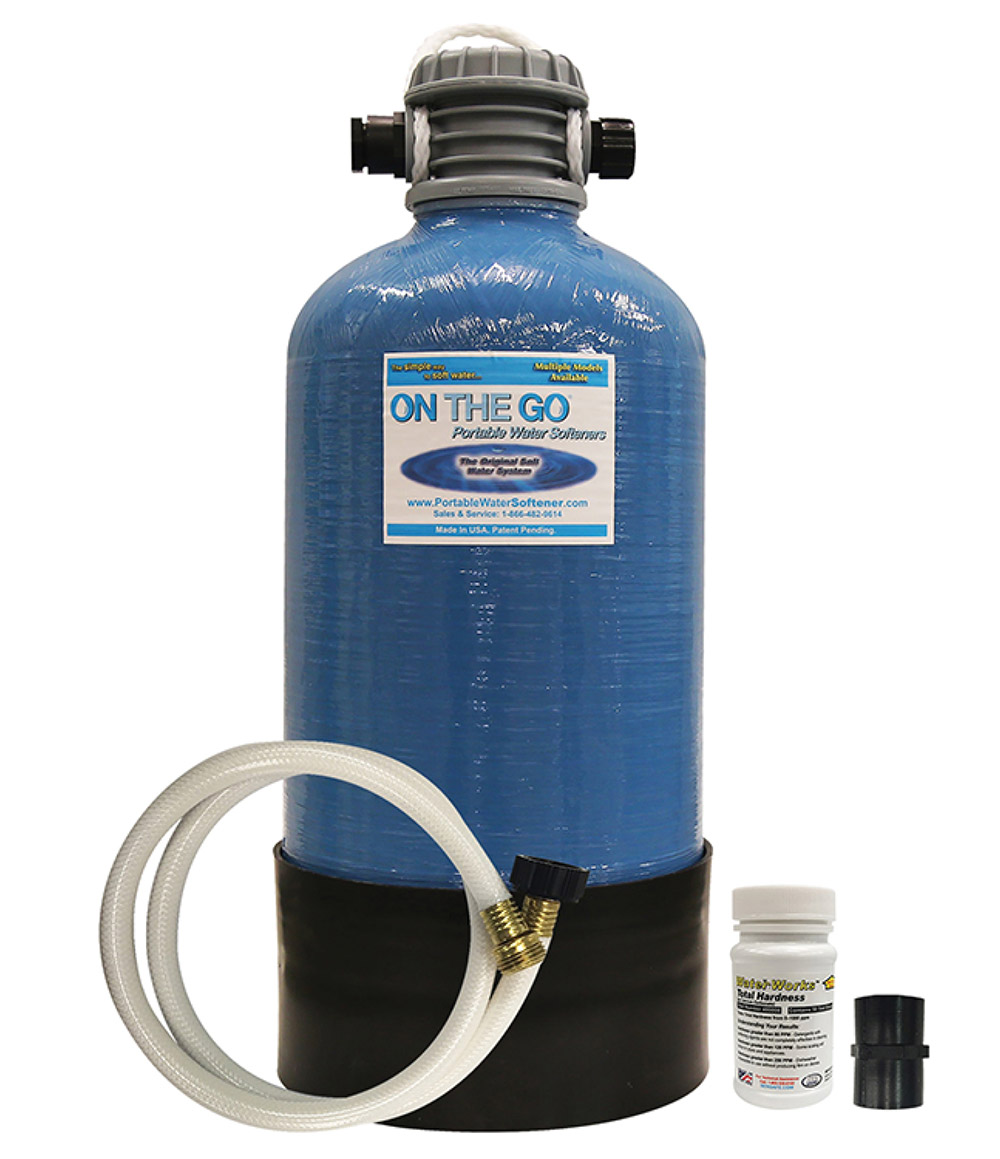
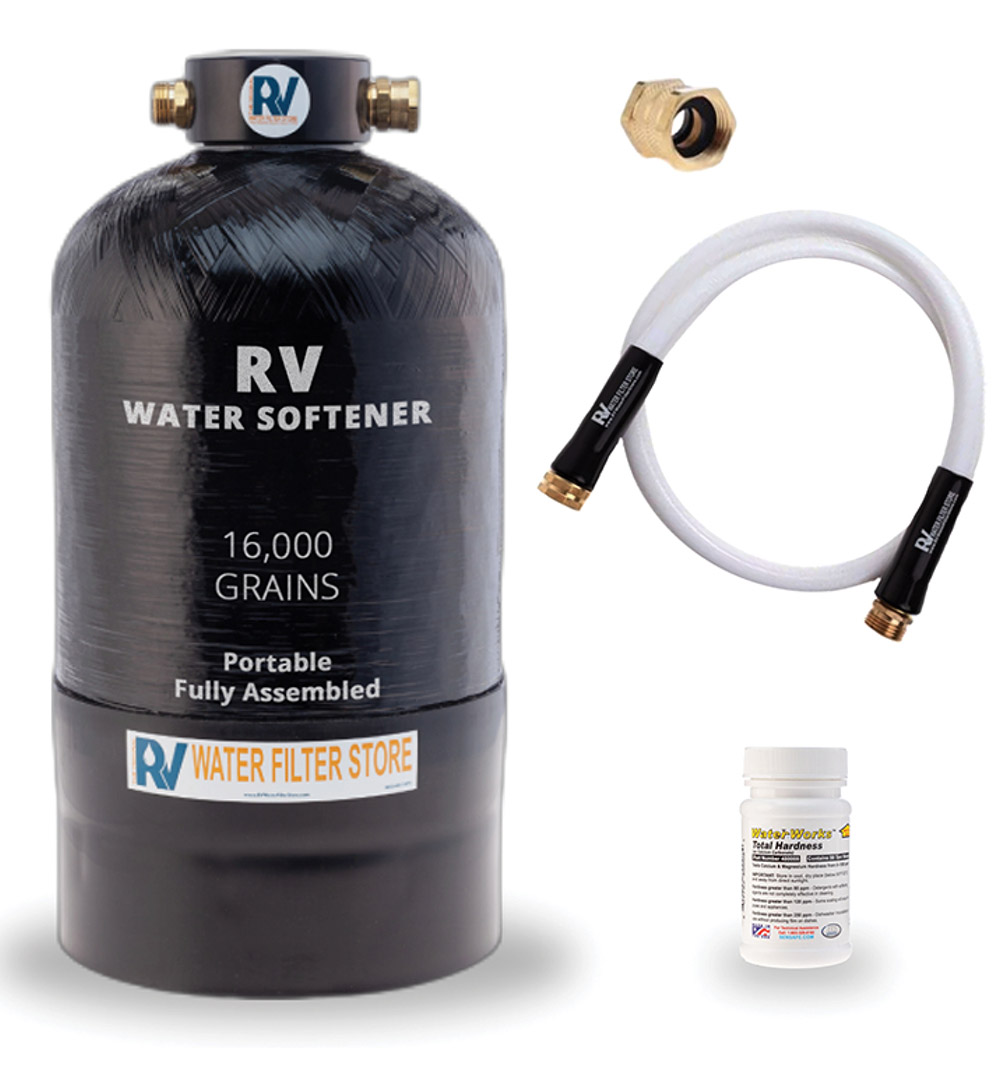
Hard water is the nemesis of any RV system, leaving caked-up calcium deposits that not only restrict the flow but can actually damage faucets, connectors and even pipes. Preventing the build-up of scale in an RV is typically accomplished with a water softener that uses salt, much in the same manner as a residential unit, which is usually too big for an RV. One of the most popular portable water softeners specifically designed for RVs is the ON THE GO cannister system (portablewatersoftener.com) that can be connected to the water system in minutes without the use of tools.

The ON THE GO water softener is packaged in a telltale blue cannister that’s commonly seen in RV parks; it’s a staple product among many full timers. The Double Standard model is best suited for those who spend more time in their RVs, while the Standard counterpart will likely suit more occasional users. Both units are touted to supply at least 20 days of soft water but that number is a moving target, subject to the level of water hardness; the harder the water, the fewer the gallons. Nevertheless, the Double Standard, which supplies double the soft water over the Standard unit, is rated to soften 1,600 gallons of water.

Providing soft water is accomplished through the regeneration of common table salt in about 15 minutes during the charging process. These softeners require backflushing, and the parts needed to do it are provided. ON THE GO water softeners are available online and at most RV supply stores; plan on paying in the neighborhood of $250-275 for the Double Standard. The ON THE GO can also be packaged with a Clearsource filtration system. At 22 inches high with a 9.5-inch diameter, the Double Standard requires sizable storage space.

There are other water softeners for RVs on the market, and the Essential RV Water Softener, with similar specifications as the ON THE GO Double Standard model, is very popular. A good source for the Essential RV Water Softener is the RV Water Filter Store (rvwaterfilterstore.com), which carries a large selection of filtration products. Blu Tech also offers a stainless-steel water softener that is smaller and suitable for shorter trips.

Clearsource rust inhibiting filter
When camping in areas with bad rust problems, consider using a Clearsource Rust Inhibiting filter in a separate 10-inch canister before the other filters. A canister and necessary fittings (not shown) can be found in home improvement/hardware stores.
Taking a different approach is the NaturalSof NS-RV Water Conditioner (rvinGenuity.com), which uses no salt, chemicals or power to provide soft water and prevent calcium build-up. To some owners, this may look like “snake oil” because the simplicity of a 3-inch, tube-style device (plus fittings) that simply connects inline via standard hose fittings doesn’t appear to be robust enough to do anything. But it does, using a proven catalytic process through a metal core that agitates flowing water and conductively changes the molecules of calcium from a bonding type of crystal, called Calcite, to a spherical, non-binding molecule, called Aragonite. When this happens, calcium flows through the system, without forming hard limescale on faucets and in appliances.

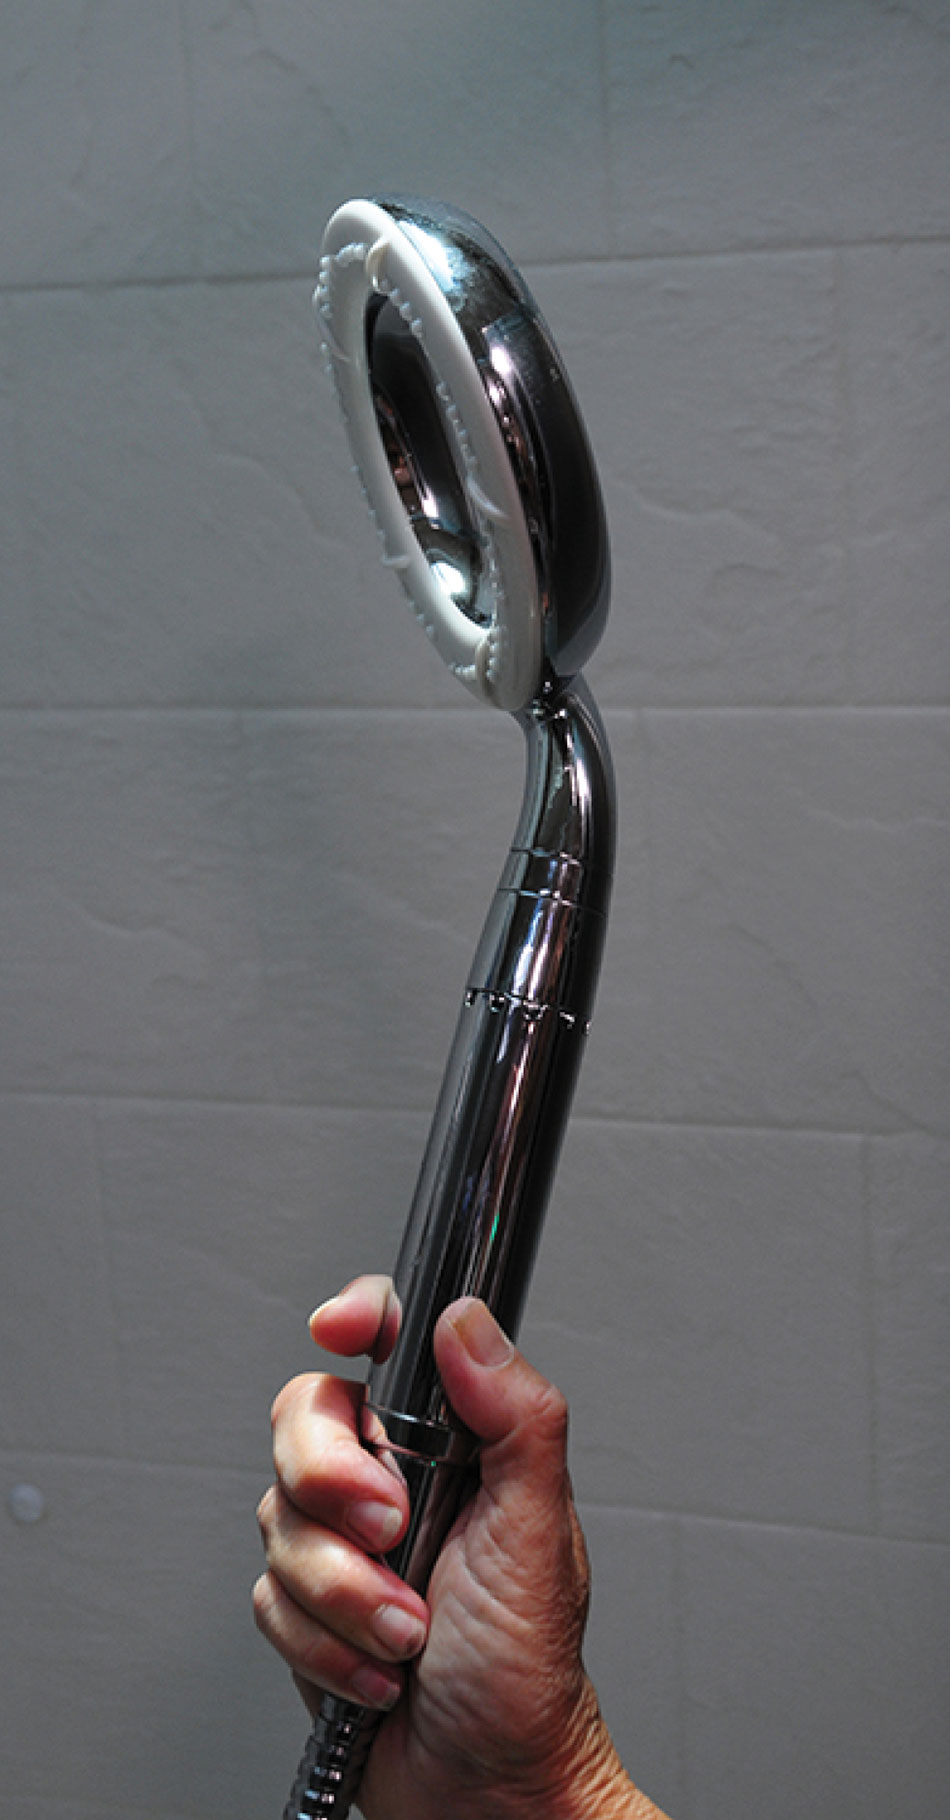
It sounds too good to be true, but it’s the same process used in the Ecocamel (ecocamel.com) Orbit Soft Water Shower Head, which prevents calcium build up and improves water softness. Livingston has been using the Ecocamel shower head for years and has also tested the NaturalSof device extensively. Testing revealed that the calcium build-up had been knocked down substantially; over a long period of time, a small amount of calcium, though, has built up on the end of the water-purifier faucet. The water also feels softer and there’s no issue about the presence of sodium in the drinking water, which is controversial. Some experts feel that drinking soft water treated with salt presents health issues; other disagree.

The NaturalSof device sells for $425, but the company claims it will last, with no maintenance requirements, for 15 years.

Removing filter with filter wrench
Filter life is dependent on water quality and usage. When the water pressure slows down, it’s time to replace the filters, which is an easy task. A filter wrench is provided with the Clearsource kit, which is used to release the canisters from the housing. Two things to remember: Make sure you retain the O-ring and don’t overtighten. If the canister will not seat freely, the filter is not in the proper position.
Making the Connection
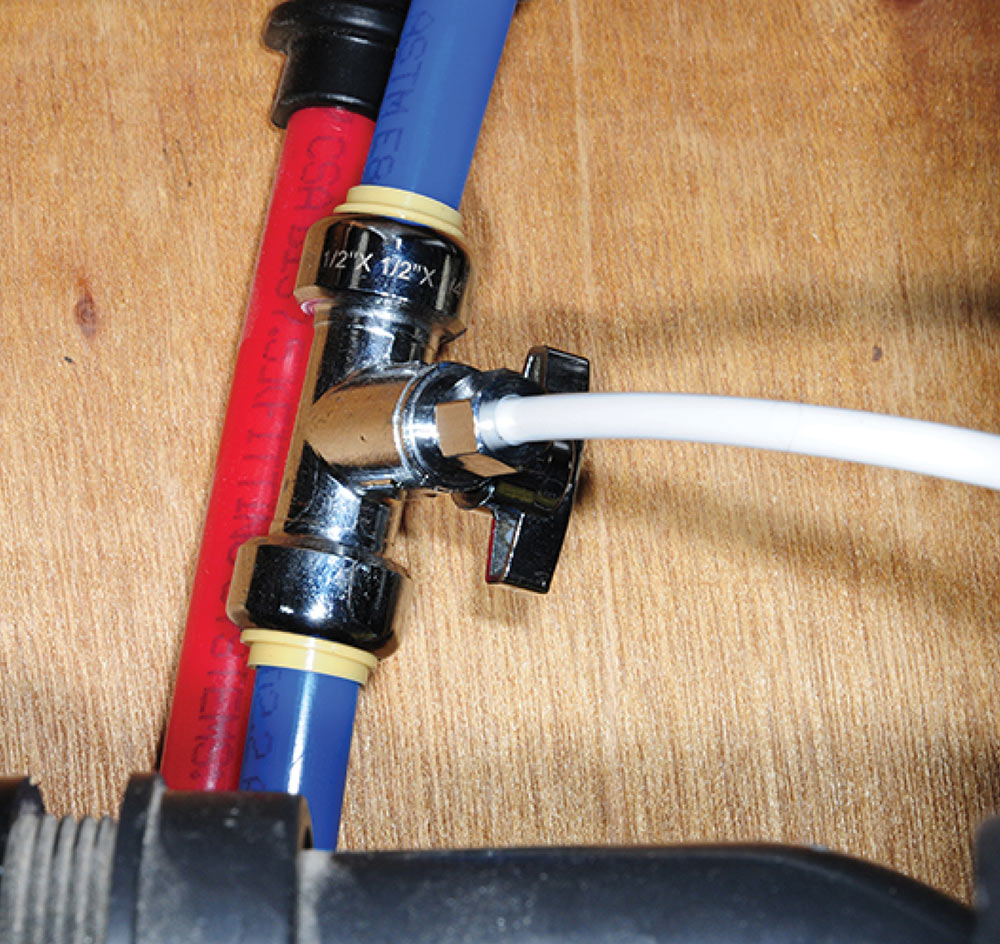
When setting up a system for an RV, most owners position their filters outside, in-line with the water hose. Standard, ¾-inch brass fittings make hookup simple, and the use of good-quality quick connectors will add convenience to the process. Many users build boxes or supports to hold the filters upright, which can be done by modifying milk crates, buckets or anything similar. While this keeps the filters off the ground, it’s not necessary; most filters will do just fine lying on the ground in a horizontal position.

Protection from direct sunlight is more important, however. Filters that are shielded from the sun will last longer and resist growing algae and other similar stuff inside that can plug the cartridge(s) prematurely. This can easily be done by placing the filters under the RV when in service, by building them into a compartment or by placing a cloth or sunscreen material over the filter housings. While it’s best to drain the filters prior to breaking camp, this is not necessary except to keep water from running all over the compartment. Rinsing and drying the canisters and filters before storing the RV is a worthwhile practice.

Tip: Install a strip of masking tape on the canisters and write the date the filters were last serviced. It’s best to service the filters before the water flow becomes too restricted.

When shopping for any type of water filter, check for the National Sanitation Foundation certification (NSF). The NSF thoroughly tests filters for flow rates, chlorine removal, taste, odor and particulates. For example, a Class I filter can remove 75% to 100% of chlorine. A Class II removes 50% to 75% and Class III will remove 0 to 50% of the chlorine. To test chlorine-removal effectiveness, we visited an RV park where the chlorine smell was exceptionally strong, rendering the water almost undrinkable. After running the water through the Clearsource Ultra three-canister system, the smell was gone and the taste was as good as that from purified bottled water.

Person holding two WeatherGuard totes
WeatherGuard totes from Clearsource not only keep the two or three canister systems clean, they double as convenient carry bags. The WeatherGuard Pro insulated bag ($299.99) even has a heating element that will prevent water from freezing down to 10 degrees F. It automatically turns on (120-volt AC power) when the internal temperature drops to 40 degrees F, turning off at 60 degrees F. If you don’t frequent cold areas in winter, the WeatherGuard tote without the heat function is very convenient.
By employing the right filtration system, not only will you have the confidence that the water is safe — regardless of region and source — but you can save weight, space and costs. Think of how many bottles you would have to buy and store to supply enough drinking water without having to run to the market every couple of days.
Blu Tech 3 stage filter
If you’re looking for a more compact and lighter filtering system, Blu Tech has some good options. The high-tech-looking AR3 Adventure Series housing employs three, 5-inch filters, weighs as little at 7.8 pounds and has a smaller profile. The system has a Longevity/sediment filter, a high-flow 0.2-micron filter for particle reduction and a “TASTY” filter that uses granulated activated charcoal to improve taste. The ARX+ four-stage system includes a cordless pump (operated on standard M12 battery) and a 25-foot hose with filters to draw water from natural sources (river or lake), providing longer stays on primitive sites with nearby water. Its key element is an electro-absorbity, 0.2 micron High Flow Off-Grid+ filter that’s tied to a carbon block filter to improve purity and taste.
TDS-3 hardwater tester in small cup of water
Hard water can lead to ugly calcium build-up and water-flow issues. Water hardness can be tested with a meter, like the TDS-3 model shown here. These meters can be purchased for usually less than $15 on Amazon. Extreme hardness was indicated in this sample taken from well water. Hardness scales can be found easily online; any value over 120 ppm is considered hard and needing treatment from a soft-water device.
"ON THE GO" soft-water tank
ON THE GO soft-water tanks use common table salt to treat hard water. It requires backflushing and recharging, which can be frequent for full-timers. The Double Standard model is best for most RVers.
"ON THE GO" RV water softener
Like the ON THE GO Double Standard water softener, the Essential RV Water Softener can be hooked up quickly and easily, and requires no power to operate.
NaturalSof NS-RV Water Conditioner components
A departure from salt regeneration water systems is the NaturalSof NS-RV Water Conditioner, a 3-inch inline device that uses a catalytic process through a metal core that prevents calcium from bonding. In other words, the calcium remains suspended and flows out with the water. It’s not cheap but eliminates the use of salt and backflushing — and also requires no power.
Ecocamel Orbit Soft Water Shower Head
The same catalytic process employed in the NaturalSof device softens water flowing through the Ecocamel Orbit Soft Water Shower Head, which prevents calcium build up and improves water softness.
Ceramic and carbon filter housings under RV sink
Canisters for a non-whole-house filtering system can be mounted under the galley sink and plumbed into the cold-water side of the faucet. For this system, ceramic and carbon-block filters treat drinking water, and since a separate spigot was not installed, cold water flows through the galley sink faucet. A piece of painter’s tape with the filter install date was placed on one of the canisters as a reminder to clean the ceramic candles or replace the carbon block filter cartridge.
Tripping the (Ultraviolet) Light Fantastic
Person filling cup from tap
Acuva Technologies’ ArrowMAX 2.0 UV-LED Water Purifier and ‘Smart’ Faucet delivers virtually pure water to your galley
By Chris Hemer
While water filters catch small particles, a purification system kills bacteria, viruses and other pathogens. Two common purification methods include ozone and LED UV light treatments, both of which are generally claimed to be up to 99.99% effective at removing bacteria, viruses and cysts like cryptosporidium and giardia.

Ozone treatments work by oxidizing the organic material in bacterial membranes, which weakens the cell wall and leads to cell rupture, causing immediate death of the cell. As an oxidizing agent, ozone is stronger than chlorine and has a kill rate that is more than three times faster — but ozone purification systems aren’t terribly practical for an RV application. They are installed as a point-of-entry treatment system — in other words, where the water would enter your RV at city water hookup.

The trouble is (for now, at least), the flow rate required to properly ozonate the water isn’t compatible with the plumbing system of an RV. The benefit of an eventual ozone water-treatment system in an RV application will be that, once the ozonated water is introduced to the RV’s plumbing, it will disinfect everything it comes in contact with — the plumbing, the freshwater holding tank, every tap in the RV.

For now, a simpler, more practical way to purify your drinking water in an RV is with an LED UV light system. As water passes through a UV water treatment system, living organisms are exposed to UV light of a specific wavelength that disrupts their DNA, making it impossible for the little critters to function and/or reproduce. UV light purification systems install inside the RV and treat the water before it exits the faucet and goes into your glass. The only caveat with an LED UV light system (and it’s a small one) is that the water must be filtered beforehand, or the UV light may not be able to penetrate the water sufficiently for adequate contact time.

With all this in mind, it makes sense to use both a high-quality filtration and water purification system. Installing most water filter setups is as simple as mounting the cannisters and connecting a hose to the inlet of the filter (or filters), but what about a purification system?

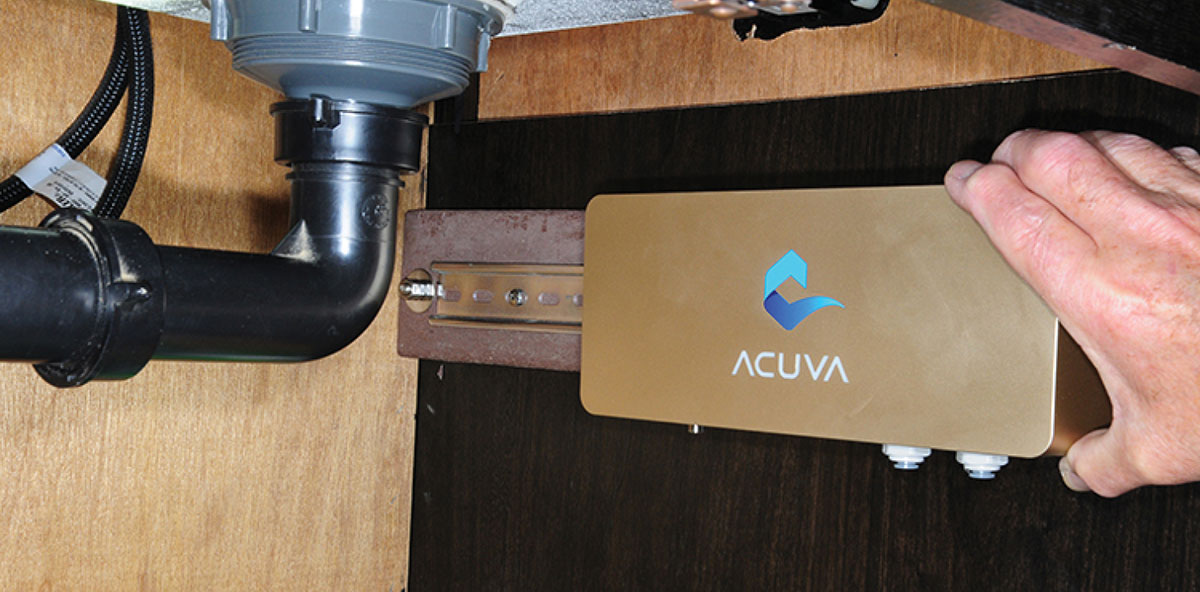
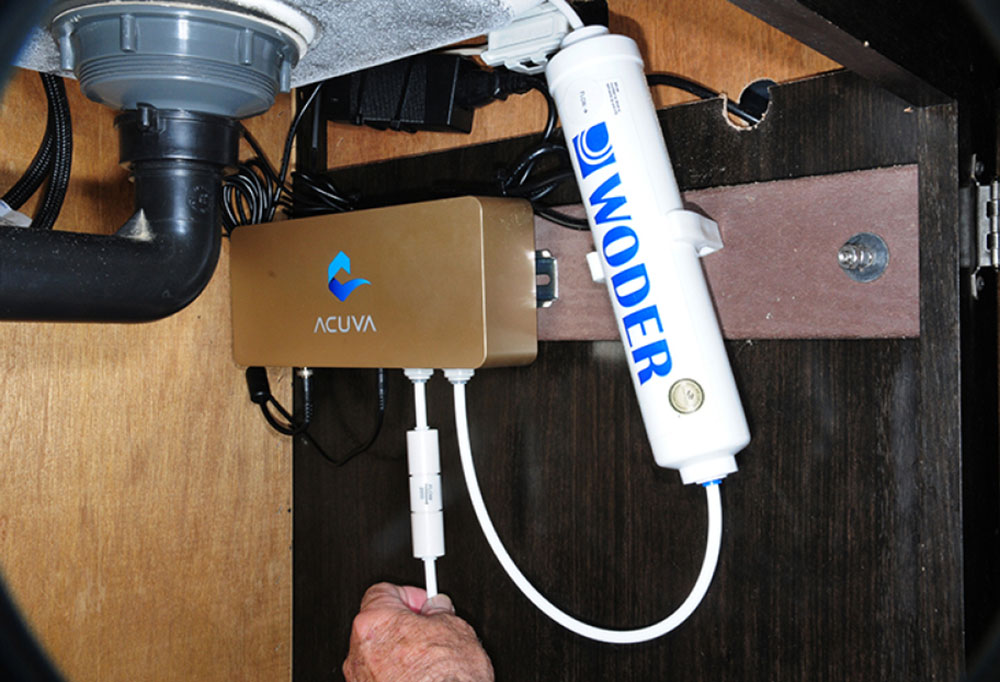
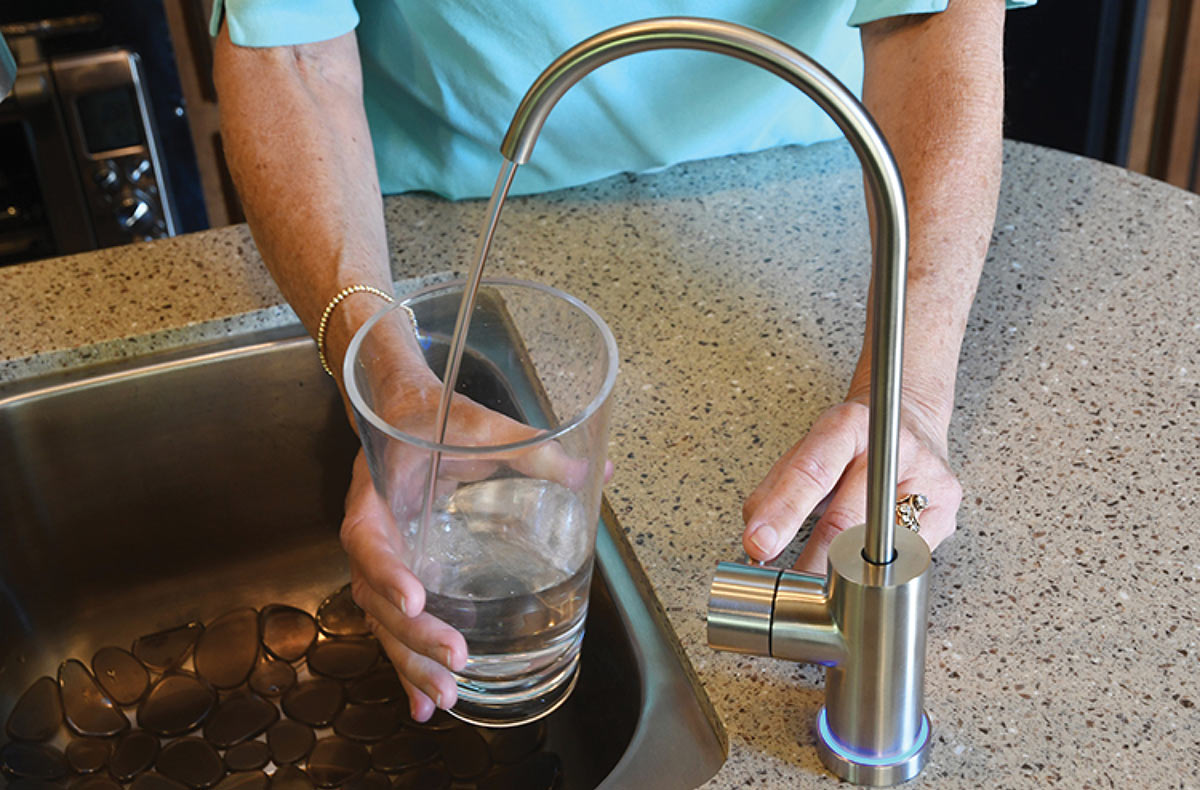
Acuva Technologies Inc. seems to have met both demands with its ArrowMAX 2.0 UV-LED Water Purifier (with Smart Faucet). The company designs, develops and manufactures advanced UV-LED systems for water, air and surface disinfection applications around the world and offers products for both OEM (manufacturer) applications as well as purification systems for boat and RV applications.

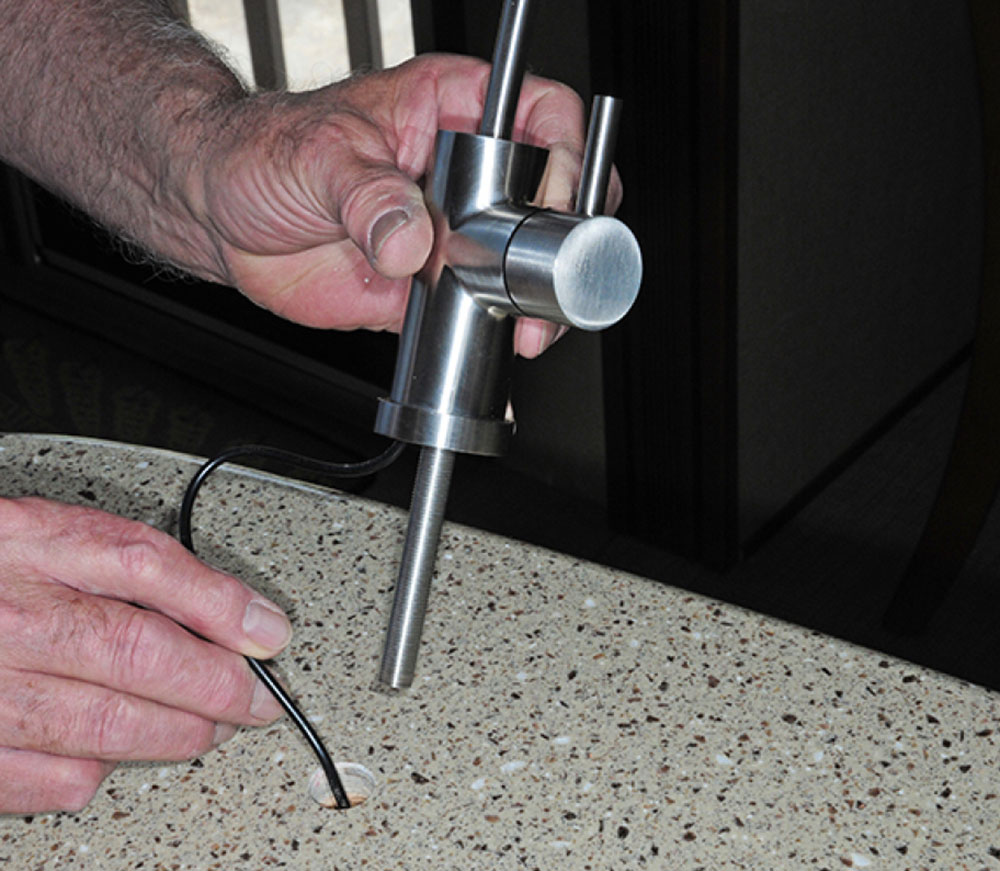
For smaller RVs, or those with only one source from which drinking water would be pulled, the compact ArrowMAX 2.0 ($599) system would seem to fill a void in the RV market. The ArrowMAX 2.0 features a polymer housing and a compact reactor design routes the water through it in a U-shape while subjecting it to the company’s patented IntenseBeam technology. Inside the polymer enclosure is a stainless-steel UV water-disinfection module.

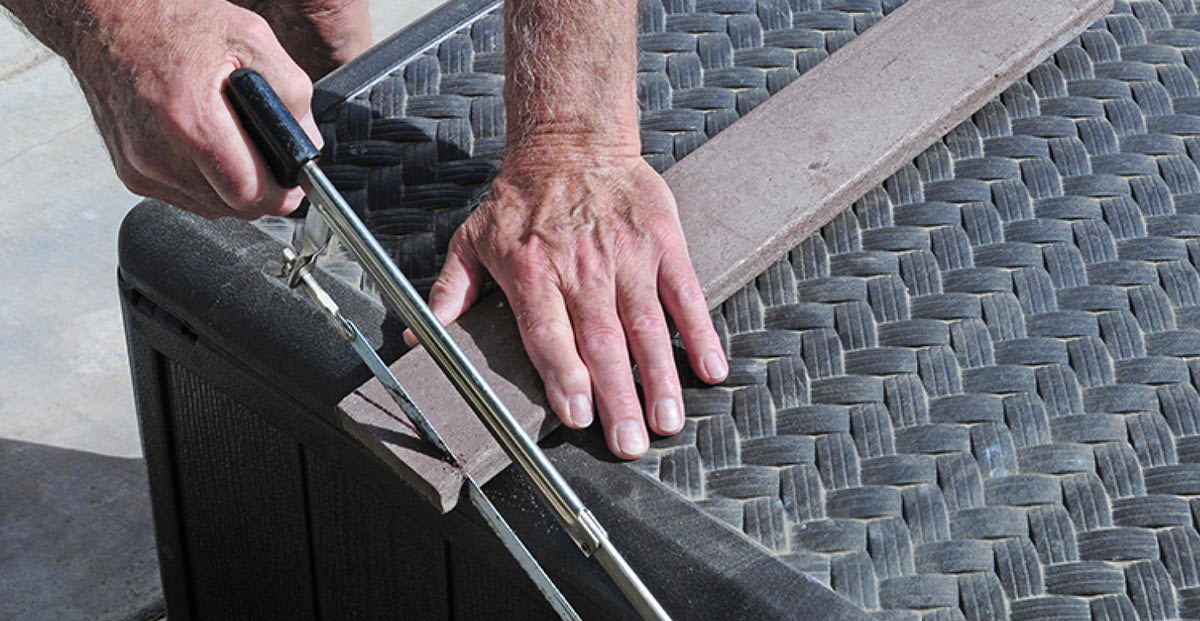
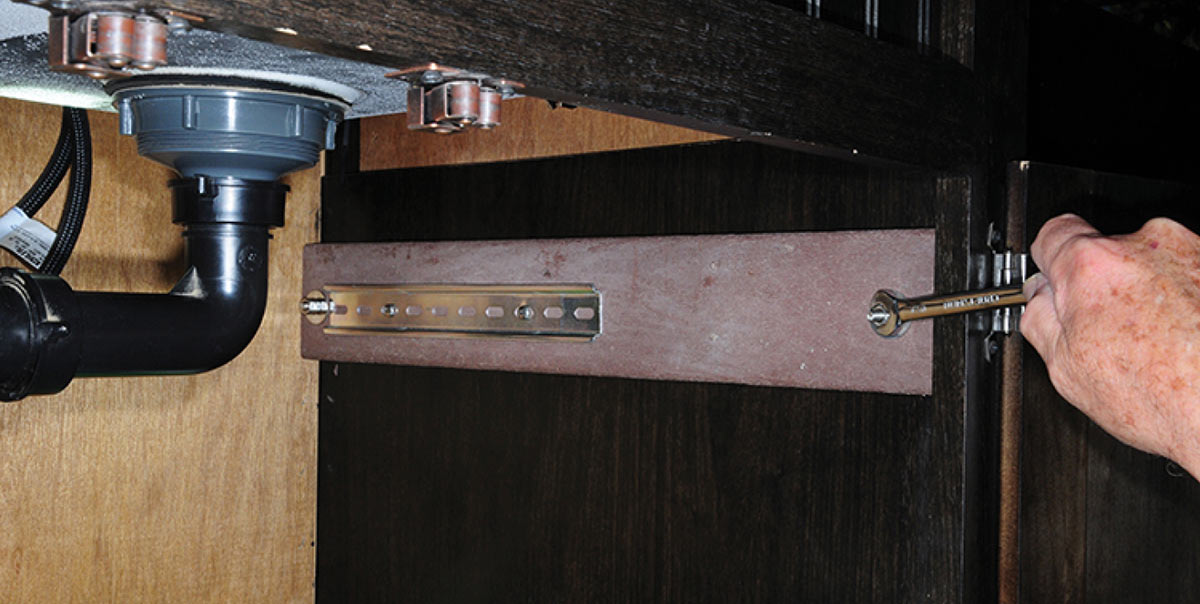
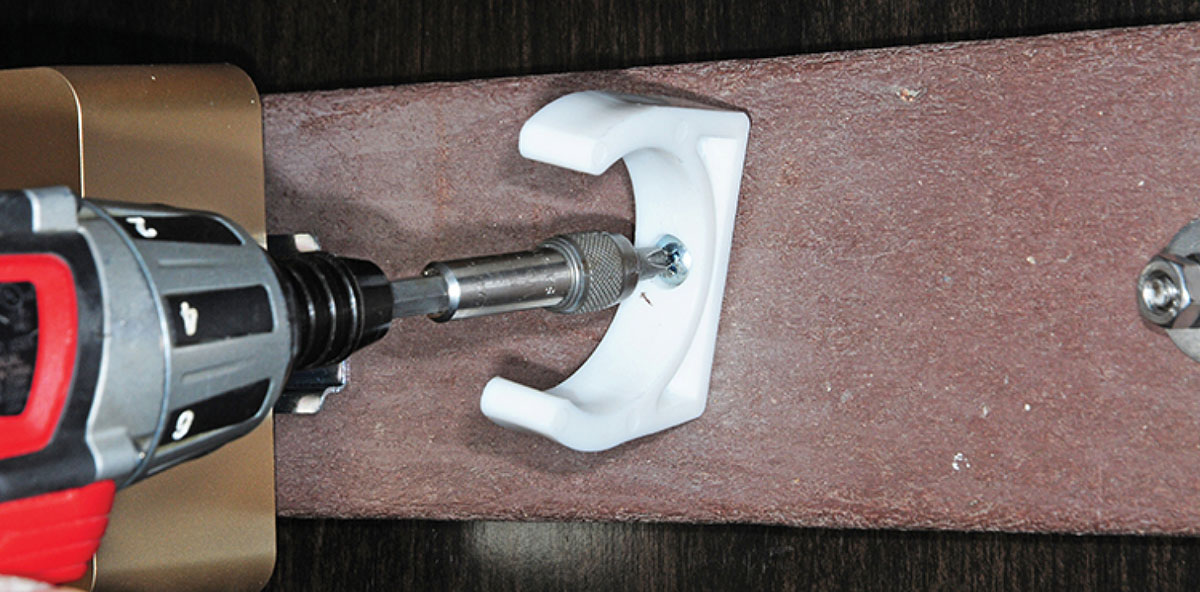
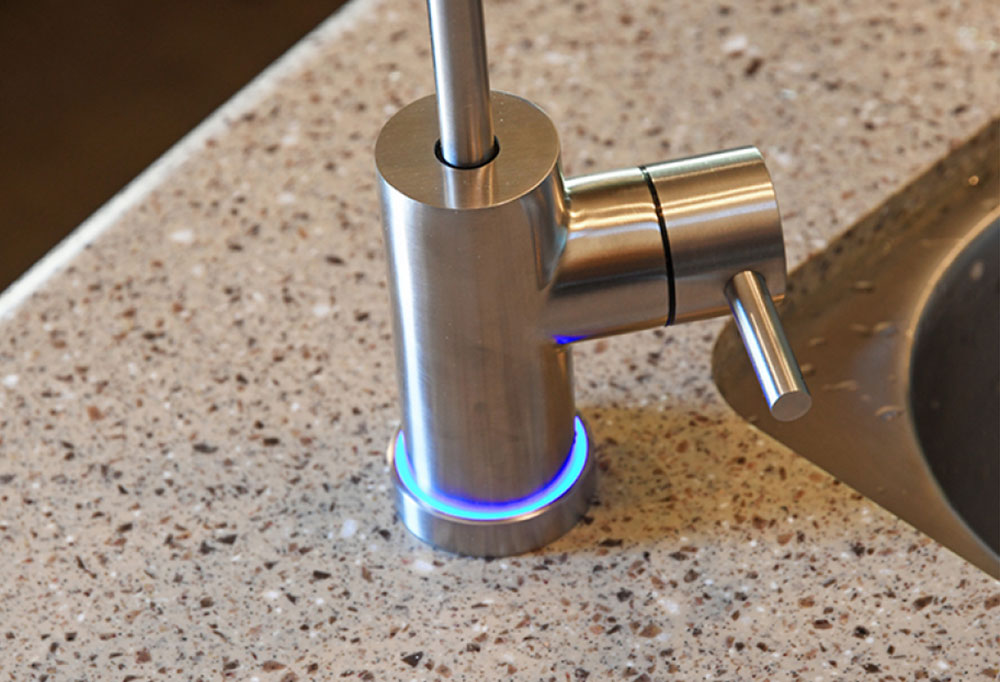
To test, we installed the system in a fifth-wheel trailer with a kitchen island. The kit includes the UV-LED disinfection system, plus the optional Smart Faucet (about $100), which as its name suggests incorporates certain “smart” features. A self-cleaning function activates every 12 hours with a UV burst that ensures all water within the UV-LED unit is sanitized. The system is activated the moment you turn on the faucet, which saves energy compared to older UV-lamp systems that had to remain on to be effective. The base of the faucet also has a blue LED ring light that illuminates to let the user know the system is operating.

Acuva Smart Faucet crosscut view
The Smart Faucet can be placed in any convenient location near the sink. In our installation, the location was predicated on access to the underside in order to tighten the hold-down spacer and fitting for attaching the ¼-inch water line. Make sure there is adequate clearance to swing the main sink faucet without contacting the Smart Faucet.
The system is said to be good for approximately 120,000 liters in its lifetime (it flows two liters per minute). Also included is a composite inline 5-micron prefilter, which is useful if you don’t already have a filter system where the water supply enters the RV (or even if you do). The prefilter removes 99% of chlorine and lead, plus reduces VOCs and unpleasant odors (it’s rated lifetime is 1,500 gallons or around six months, depending upon usage). All told, the system is said to “inactivate” 99.999% of E. coli bacteria in drinking water.

The kit also includes mounting hardware, necessary plumbing and a power supply for connecting to 120-volt AC service, or it can be hard-wired to a 12-volt DC source.

Sawing piece of bender board
The kitchen island counter/sink structure was made of single sheets of paneling, and not stout enough for mounting the ArrowMax 2.0 box. It was obvious that some sort of support structure was needed. We used a piece of bender board and cut it to fit across the end of the island structure. The support board may not be necessary if the island structure is made of thicker material. Once the board was cut to size, holes were drilled in the ends to accommodate the fasteners.
Bracket fastened to bender board
The bracket for the ArrowMax 2.0 unit was fastened to the support board before installation on the island cabinet wall. This was easily accomplished using the provided screws. With the bracket attached, the support board was bolted in place using a large washer on each bolt. The unit slides on to the mounting bracket, requiring enough space on either side to keep it flat while maneuvering it into place. If there is not enough room to slide the box in place, it can be mounted before attaching the support board.
Sliding filter box onto bracket
There was just enough room to slide the box in place after mounting the support board. There are specific requirements for positioning the unit. It can be mounted to a wall, floor or ceiling, as long as it remains in a horizontal position, with the fittings on top or bottom. It cannot be mounted vertically.
Pre-filter mounting clip screwed into board
An inline prefilter was also mounted on the support board using the provided plastic clip. The clip is very rigid, making it difficult to seat the filter. It takes quite a bit of pushing, but once in place, the filter is very secure.
T-fitting added to cold water line
The water is sourced from the cold line leading to the existing sink faucet. A ½-inch Pex to ¼-inch O.D. tee/shut-off valve is attached after the water line is cut. Make sure city water is shut and/or the demand pump is off before cutting the water line. Forget this step, and you’ll be sopping up water for a while. Use a rag to catch excess water after cutting the line. We were not overly excited with the quality of the tee fitting provided in the kit; while it didn’t leak, we would prefer to use a AquaLock reducing union tee, which has a sterling reputation for reliability. The water lines simply pushed into each side of the supplied tee fitting, but the ¼-inch tubing requires the use of a compression ferrule and wrench for tightening.
Pre-filter mounting clip screwed into board
An inline prefilter was also mounted on the support board using the provided plastic clip. The clip is very rigid, making it difficult to seat the filter. It takes quite a bit of pushing, but once in place, the filter is very secure.
Cutting 1/4 water line from T-fitting
Pushing 1/4 water line into filter
The ¼-inch water line from the tee fitting was cut to size after routing in such a way to protect it from being jostled by stored items inside the cabinet. Only use a parallel jaw cutter to ensure the end of the tubing is straight and not squashed. The ¼-inch water line was pushed into the filter without the need for tools. Just make sure the flow direction is maintained (marked on the filter) and there is enough room when routing to avoid crimping the tubing.
Inserting water line into ArrowMax box
There’s no specification for mounting the inline filter. Here, it’s mounted in such a way to prevent the ArrowMax 2.0 unit from sliding off its bracket. Again, consider interference from stored items when making decisions where to mount the components. A section of ¼-inch water line was cut and run from the filter outlet to the inlet on the box. No tools are required.
Drilling hole into countertop for faucet
Once the location for mounting the faucet is determined, a ¾-inch hole must be drilled into the countertop. It goes without saying that you only get one shot at this. The countertop for this project is 1-inch thick, which presented an issue when mounting the Smart Faucet.
Routing wire through hole
The Smart Faucet rod and wire that plugs into the ArrowMax 2.0 is routed through the hole in the countertop. It takes two people to complete this step: one to hold the faucet in place while the other person tightens the plastic threaded fastener. An O-ring in the faucet base prevents water on the counter from leaking into the cabinet.
Underside of sink showing fittings
Since this Smart Faucet was an early production model, the rod provided was too short to get through the 1-inch countertop and provide enough threads for connecting the ¼-inch water line. Normally, the wire will go through the spacer before tightening the plastic fastener, but in this case, we had to cut the spacer to expose the correct number of threads to connect the water line. The threaded rod in subsequent kits should be long enough to accommodate countertops up to 1½ inches.
Flow restrictor placed onto waterline
A flow restrictor was placed in the ¼-inch water line from the unit’s outlet to the Smart Faucet. The restrictor can be placed in a convenient location in the line and requires no tools for connecting the water line at each end. Here, it’s placed near the unit; flow direction is marked on the body of the restrictor. Connecting the power was the last step and a hole was cut in the side of the island structure to route the cable for plugging into the 120-volt AC outlet on the other side. The power adapter is used to provide 12-volt DC service to the unit. We selected the 120-volt AC model because there was no 12-volt DC service in the island structure and the fifth-wheel is equipped with an inverter as part of a solar system, so power will be available when unhooked.
Installed Smart Faucet with base ring light lit blue
The Smart Faucet has a ring light built into the base, which informs the user when the unit is active and water is being treated. This works in concert with the logo light in the unit itself. There’s no light when the system is idle and a green light signifies the system is undergoing self-cleaning. The valve on the Smart Faucet works smoothly and water flow is pretty decent, considering pressure is restricted on purpose. With clean, great-tasting water out of the tap, we can finally say “goodbye” to bottled water.